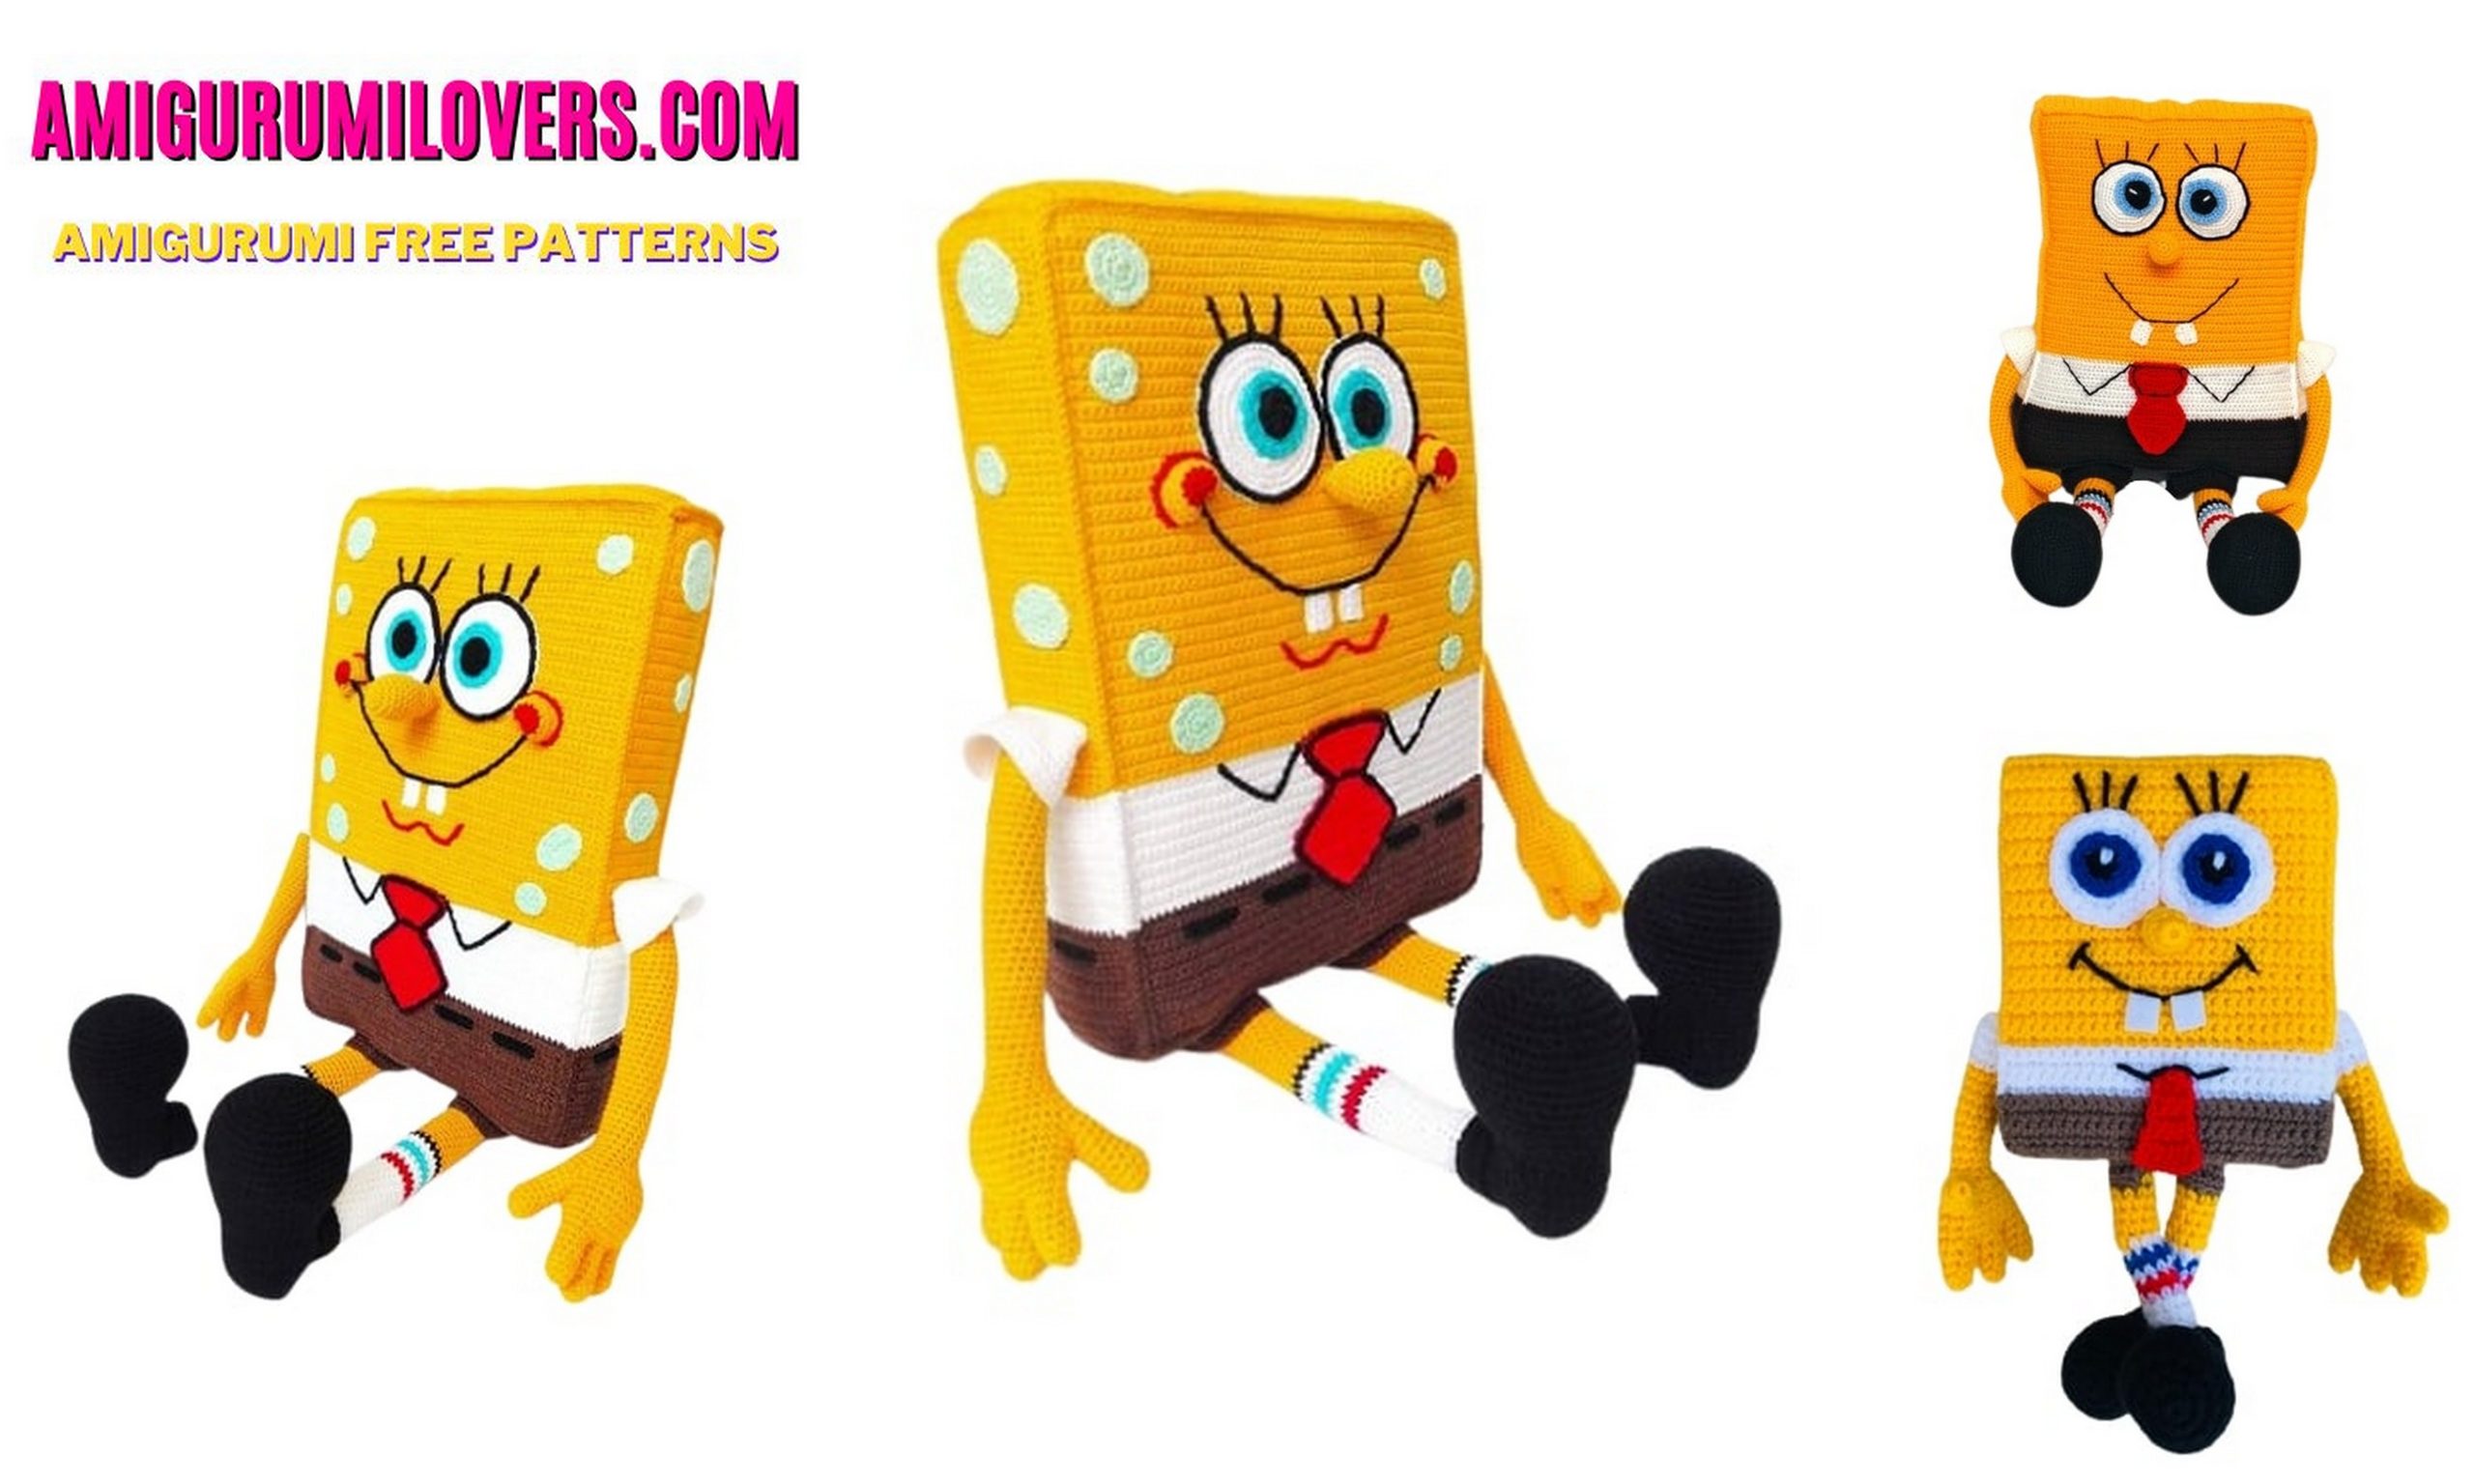
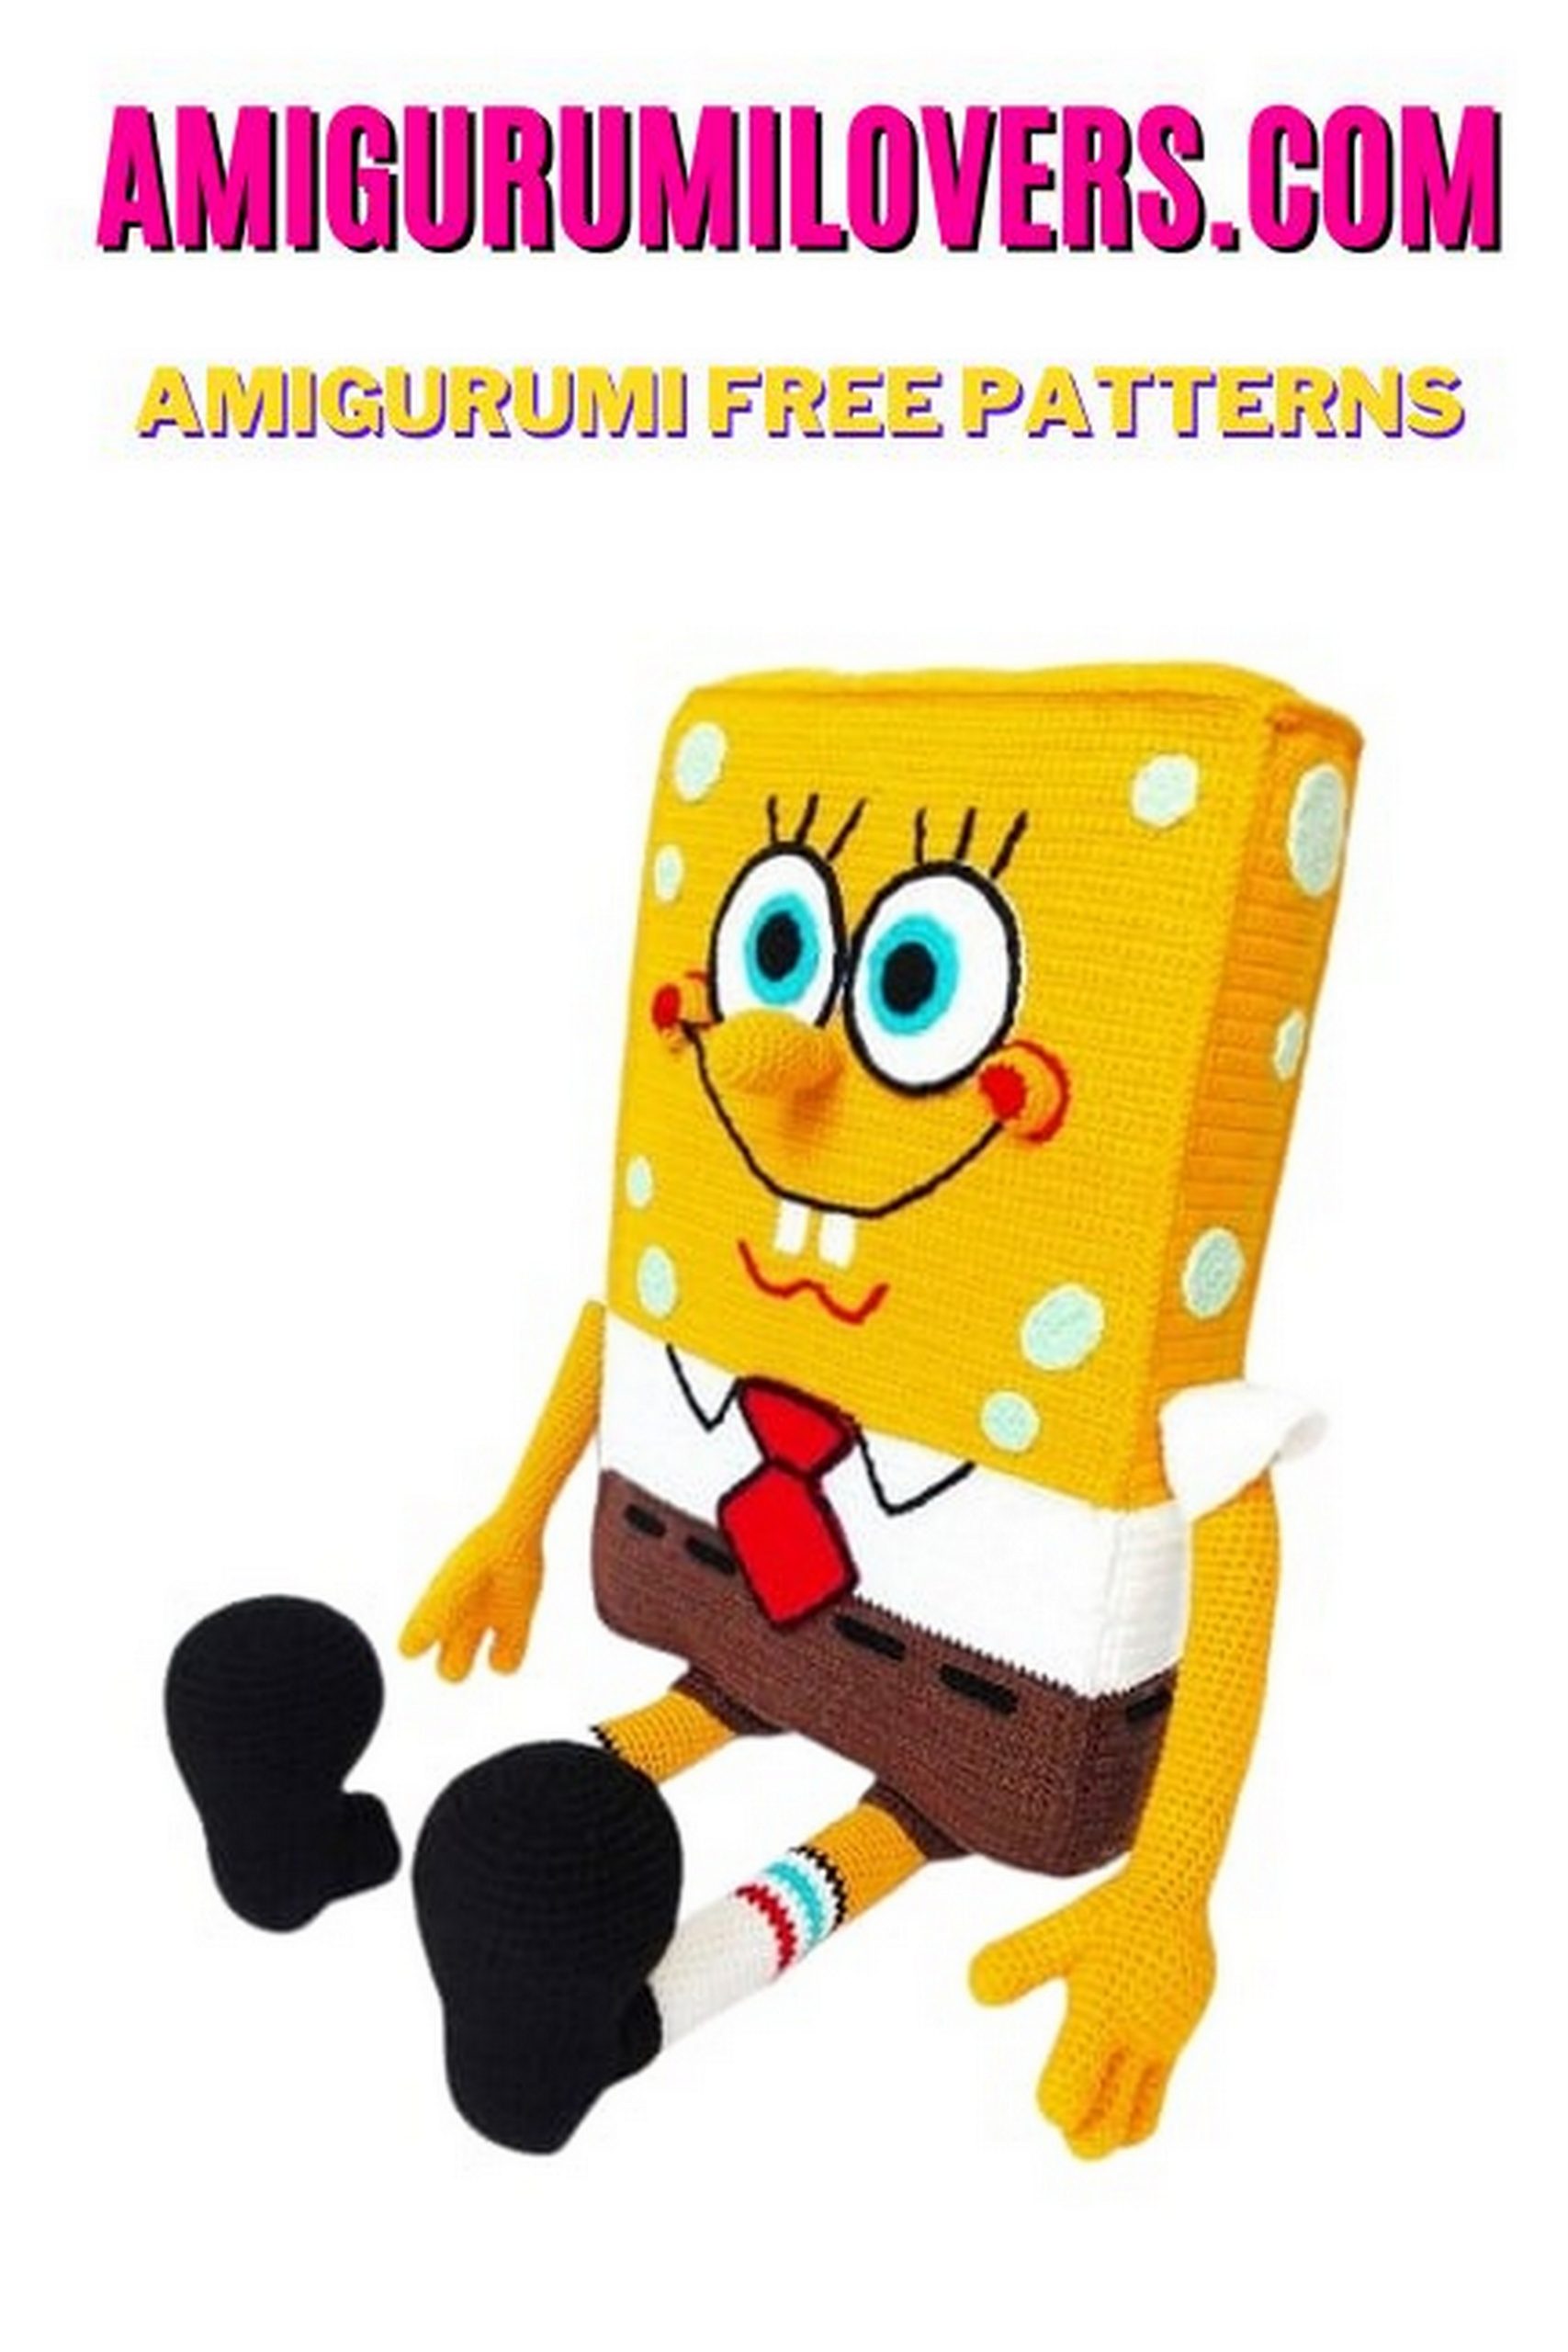
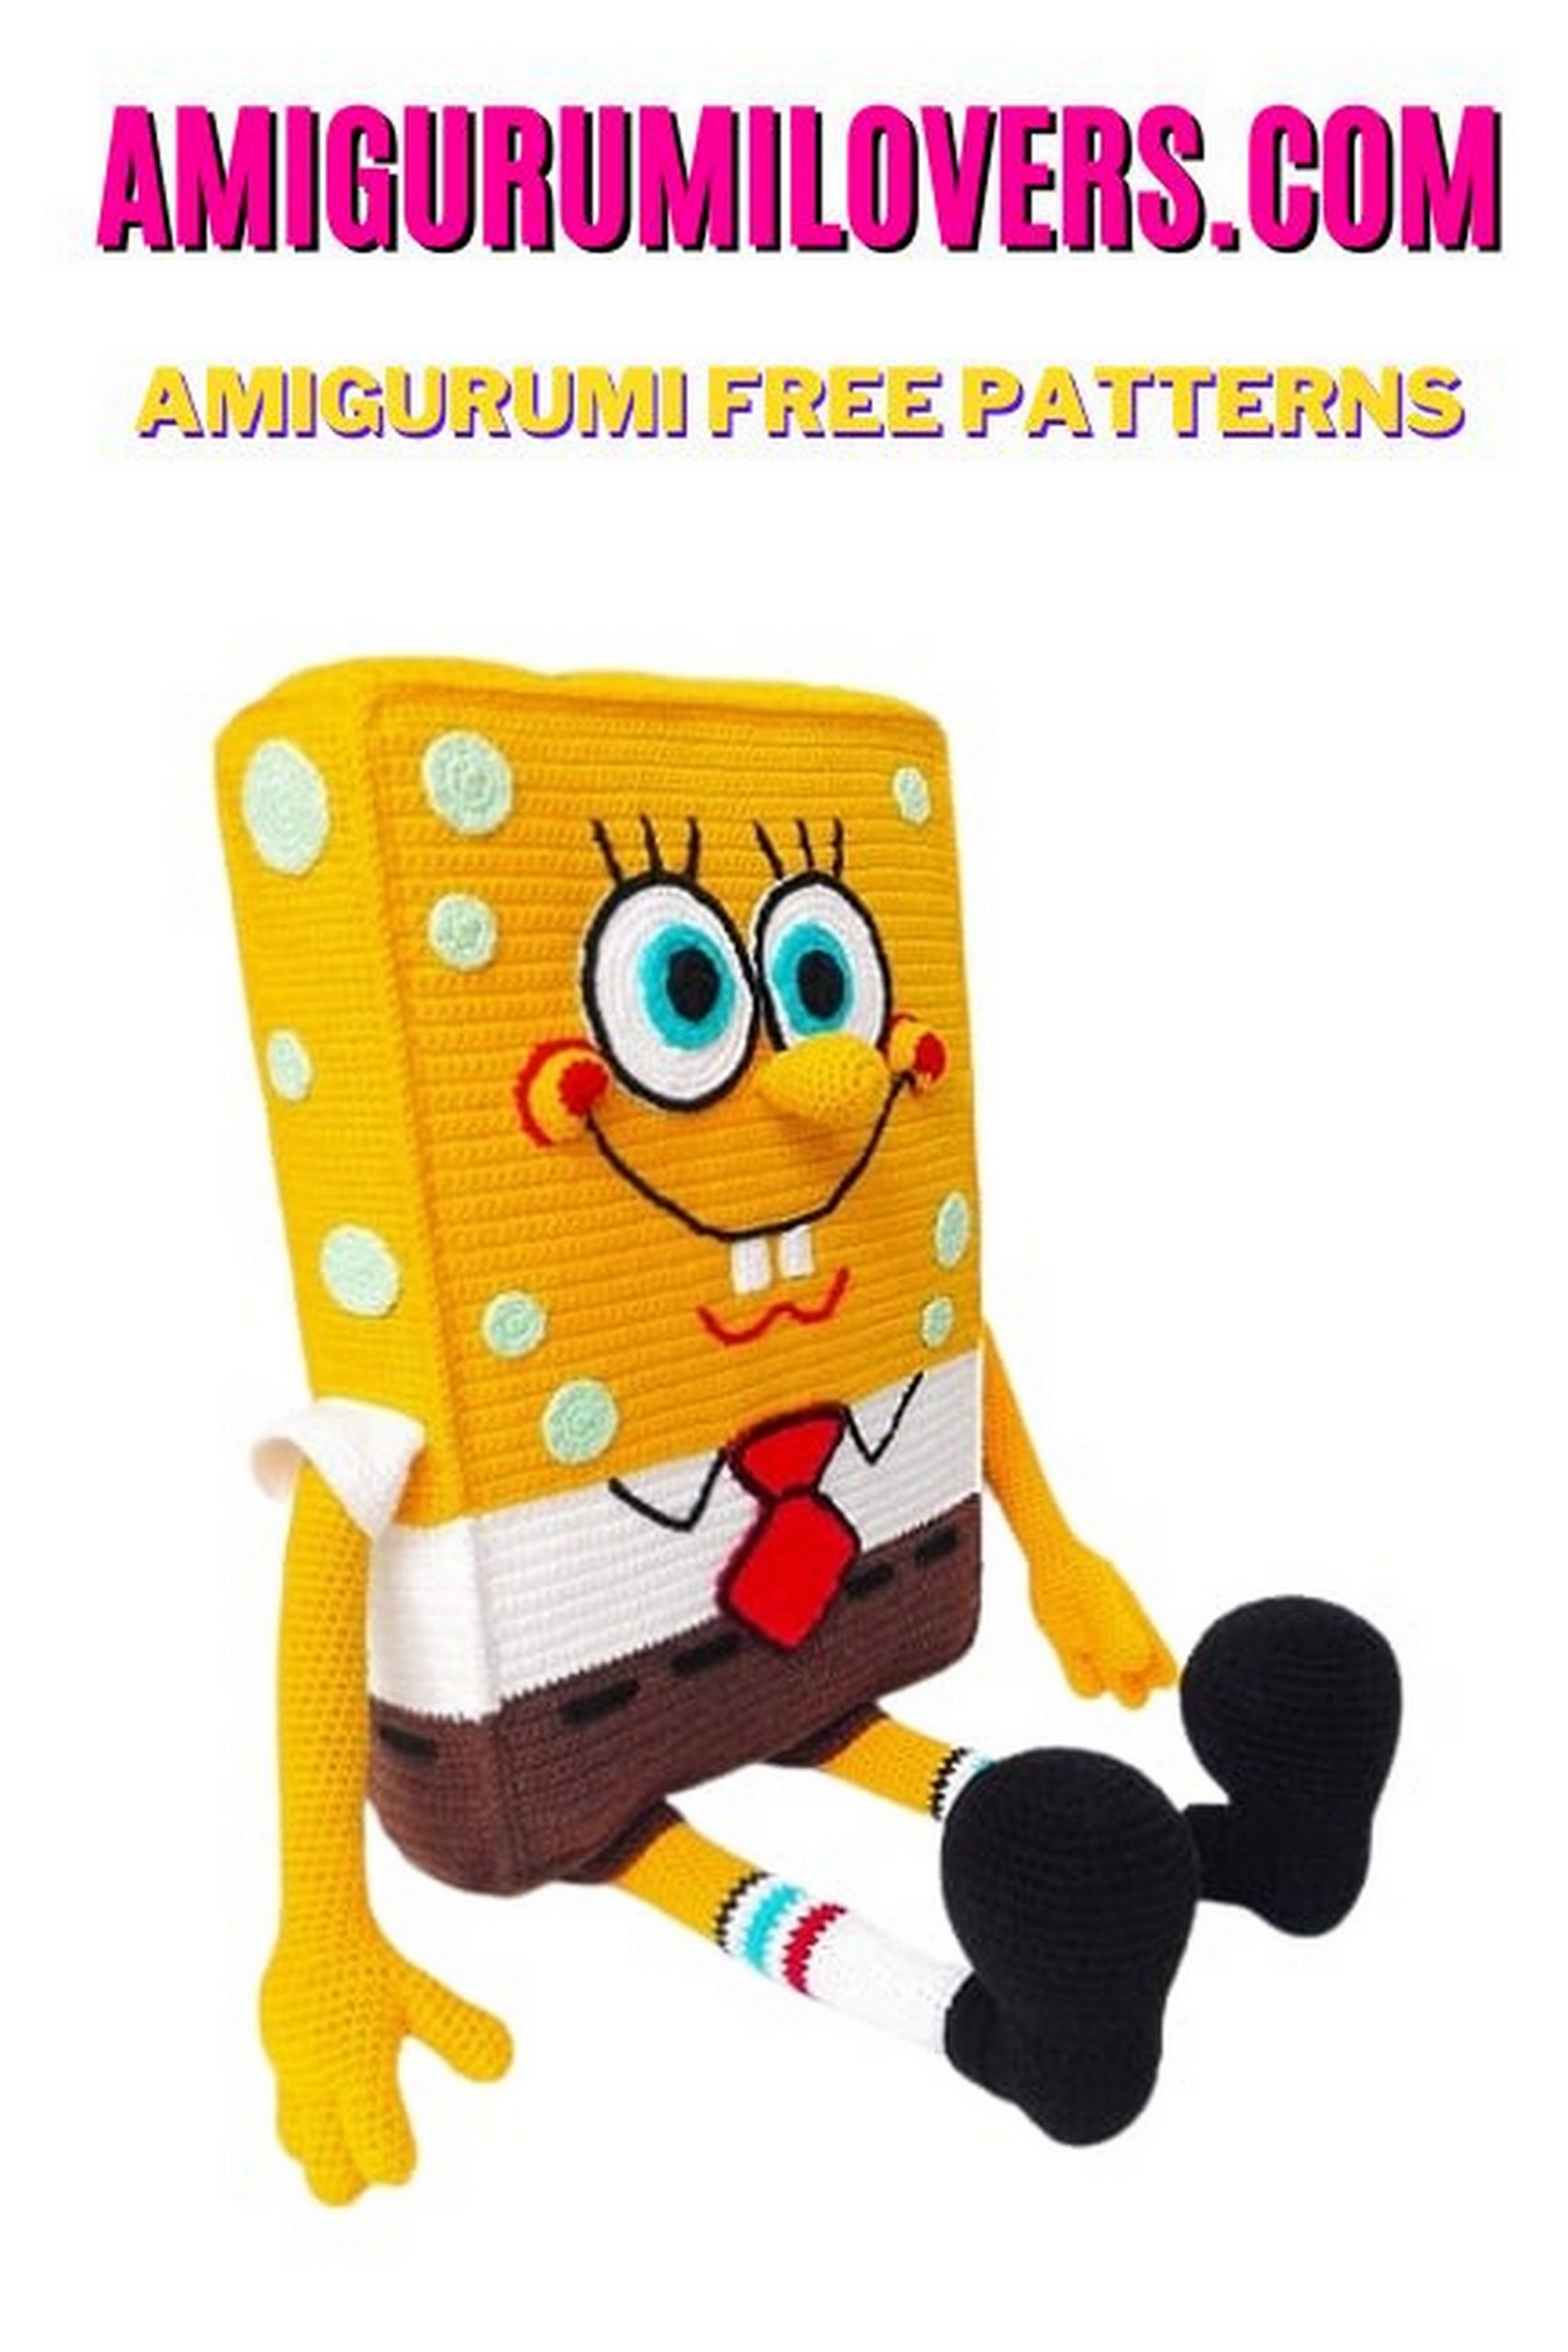
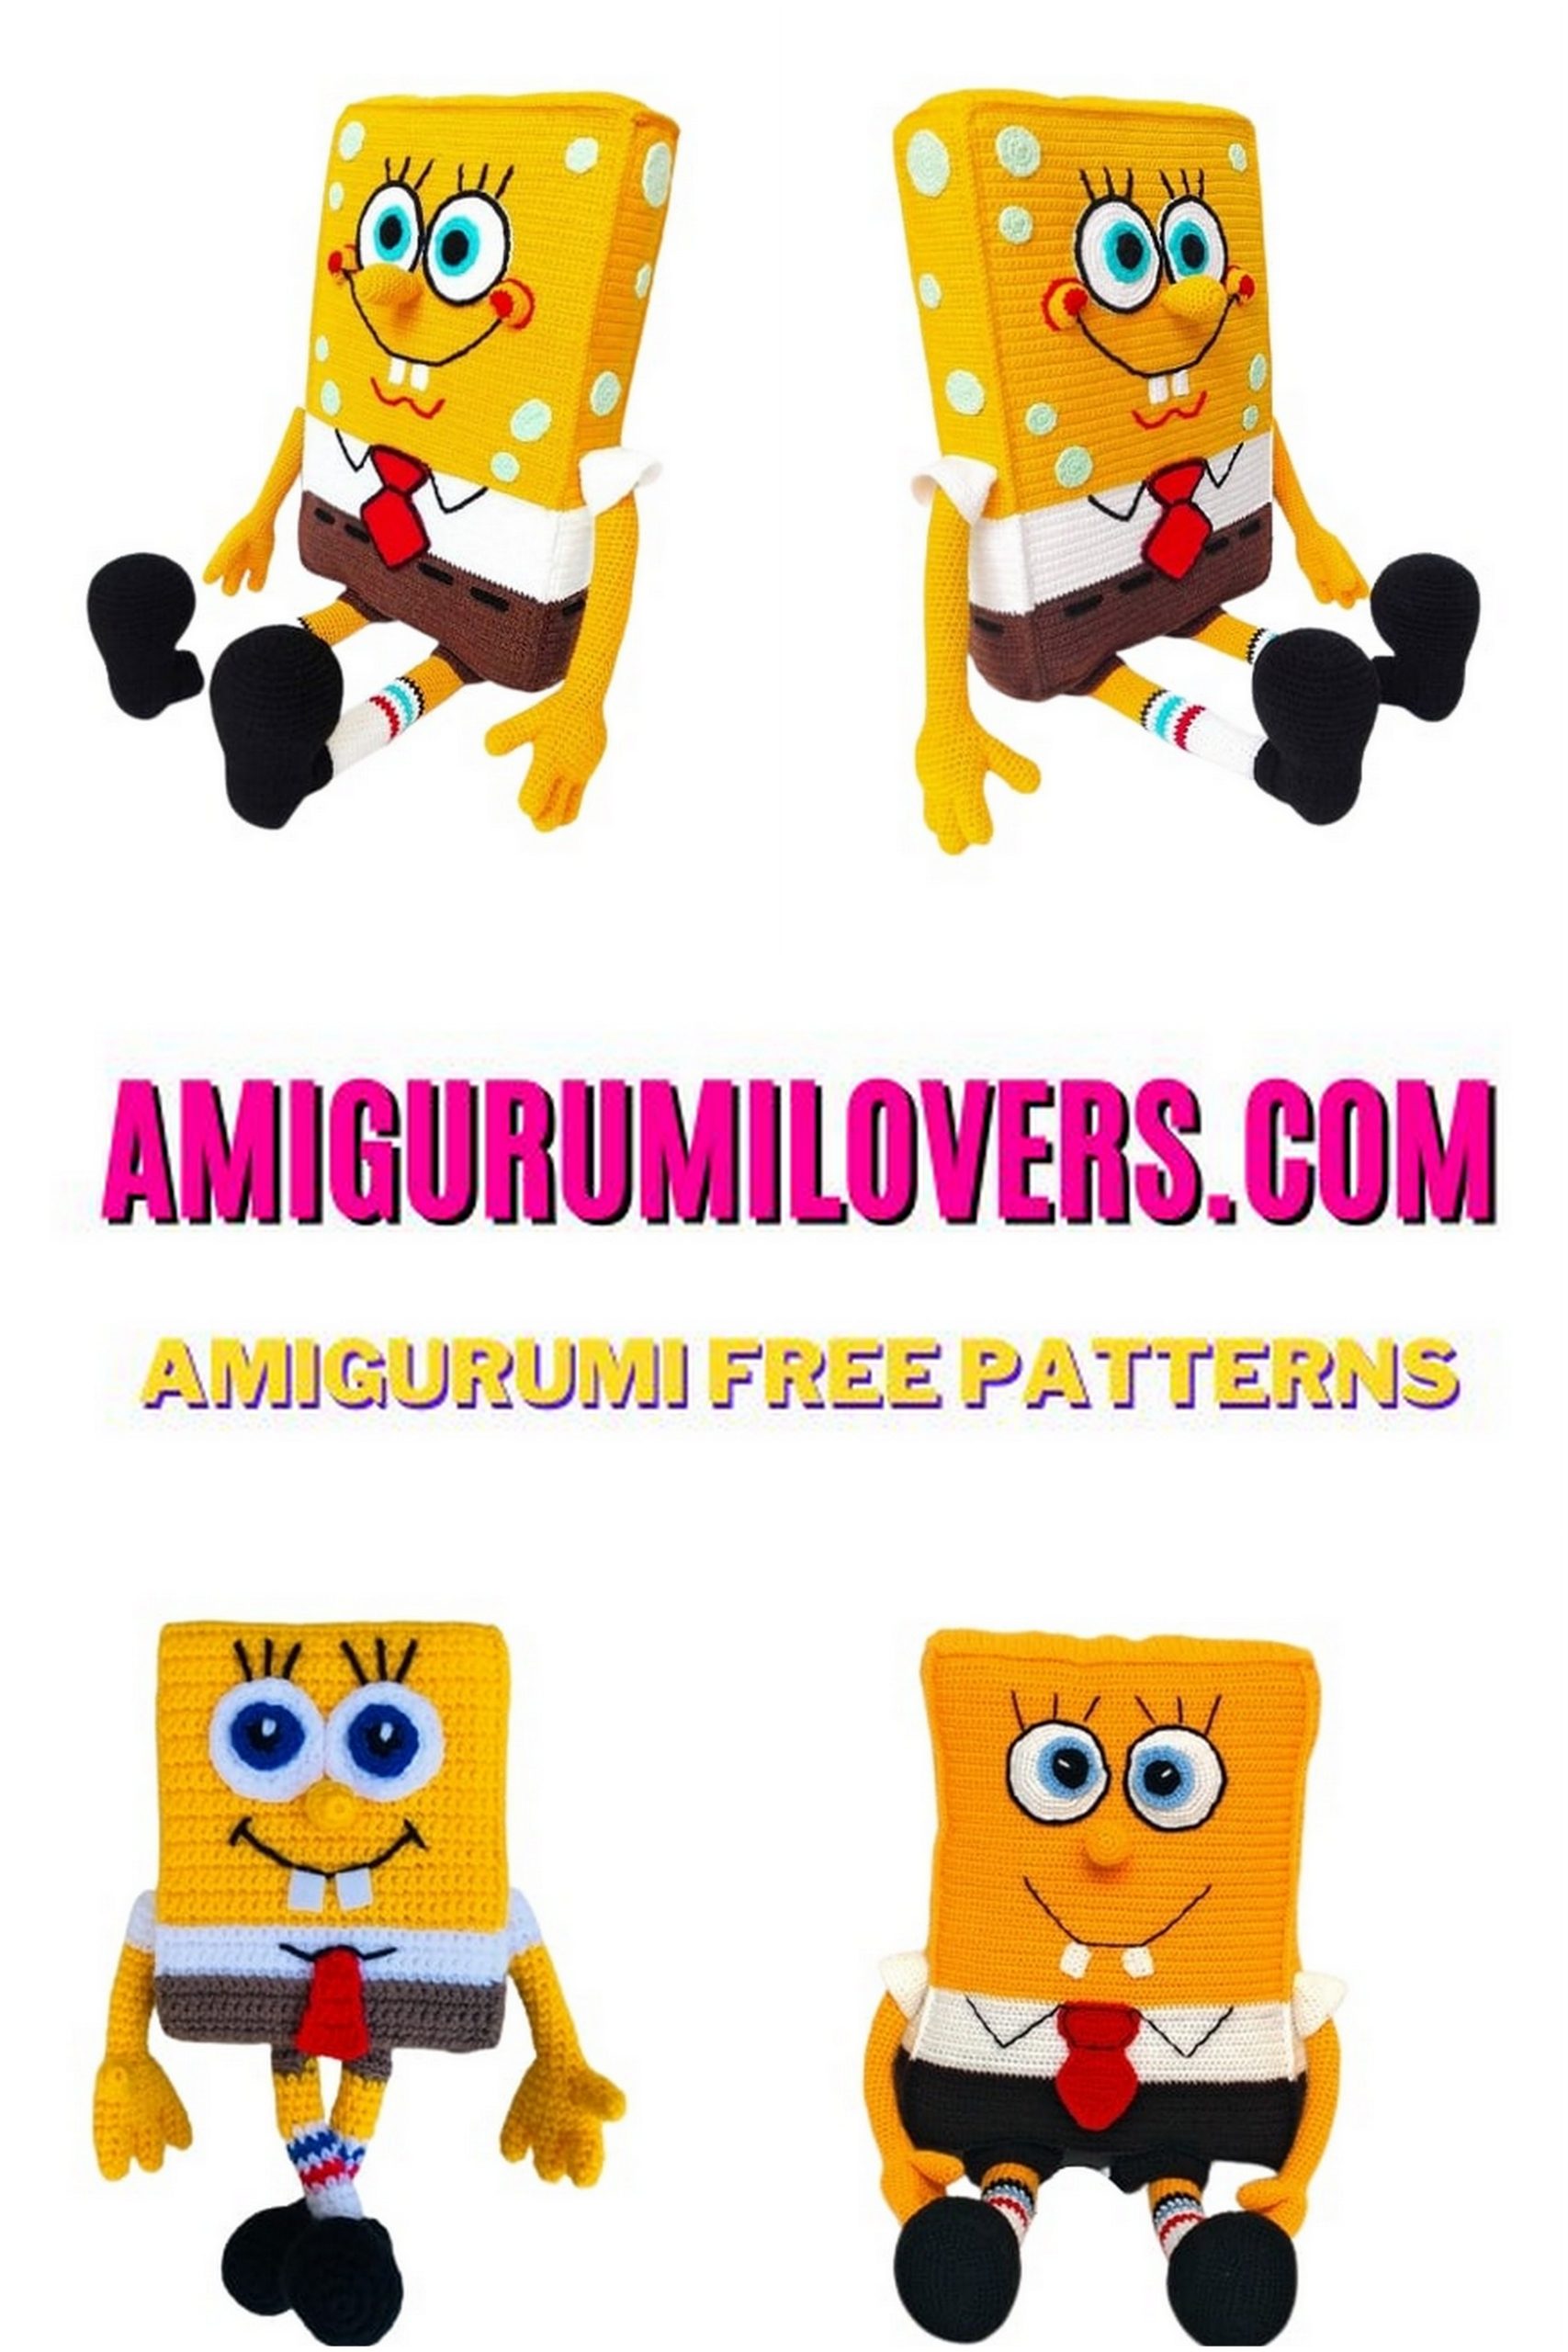
Sponge Bob Amigurumi Free Pattern
You may also enjoy exploring our free amigurumi patterns and other popular amigurumi animal patterns available on our website.
Welcome to our crochet corner, where creativity meets comfort! If you’ve ever wanted to bring a piece of the beloved animated world into your home, you’re in for a treat. Today, we’re excited to share a delightful free pattern for creating your very own Sponge Bob Amigurumi. This charming little character is not only fun to make but also adds a whimsical touch to any space. Whether you’re a seasoned crocheter or just starting out, this beginner-friendly guide will walk you through each step, ensuring your Sponge Bob comes to life just as you envision it.
Amigurumi, the enchanting art of crocheting small, stuffed animals and characters, has skyrocketed in popularity over the years. One of its most appealing aspects is the ability to express your creativity while producing adorable, huggable companions. Sponge Bob, with his cheerful smile and quirky personality, is a fantastic choice for your next crochet project. Not only does he evoke fond childhood memories, but he’s also easily recognizable and loved by people of all ages, making your finished piece a great gift or a unique addition to your home decor.
This post will provide you with a detailed, step-by-step pattern that’s easy to follow, even for beginners. We understand that starting a new crochet project can feel overwhelming, but rest assured, we’re here to guide you every step of the way. You’ll learn about the materials required, basic crochet stitches, and tips for achieving the best results. Our aim is to make the process enjoyable and accessible, so you can focus on the joy of creating something special.
In addition to being a fantastic way to practice your crochet skills, making a Sponge Bob Amigurumi is an excellent opportunity to explore color combinations and textures. You can choose the classic yellow and brown hues associated with Sponge Bob, or get creative and personalize your project with different yarn types and shades. The possibilities are endless, allowing your personality and style to shine through in your work.
So grab your crochet hook, gather your materials, and prepare to dive into a sea of creativity with this fun Sponge Bob Amigurumi free pattern. Whether you’re making it for yourself, as a gift for a loved one, or even as a cute decoration, we believe that this project will bring joy and laughter to your crochet journey. Ready to get started? Let’s jump right into the pattern and make some crochet magic happen!
Welcome to our website where you can find the most beautiful and highest quality samples of Amigurumi patterns. All the amigurumi patterns you can’t find are available on our website. Every day we continue to share new amigurumi patterns for you. Stay tuned to reach these amigurumi patterns before anyone else.
Abbreviations:
SC – single crochet
İNC – increase
DEC – decrease
CH – chain
Materials:
İnchia YarnArt Baby 100g – Yellow
İnchia YarnArt Baby 50g – White
Brown string 50 gr
İnciaza light salad for stains a little
İnciaаa black 30 gr
İnciaza a little bit for eyes and feet
İnciaza red slightly for legs
Hook number 2
Filler or gdeck (5 cm thick)
Cardboard on the sole or plastic
Needle and thread for staining stains and eye
A good mood is a must!
SpongeBob height 50 cm, inc and using the same inc.
PATTERN
Body:
Front and back (2 children)
Dial 60 ch + 1ch d / lift, knit sc.
1 – 54 p: 54 rows yellow (60sc) – 20 cm
55 – 67 p: 13 rows white (60 sc) – 5 cm
68 – 81 p: 14 rows of brown (60 sc) – 5 cm
Sidewalls (2 children):
Dial 12 ch + 1 ch d / lift
1 – 54 p: 54 rows yellow (12sc) – 20 cm
55 – 67 p: 13 rows white (12sc) – 5 cm
68 – 81 p: 14 rows brown (12sc) – 5 cm
Top and bottom (2 children):
Dial brown 12ch + 1ch d / lift
1 – 60 p: 12sc brown
Dial yellow 12ch + 1ch d / lift
1 – 60 p: 12sc yellow
Eyes (2 children):
Black thread:
1p: into mgic ring7sc (7sc)
2p: inc X 7 (14sc)
Golden thread:
1p: into mgic ring (7sc)
2p: inc X 7 (14sc)
3p: (sc, inc) X 7 (21sc)
4p: (2sc, inc) X 7 (28sc)
White thread:
1p:: into mgic ring7sc (7sc)
2p: inc X 7 (14sc)
3p: (sc, inc) X 7 (21sc)
4p: (2sc, inc) X 7 (28sc)
5p: (3sc, inc) X 7 (35sc)
6p: (4sc, inc) X 7 (42sc)
7p: (5 sc, inc) X 7 (49sc)
8p: (6 sc, inc) X 7 (56sc)
9p: tie back with black thread SL-ST (56sl-st)
Fasten the thread, cut.
Collect eyes, put in place.
Nose:
1p:: into mgic ring 6sc (6sc)
2p: inc X 6 (12sc)
3p: (sc, inc) X 6 (18sc)
4-8r: 5 rows unchanged (18sc)
9p: (dec., Sc) X 6 (12sc) – fill
10 – 12 p: 3 rows unchanged (12sc)
13p: dec X 6 (6sc)
14p: 1 row unchanged (6sc)
Fasten the thread, leave the tip for embedding.
Zdesy (2 pcs):
Type 5ch with a white thread, knit from the 2nd loop
1-3 p: 3 rows unchanged (4sc)
Fasten the thread, cut.
Tie:
Dial in red 12ch + 1ch.
1p: 12sc
2p: dec, 8sc, dec (10sc)
3p: dec, 6sc, dec (8sc)
4p: dec, 4sc, dec (6sc)
5p: dec, 2sc, dec (4sc)
6p: inc, 1sc, inc, 1sc (6sc)
7p: inc, 3sc, inc, 1sc (8sc)
8p: inc, 5sc, inc, 1sc (10sc)
9p: inc, 7sc, inc, 1sc (12sc)
10p: inc, 9sc, inc, 1sc (14sc)
11p: dec, 10sc, dec
12p: dec, 8sc, dec
13p: dec, 6sc, dec
14p: dec, 4sc, dec
15p: dec, 2sc, dec
16p dec, dec
17p: dec
Tie all sc, fasten and cut the thread.
Now we are collecting Spancha. Putting it together and putting it in place, nose, zdeski (we embroider a smile and a collar with a chain stitch or as you are comfortable).
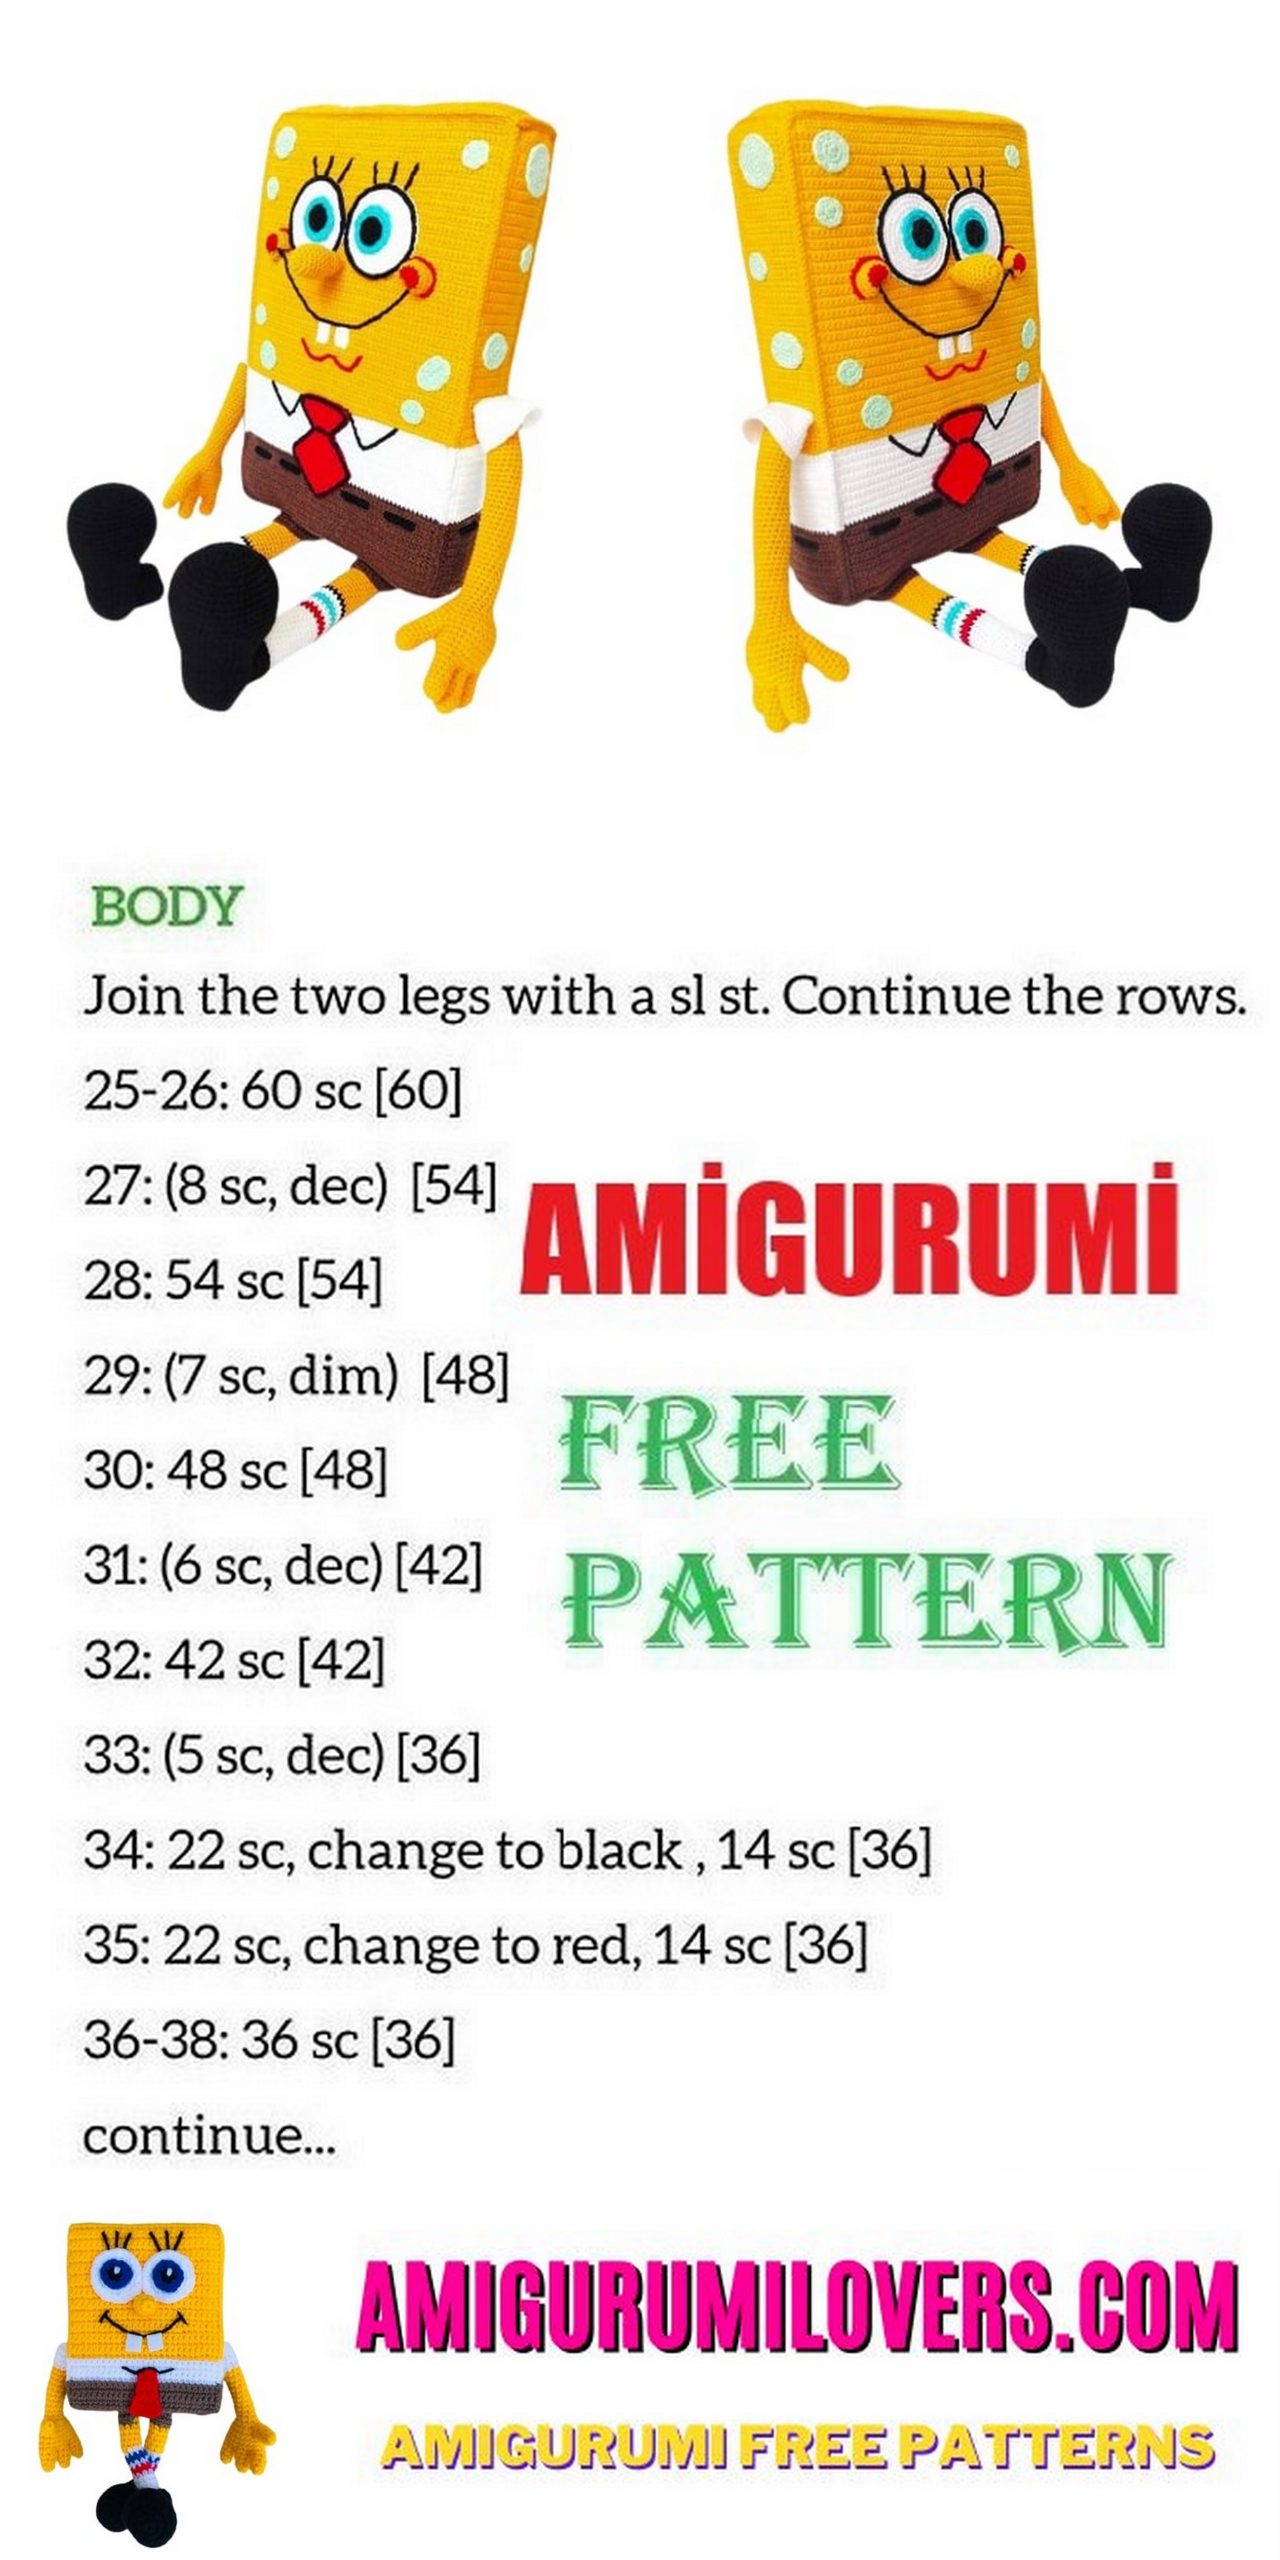
Now we collect the body. I connect sc, bottom until I fasten, fill, then inc connect.
Go around the edges with a step:
Spots, light green color:
On the front:
1pc: 1p: into mgic ring6sc (6sc)
2p: inc X 6 (12sc)
3p: (sc, inc) X 6 (18sc)
4p: (2sc, inc) X 6 (24sc)
3pcs: 1p: into mgic ring6sc (6sc)
2p: inc X 6 (12sc)
1pc: Dial 5 ch, knit with the 2nd ch
1p: 3sc, 3sc last, on the other hand 2sc, inc.
2p: inc, 2sc, inc X 3, 2sc, inc X 3
On the sidewalls, 2 pcs of each type:
4pcs: 1p: into mgic ring6sc (6sc)
2p: inc X 6 (12sc)
4pcs: 1p: into mgic ring6sc (6sc)
2p: inc X 6 (12sc)
3p: (sc, inc) X 6 (18sc)
On the back:
4pcs: 1p: into mgic ring6sc (6sc)
2p: inc X 6 (12sc)
2pcs: 1p: into mgic ring6sc (6sc)
2p: inc X 6 (12sc)
3p: (sc, inc) X 6 (18sc)
1pc: Dial 5 ch, knit with the 2nd ch
1p: 3sc, 3sc last, on the other hand 2sc, inc.
1pc: 1p: into mgic ring6sc (6sc)
2p: inc X 6 (12sc)
3p: (sc, inc) X 6 (18sc)
4p: (2sc, inc) X 6 (24sc)
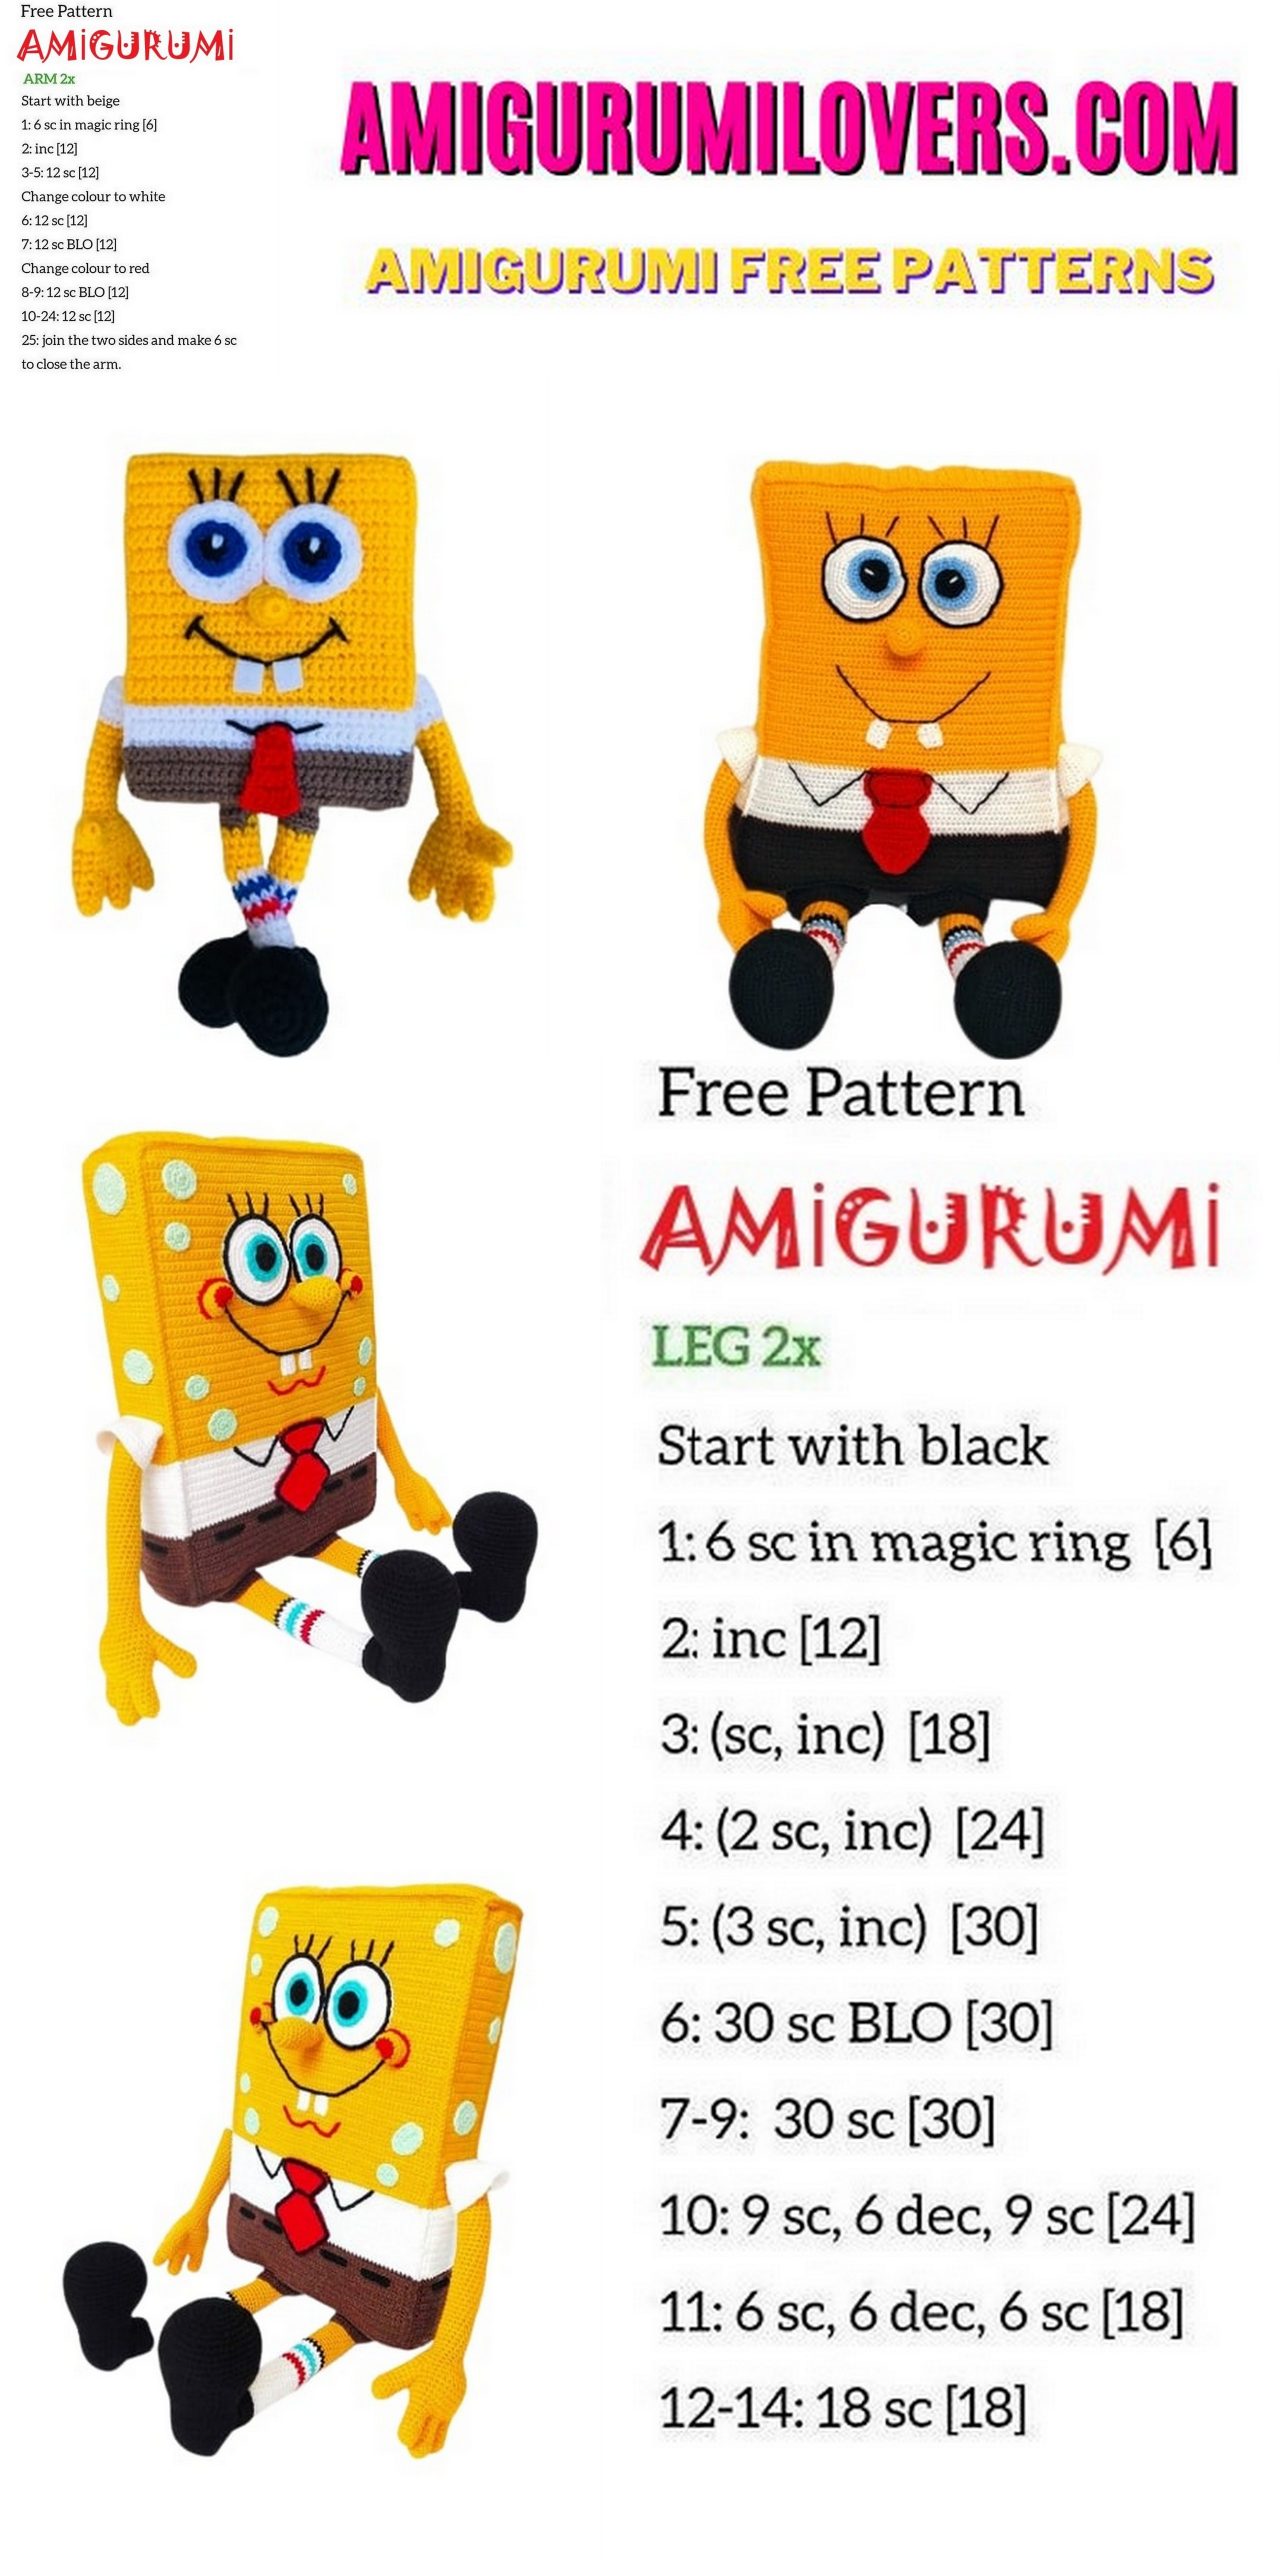
Pens:
Armbands (2 child)
Dial with a white thread 30ch, connect into a ring, knit in closed rows:
1 -4p: 4 rows unchanged (30sc)
5p: (dec, 3sc) X 6 (24sc)
6-8p: 3 rows unchanged (24sc)
Leave the thread for embedding.
Finger 1 (2 children):
1p: into mgic ring6sc (6sc)
2p: inc X 6 (12sc)
3p: 1 row unchanged (12sc)
4p: (dec, 4sc) X 2 (10sc)
5 -7 p: 3 rows unchanged (10sc)
Fasten the thread, leave 10cm.
Finger 2 (2 children):
1p: into mgic ring6sc (6sc)
2p: inc X 6 (12sc)
3p: 1 row unchanged (12sc)
4p: (dec, 4sc) X 2 (10sc)
5 -8 p: 4 rows unchanged (10sc)
Fasten the thread, leave 10cm.
Finger 3 (2 children):
1p: into mgic ring6sc (6sc)
2p: inc X 6 (12sc)
3p: 1 row unchanged (12sc)
4p: (dec, 4sc) X 2 (10sc)
5 -6 p: 2 rows unchanged (10sc)
Do not cut the thread.
Connect the fingers:
1p: 5sc of the 3rd finger, 5sc of the 2nd finger, 10sc of the 1st finger, 5sc of the 2nd finger, 5sc of the 3rd fingers (30).
Stuff your fingers tight and close the holes between your fingers
1p – 8p: 7 rows unchanged (30)
9p: (dec, 3sc) X 6 (24sc)
10p: (dec, 2sc) X 6 (18sc)
11p: (dec, 1sc) X 6 (15sc)
12- 45r: 34 rows unchanged (15sc)
Fill the handle, leave the thread for embedding.
Thumb (2ch):
1p: into mgic ring6sc (6sc)
2p: inc X 6 (12sc)
3-4 p: 2 rows unchanged (12sc)
5p: (dec, 4sc) X 2 (10sc)
6 – 10r: 5 rows unchanged (10sc)
Leave the thread for embedding.
İncish to the hand.
İncish the pens to the body. Dress the white sleeve, inc first hand, then sleeve, focus on the photo.
Boots (2 child):
Sole:
Dial the black knit 12ch, start with the 2nd.
1p: 10sc, 3sc in 1 on the other side: 9sc, 2sc in 1 (24sc)
2p: inc, 9sc, inc X 3, 9sc, X 2 (30sc)
3p: (sc, inc), 9sc, (sc, inc) X 3, 9sc, (sc, inc) X 2 (36sc)
4p: (2sc, inc), 10sc, inc, 6sc, inc, 10sc, inc, 4sc (40sc)
5p: (3sc, inc), 10sc, inc, 8sc, inc, 10sc, inc, 5sc (44sc)
6p: (4sc, inc), 10sc, inc, 10sc, inc, 10sc, inc, 6sc (48sc)
7p: 4sc, inc, 13sc, inc, 4sc, inc, 4sc, inc, 13sc, inc, 4sc, inc (54sc)
Circle the sole on cardboard or plastic, cut.
8p: behind the back wall (54sc)
9p: 1 row unchanged (54sc)
10 – 16p: 7 rows unchanged (54sc)
insert cardboard
17p: (dec, 6sc) X 6 (42sc)
18p: (dec, 5sc) X 6 (36sc)
19p: (dec, 4sc) X 6 (30sc)
20p: (dec, 3sc) X 6 (24sc) – fill
21p: (dec, 2sc) X 6 (18sc)
22p: (dec, sc) X 6 (12sc)
23p: dec X 6 (6sc)
24p: tighten the loops, remove the thread.
Legs:
Dial the yellow knit 18ch, connect into a ring, knit in a spiral, leave the tail 25cm for embedding.
1-14p: 14 rows unchanged (18sc) break off
15 – 16r: 2 rows black (18sc) break off
17p: 1 row white (18sc) do not break the thread
18 – 19r: 2 rows of gold (18sc) break off
20-21p: 2 rows white (18sc)
22 – 23p: 2 rows of red (18sc) break off
24 – 41r: 18 rows white (18sc) break off
42p: 1 row black (18sc)
Fasten the thread, leave d / inc.
Panties (2 child):
Dial brown inc. 36ch, connect into a ring, knit in closed rows
1 – 6p: 6 rows unchanged (36sc)
Fasten the thread, leave d / inc.
Put the pants on the legs, inc first sew the legs, then the pants.
İncish all the spots. All is ready!
Before you leave, make sure to check out more free amigurumi crochet patterns and discover new ideas for your next project.
You can also browse our full amigurumi pattern archive for hundreds of beginner-friendly designs.