Free Bart Simpson Amigurumi Pattern | Craft Your Crochet Tribute to Bart
You may also enjoy exploring our free amigurumi patterns and other popular amigurumi animal patterns available on our website.
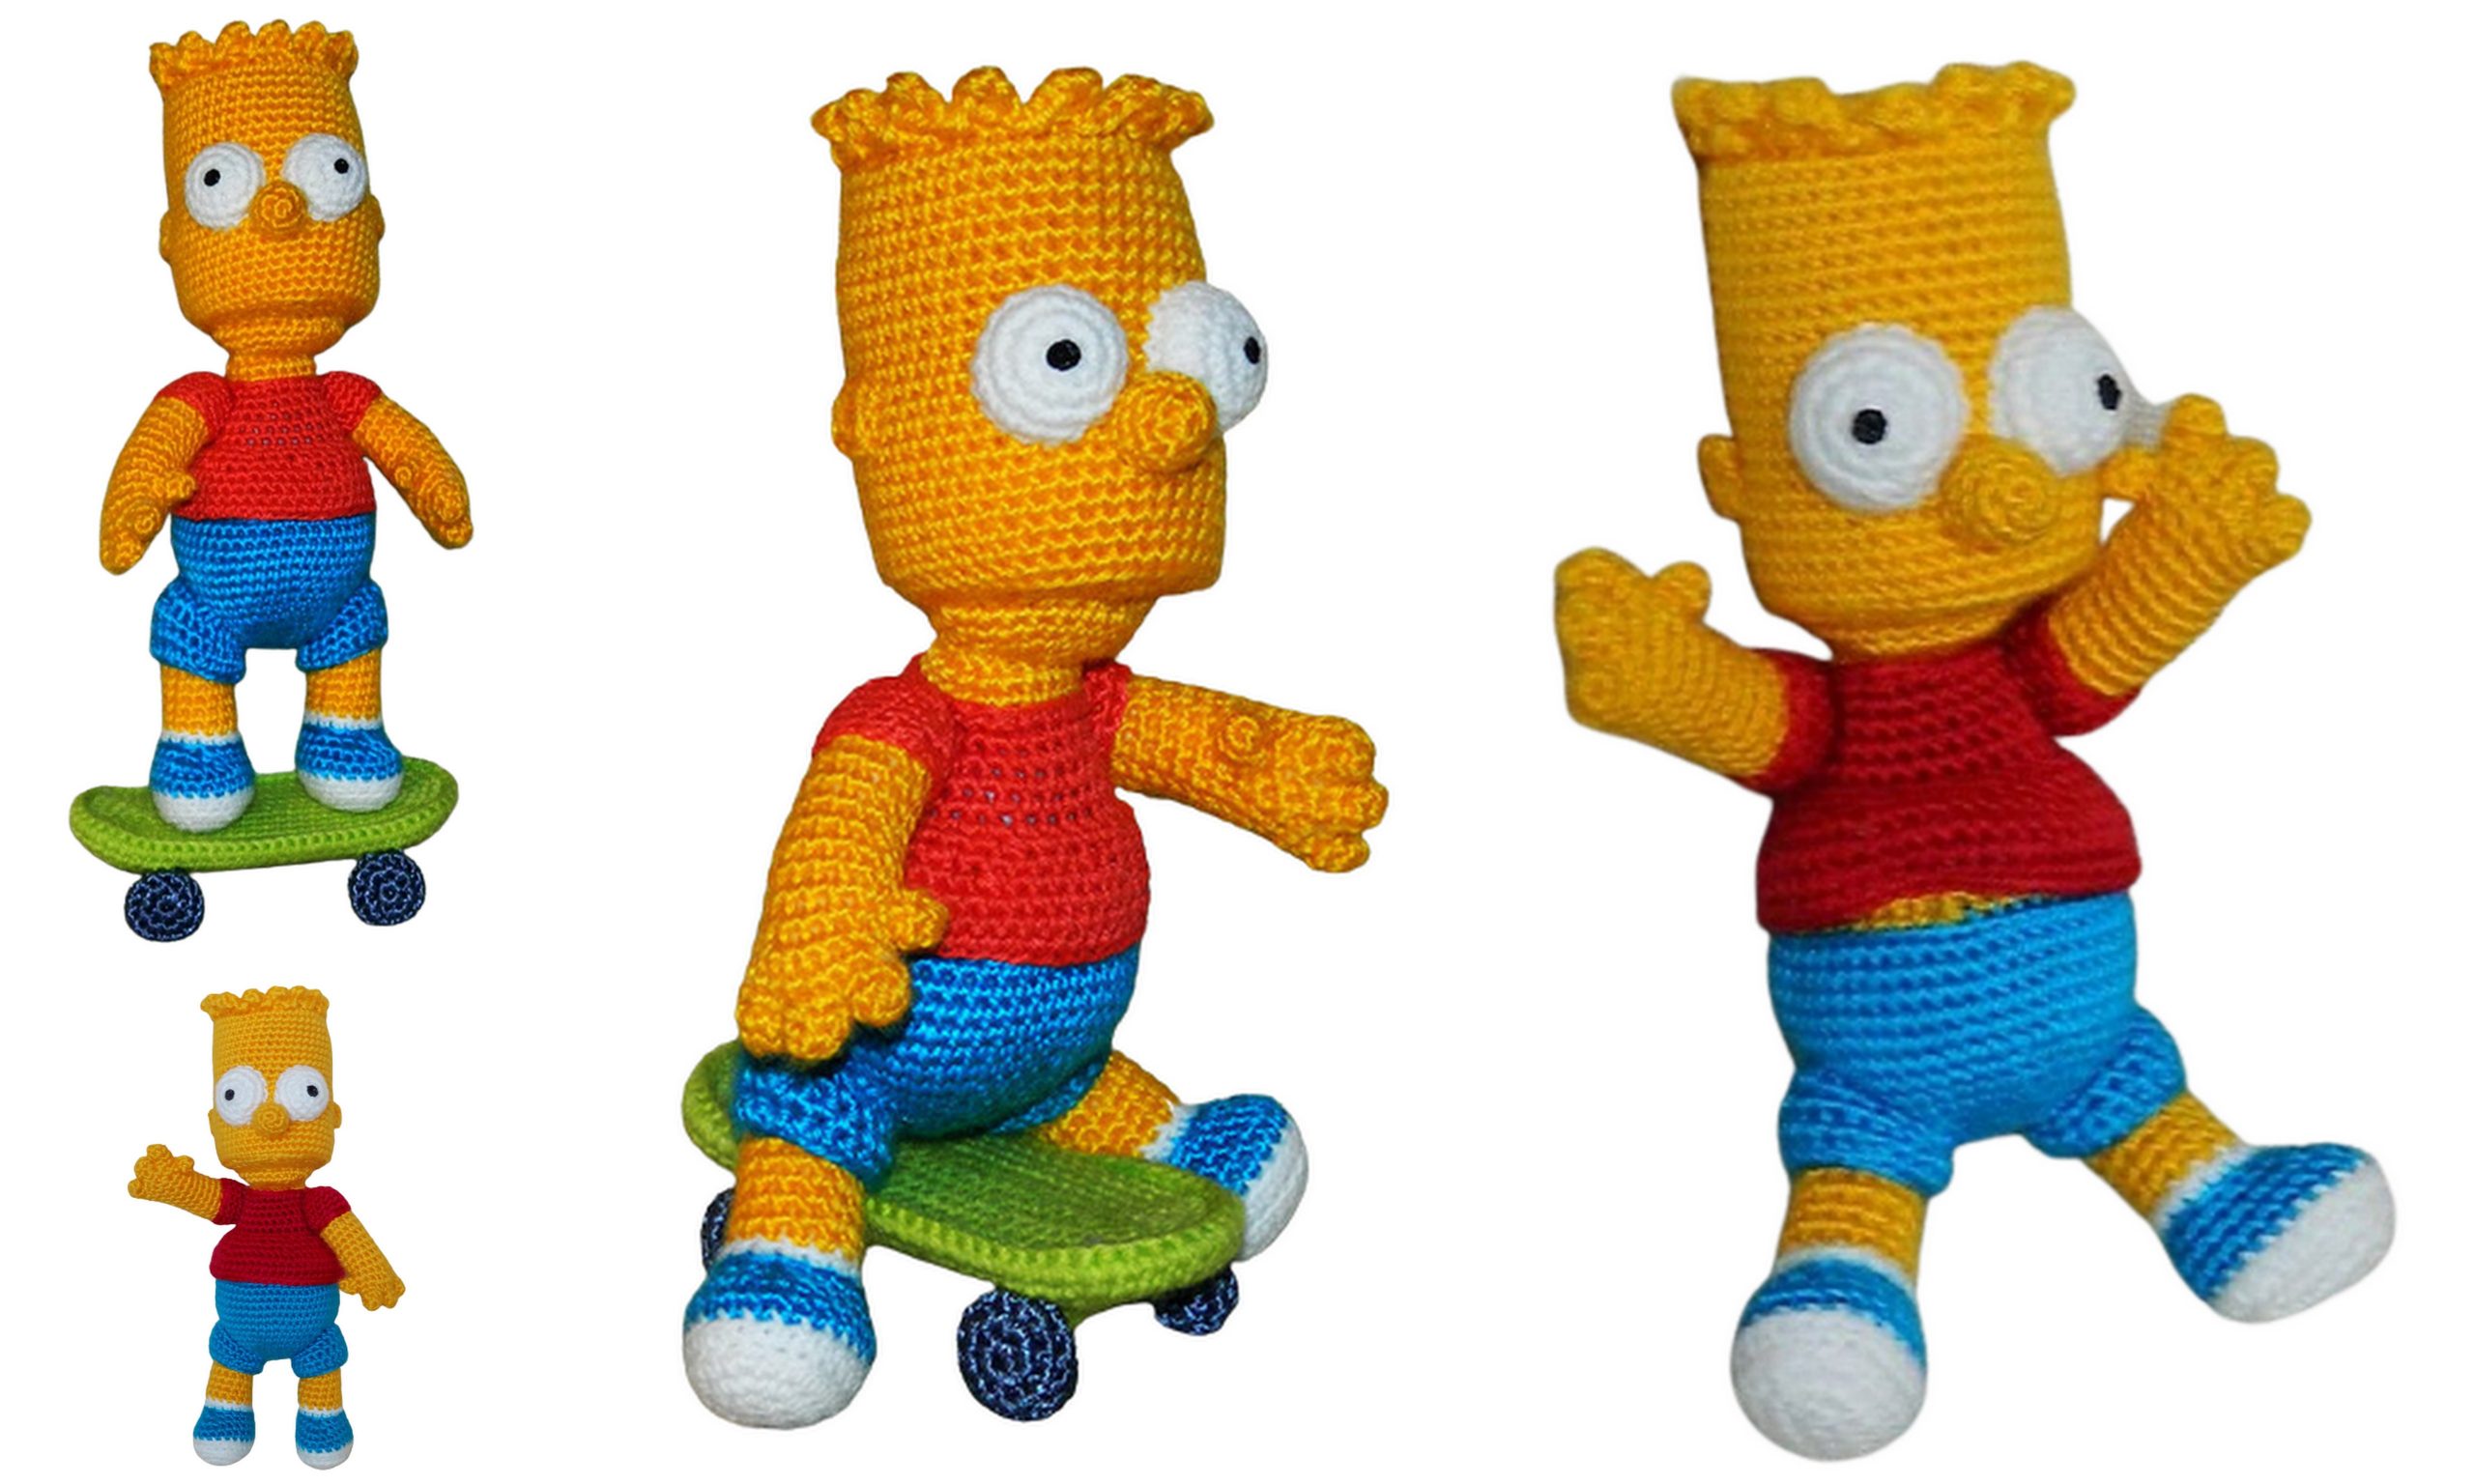
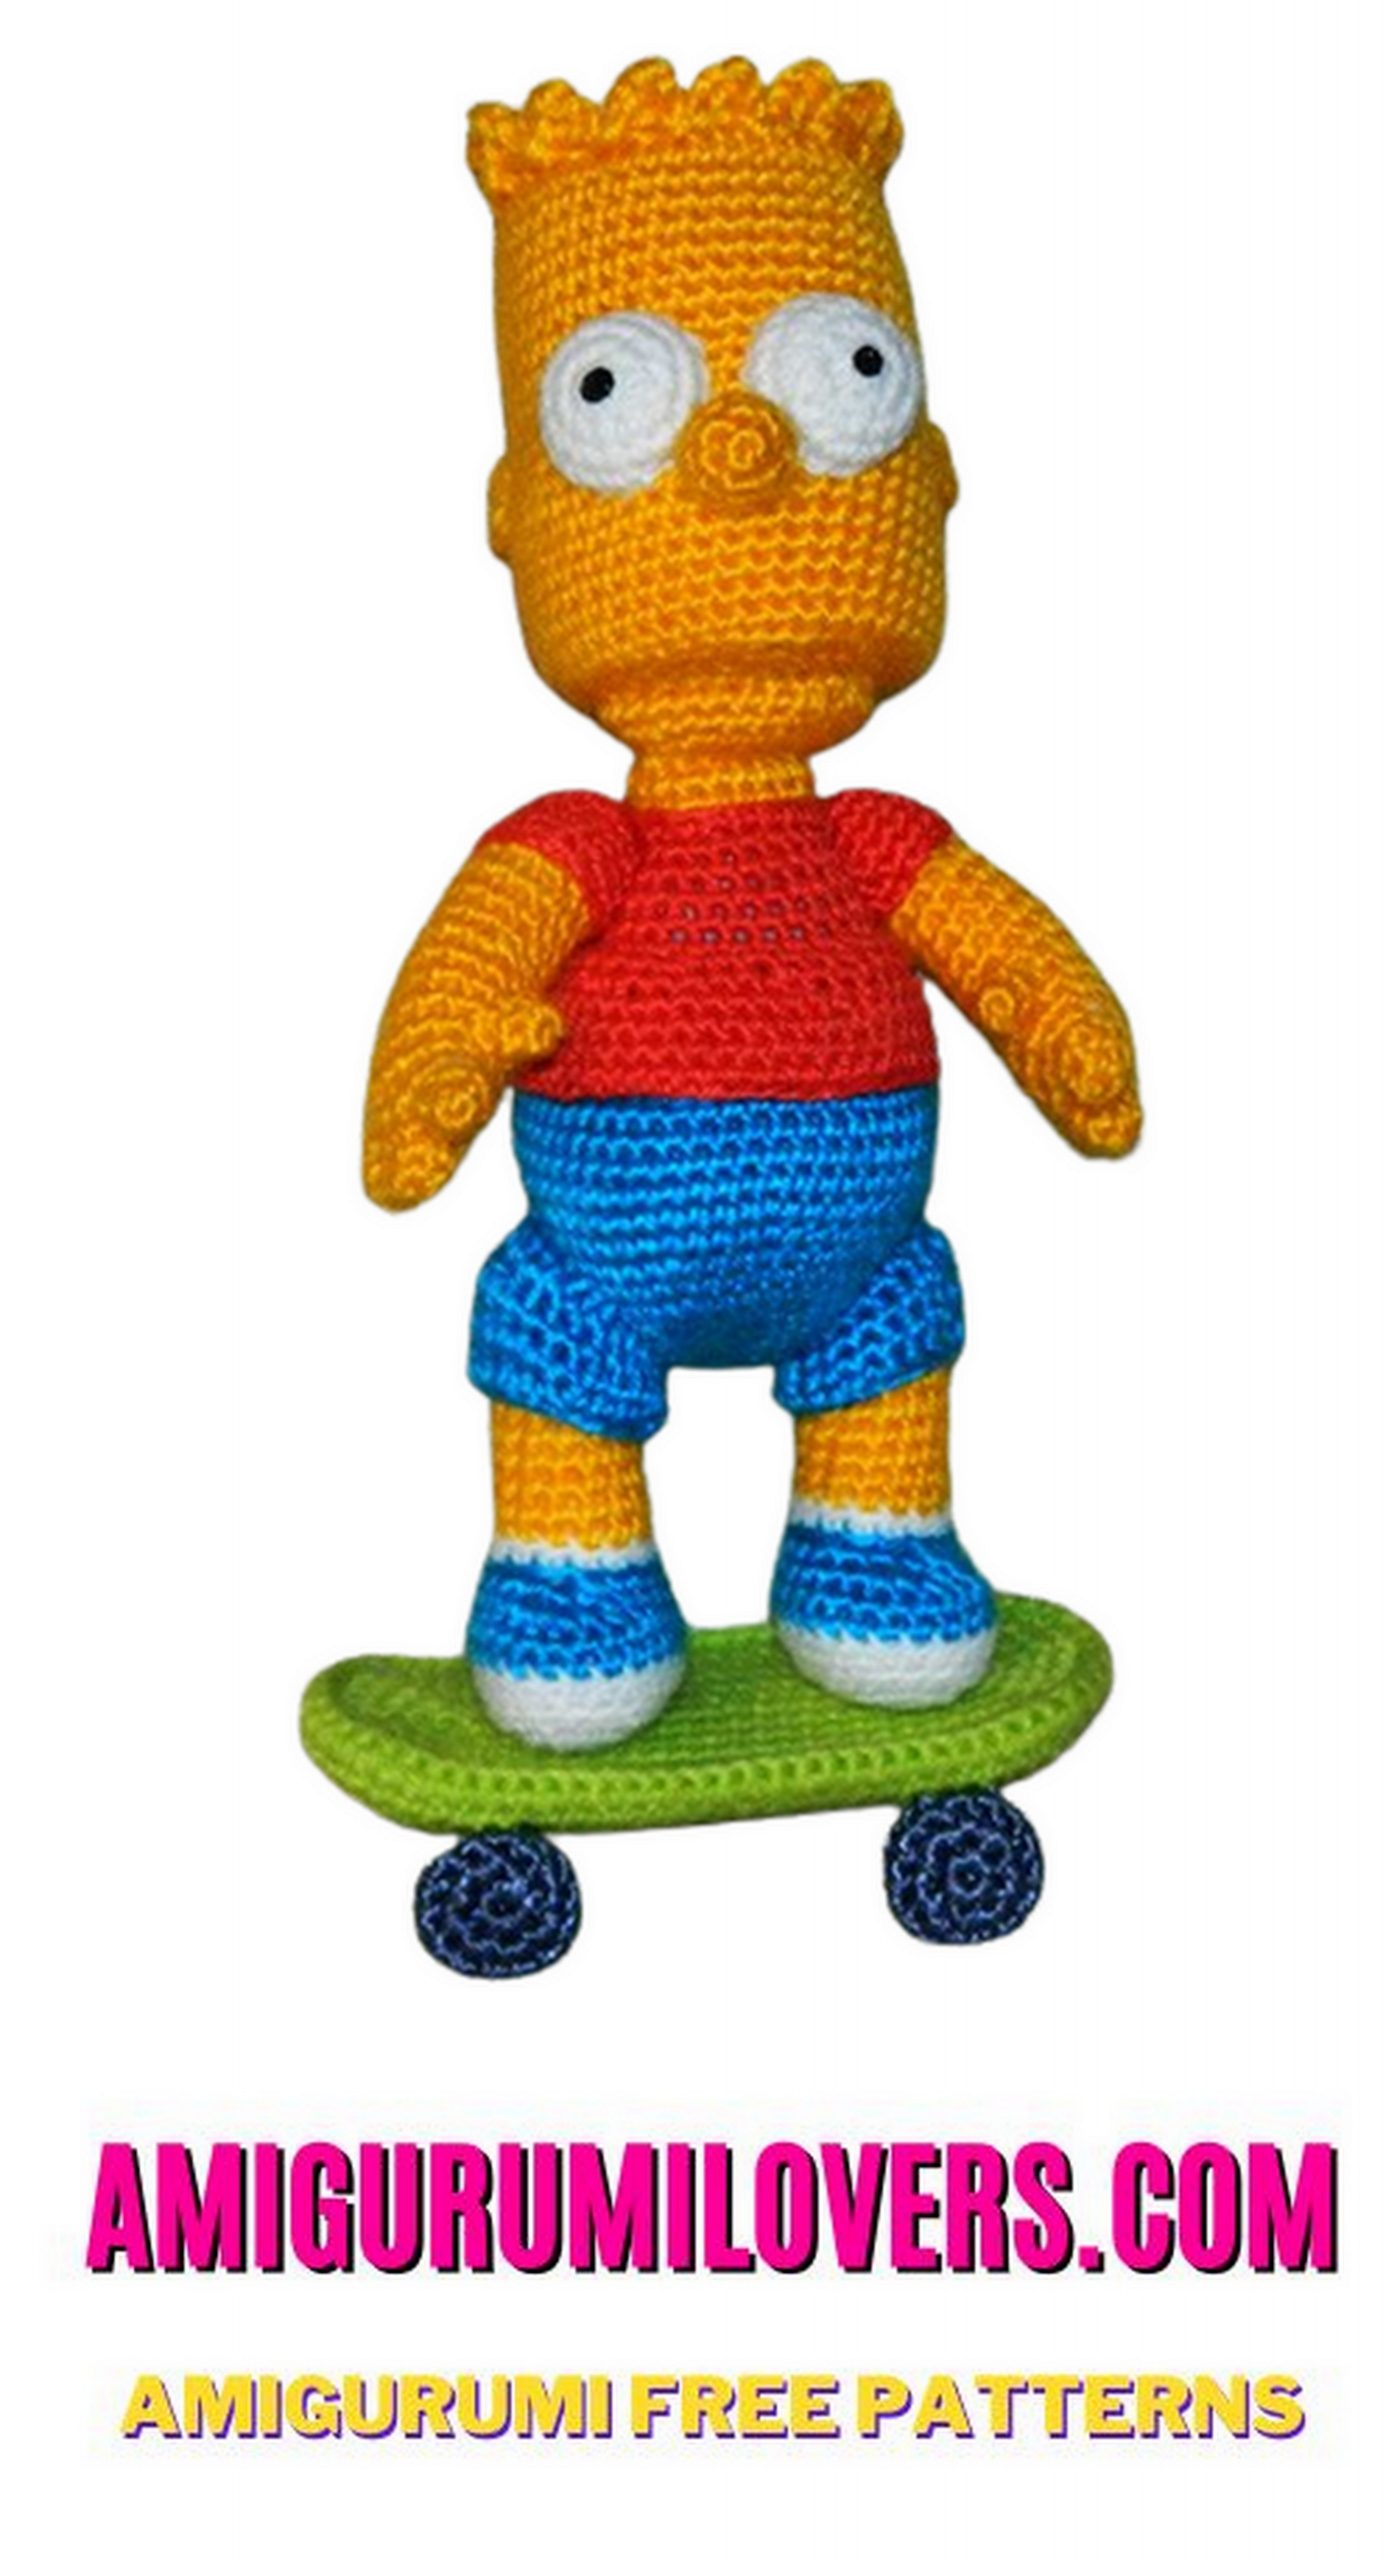
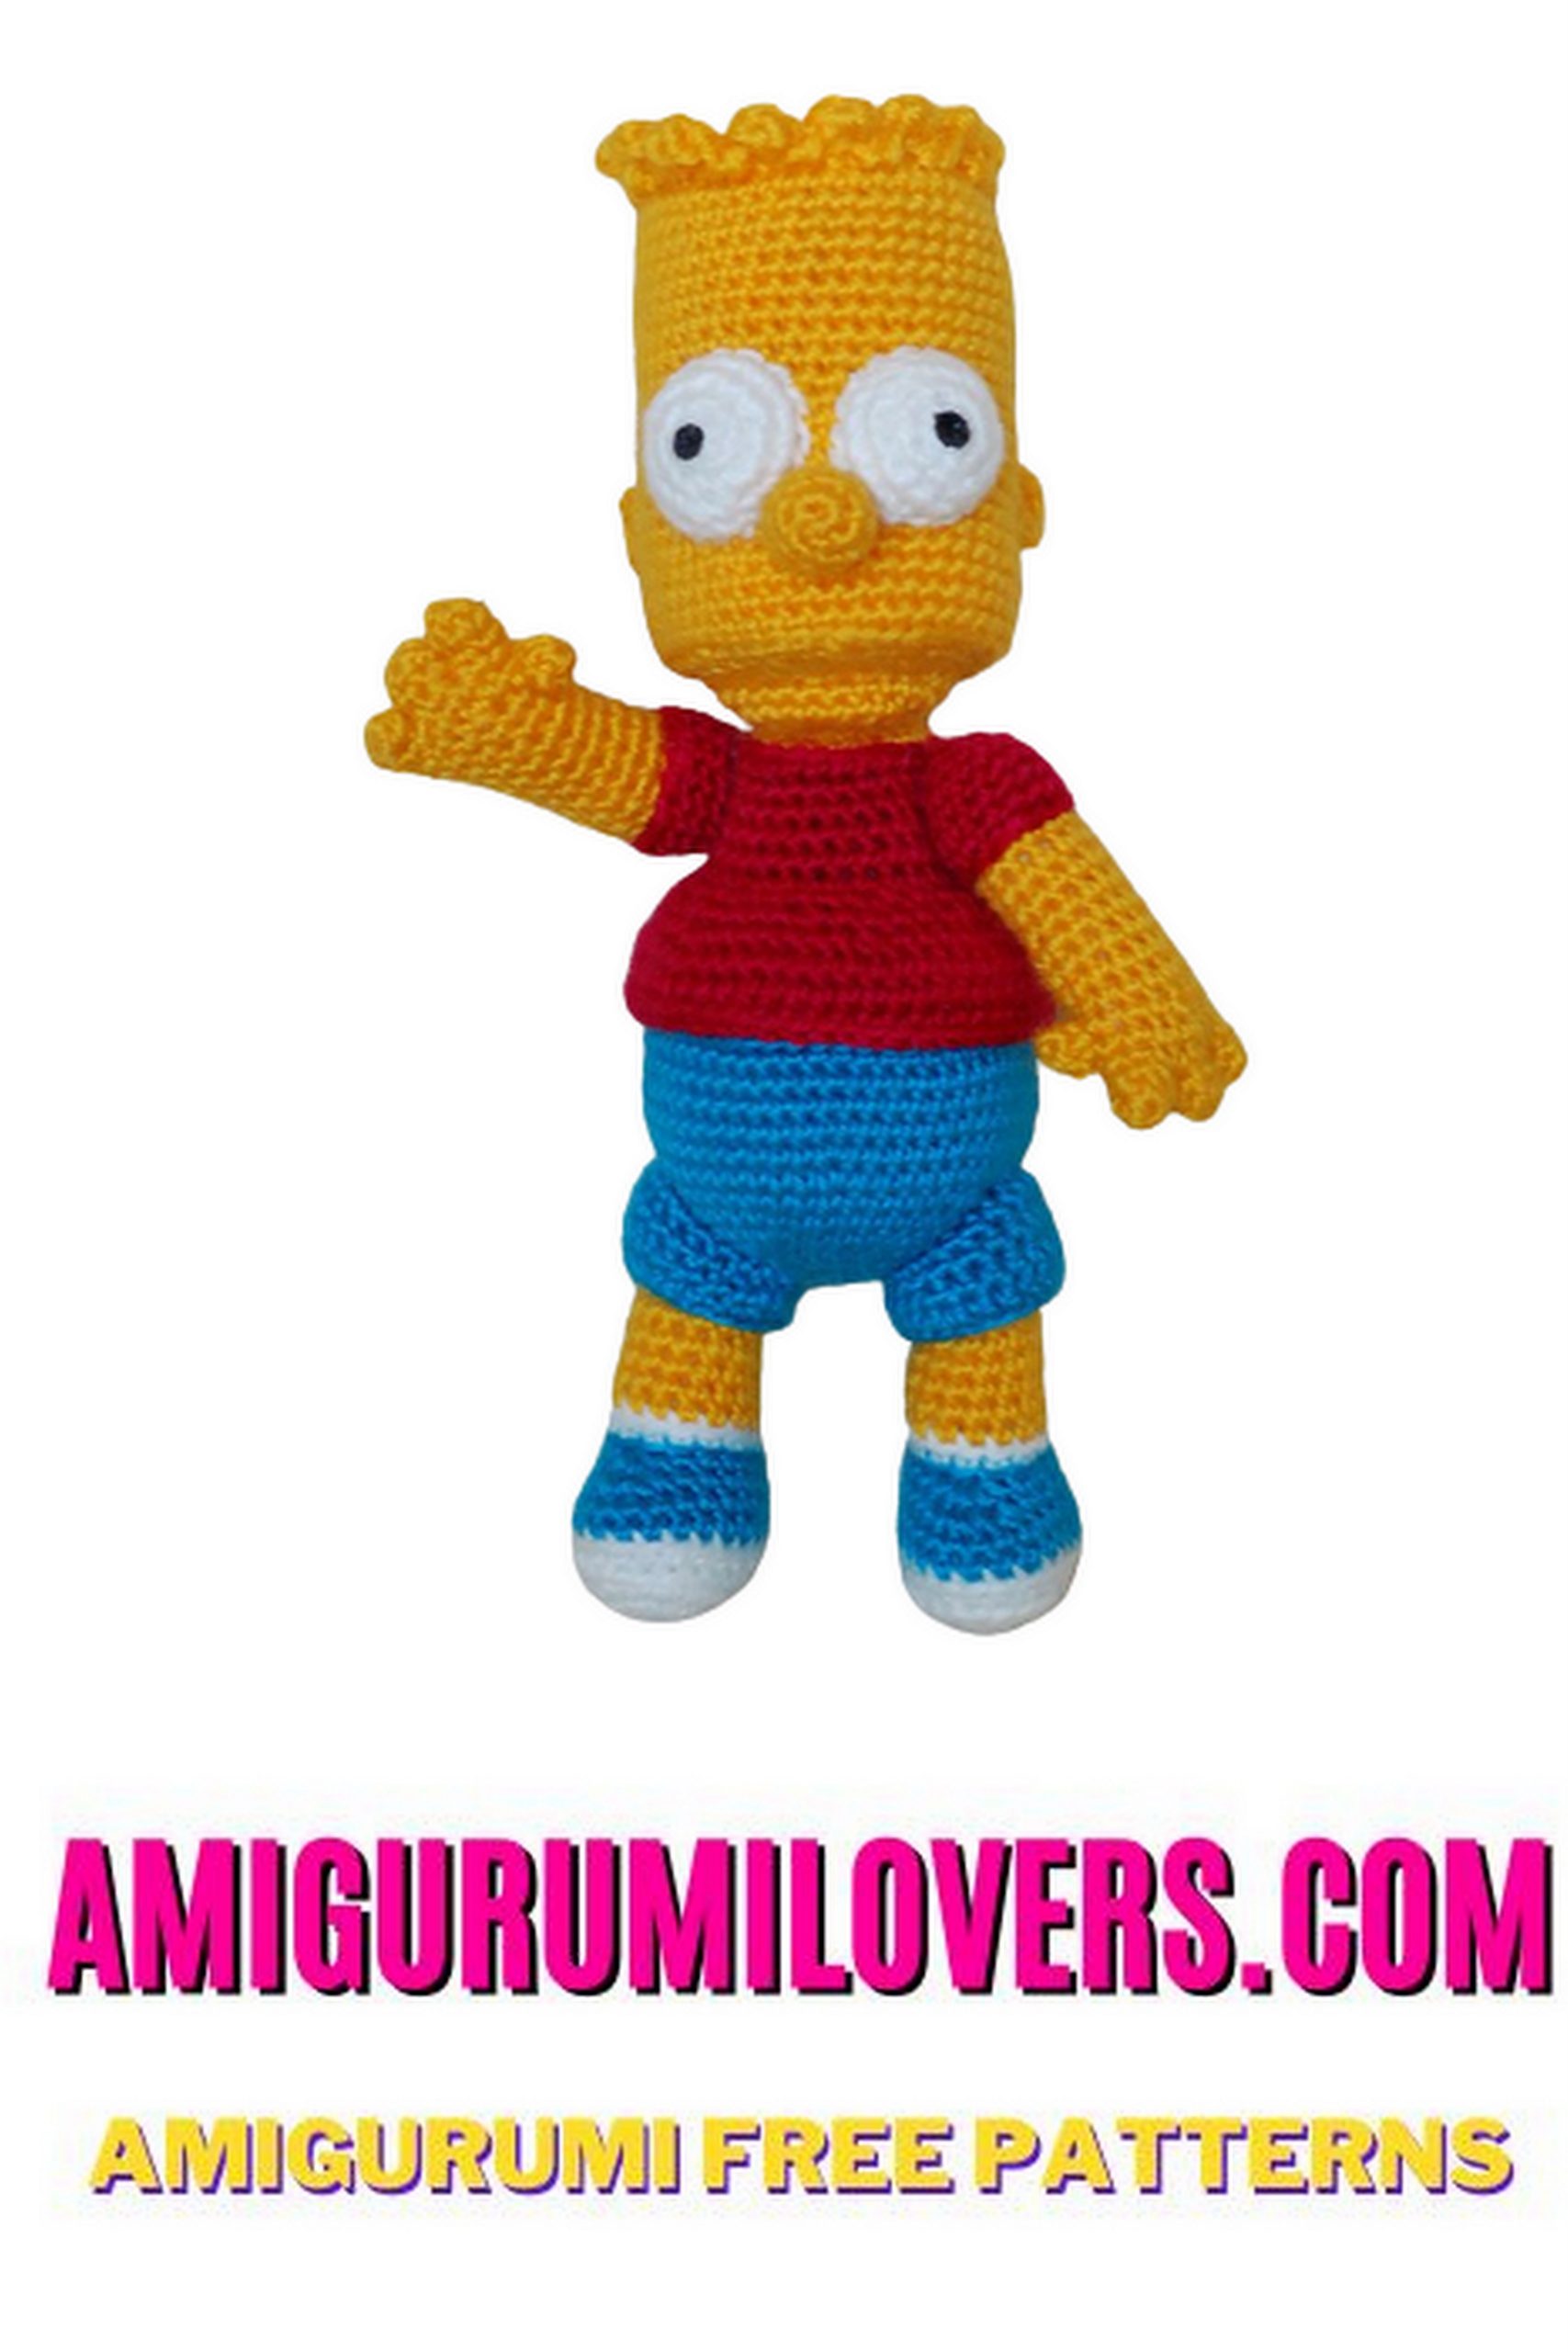
If you’re looking to combine your love for crochet with a touch of pop culture, you’ve come to the right place. In this blog post, we’re excited to present a free amigurumi pattern inspired by none other than Bart Simpson, the mischievous yet lovable character from the iconic animated series, “The Simpsons.” Whether you’re a seasoned crocheter or just starting out, this pattern is designed to be approachable and fun, making it perfect for crafters of all skill levels. Amigurumi is a delightful way to bring characters to life using yarn, and there’s something particularly special about creating your own plush version of Bart. Imagine the joy of seeing your completed creation, with its signature spiky hair and charming outfit, ready to be displayed or gifted to a fellow fan.
Our free Bart Simpson amigurumi pattern will guide you step-by-step, ensuring you understand each part of the process. You’ll not only have a fantastic project to work on but will also gain confidence in your crochet skills. The materials needed are simple and widely available, which means you can get started right away. We’ll cover the basics, from choosing the right yarn to the tools you’ll need, so you won’t feel overwhelmed. Each stitch will be carefully explained, and even if you’re a beginner, you’ll find that making amigurumi is much easier than you might think!
As you delve into this fun crochet project, you’ll discover the therapeutic benefits of crafting. Crochet can help you relax and unwind while giving you a sense of achievement as you watch your Bart Simpson figure come to life. Whether you choose to make him for your own collection, as a playful decoration for your home, or as a unique gift for a friend, creating this amigurumi version of Bart is sure to spark joy and nostalgia in anyone who sees it.
Don’t worry if you’re new to amigurumi; this post will break everything down, ensuring clarity at each step. From the initial chain stitches to the final sewing up, you’ll be guided thoroughly. We encourage you to personalize your Bart and have fun experimenting with colors and accessories that reflect your own style. Maybe you’ll add a skateboard or a baseball cap to make your amigurumi even more special. This creative process allows for endless possibilities, inviting you to express your craftsmanship and personality.
So, grab your crochet hook and your yarn, and let’s embark on this fun adventure together. By the end of this project, not only will you have a delightful Bart Simpson amigurumi, but you’ll also have gained new skills and insights into the world of crochet. Let’s bring a piece of Springfield into your home—happy crocheting!
Welcome to the world of crochet and nostalgia! How about crocheting your own tribute to the iconic Bart Simpson, one of television’s most beloved characters? The fantastic news is that this guide provides the Bart Simpson Amigurumi pattern for free! Whether you’re a dedicated fan or simply looking for a fun crochet project, this pattern is designed to cater to all, offering clear and detailed step-by-step instructions for an enjoyable crafting adventure.
Pattern Highlights:
- Materials List: Discover the materials you’ll need to bring Bart Simpson to life in crochet form.
- Basic Techniques: The pattern includes explanations of fundamental amigurumi crochet techniques, making it accessible for crafters of various skill levels.
- Detailed Instructions: Each step is meticulously explained to ensure a smooth crafting process.
- Nostalgic Fun: Your finished Bart Simpson Amigurumi will be a delightful addition to your collection and a tribute to a pop culture icon.
To learn more about the Bart Simpson Amigurumi pattern and embark on your crochet adventure, follow the instructions below. Craft your very own crochet Bart and let the world of amigurumi fill your days with creativity and nostalgia!
Materials:
1) Acrylic (300 meters/100 gr) – yellow, red, blue, white
2) Acrylic paint – black
3) Hook 2.0 mm (main) and 2.5 mm
4) Thin plastic or cardboard
5) Padding polyester
Dimensions of finished toys:
Crochet 2.0 mm hook
Height is 18 cm
PATTERN
Legend and used stitches:
Amigurumi ring – make double adjustable ring
Ch – chain
Sl st – slip stitch
Sc – single crochet
Hdc – half double crochet
Dc – double crochet
Crab stitch
(24) – the number of stitches in a crocheted round (row)
“Dec” – decrease – crochet two stitches of the previous round (row) together
“Inc” – increase – crochet two stitches into one stitch of the previous round (row)
“Unchanged” – crochet one stitch in each stitch of the previous round
(1 Sc, 1 Inc) rep 6 times – repeat rapport 6 times
Head:
Crochet yellow thread circular.
1 round – amigurumi ring, 6 Sc (6)
2 round – 6 Inc (12)
3 round – (1 Sc, 1 Inc) rep 6 times (18)
4 round – (2 Sc, 1 Inc) rep 6 times (24)
5 round – (3 Sc, 1 Inc) rep 6 times (30)
6 round – (4 Sc, 1 Inc) rep 6 times (36)
7 round – (5 Sc, 1 Inc) rep 6 times (42)
8 round – 42 Sc back loop only (42)
9 – 28 rounds – Unchanged (42)
Stop crochet. Cut 2 plastic circles with a diameter of head’s base. Insert one circle into the crocheted detail and fill the head of padding polyester tightly. Put second plastic circle atop and continue to crochet.
29 round – (5 Sc, 1 Dec) rep 6 times back loop only (36)
30 round – (4 Sc, 1 Dec) rep 6 times (30)
31 round – (3 Sc, 1 Dec) rep 6 times (24)
32 round – (2 Sc, 1 Dec) rep 6 times (18)
33 round – (1 Sc, 1 Dec) rep 6 times (12)
34 round – 6 Dec (6)
Finish crochet, sew up the hole.
Hairstyle “Frieze”:
Crochet yellow two-ply yarn with hook 2,5 mm.
Fasten thread at the 7th round of the crocheted head by the free front loop and crochet 14 parts of Bart’s “frieze”:
1 Sl st in the first base loop, cast on 3 Chs, 1 Sc in the second loop from the hook, 1 Hdc in the third loop, skip 1 base loop and crochet 1 Sl st in the third base loop – the first part of his “frieze” is ready. Then crochet 1 Sl st in the 4th base loop and crochet the second part of Bart’s “frieze” and so on.
There will be 14 parts from the 42 base loops.
Eyes (2 pieces):
Crochet white thread circular.
1 round – amigurumi ring, 6 Sc (6)
2 round – 6 Inc (12)
3 round – (1 Sc, 1 Inc) rep 6 times (18)
4 round – Unchanged (18), Sl st.
Break off yarn, leaving a long end for sewing to the head
Nose:
Crochet yellow thread circular.
1 round – amigurumi ring, 6 Sc (6)
2 round – (1 Sc, 1 Inc) rep 3 times (9)
3 – 5 rounds – Unchanged (9)
Break off yarn, leaving a long end for sewing to the head.
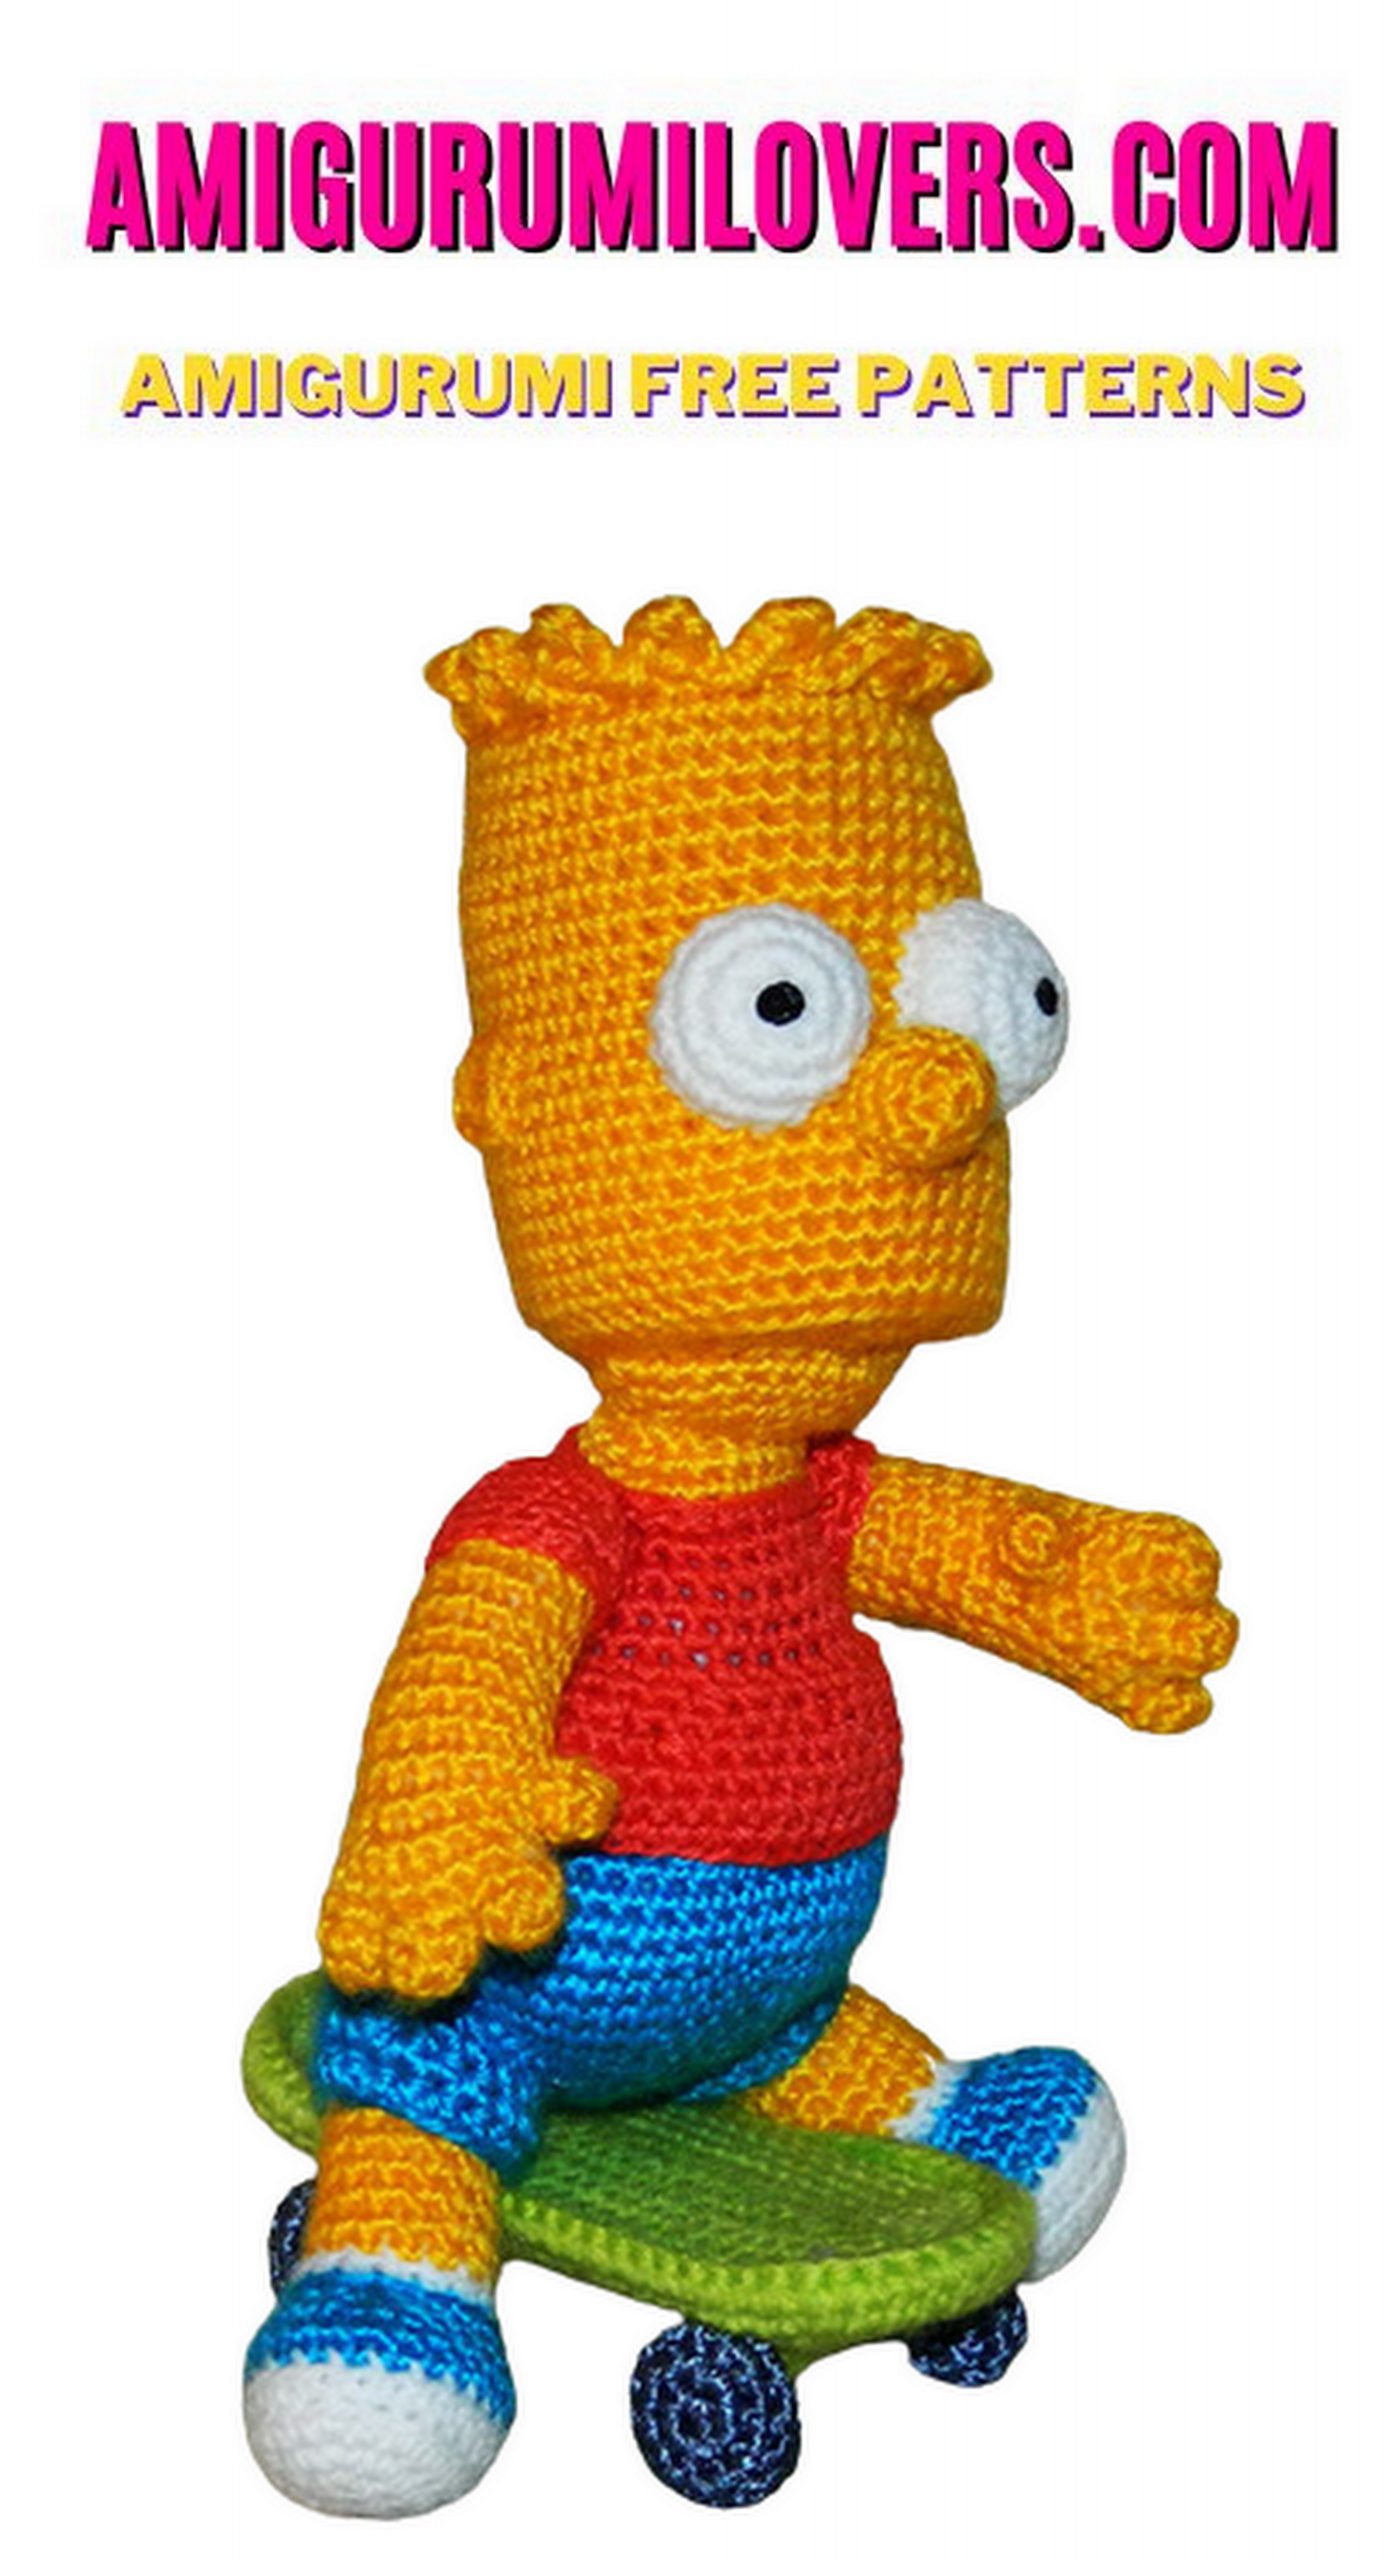
Sew eyes and nose to the head as shown in a picture. Fill details of padding polyester.
Lower lip:
Crochet yellow thread circular.
1 round – cast on 4 Chs, 2 Sc beginning from the second loop from the hook, 3 Sc in the last loop of chain, turn the
crochet clockwise, 1 Sc, 2 Sc in the last loop of round (8)
2 round – 1 Inc, 1 Sc, 3 Inc, 1 Sc, 2 Inc (14)
3 round – 1 Sc, 1 Inc, 1 Sc, (1 Sc, 1 Inc) rep 3 times, 1 Sc, (1 Sc, 1 Inc) rep 2 times (20)
4 round – 9 Sc, 1 Inc, 2 Sc, 1 Inc, 3 Sc, 1 Inc, 2 Sc, 1 Inc (24)
5 round – 10 Sc, 1 Inc, 3 Sc, 1 Inc, 4 Sc, 1 Inc, 3 Sc, 1 Inc (28)
Break off yarn, leaving a long end for sewing to the head.
Sew the lip as shown in a picture.
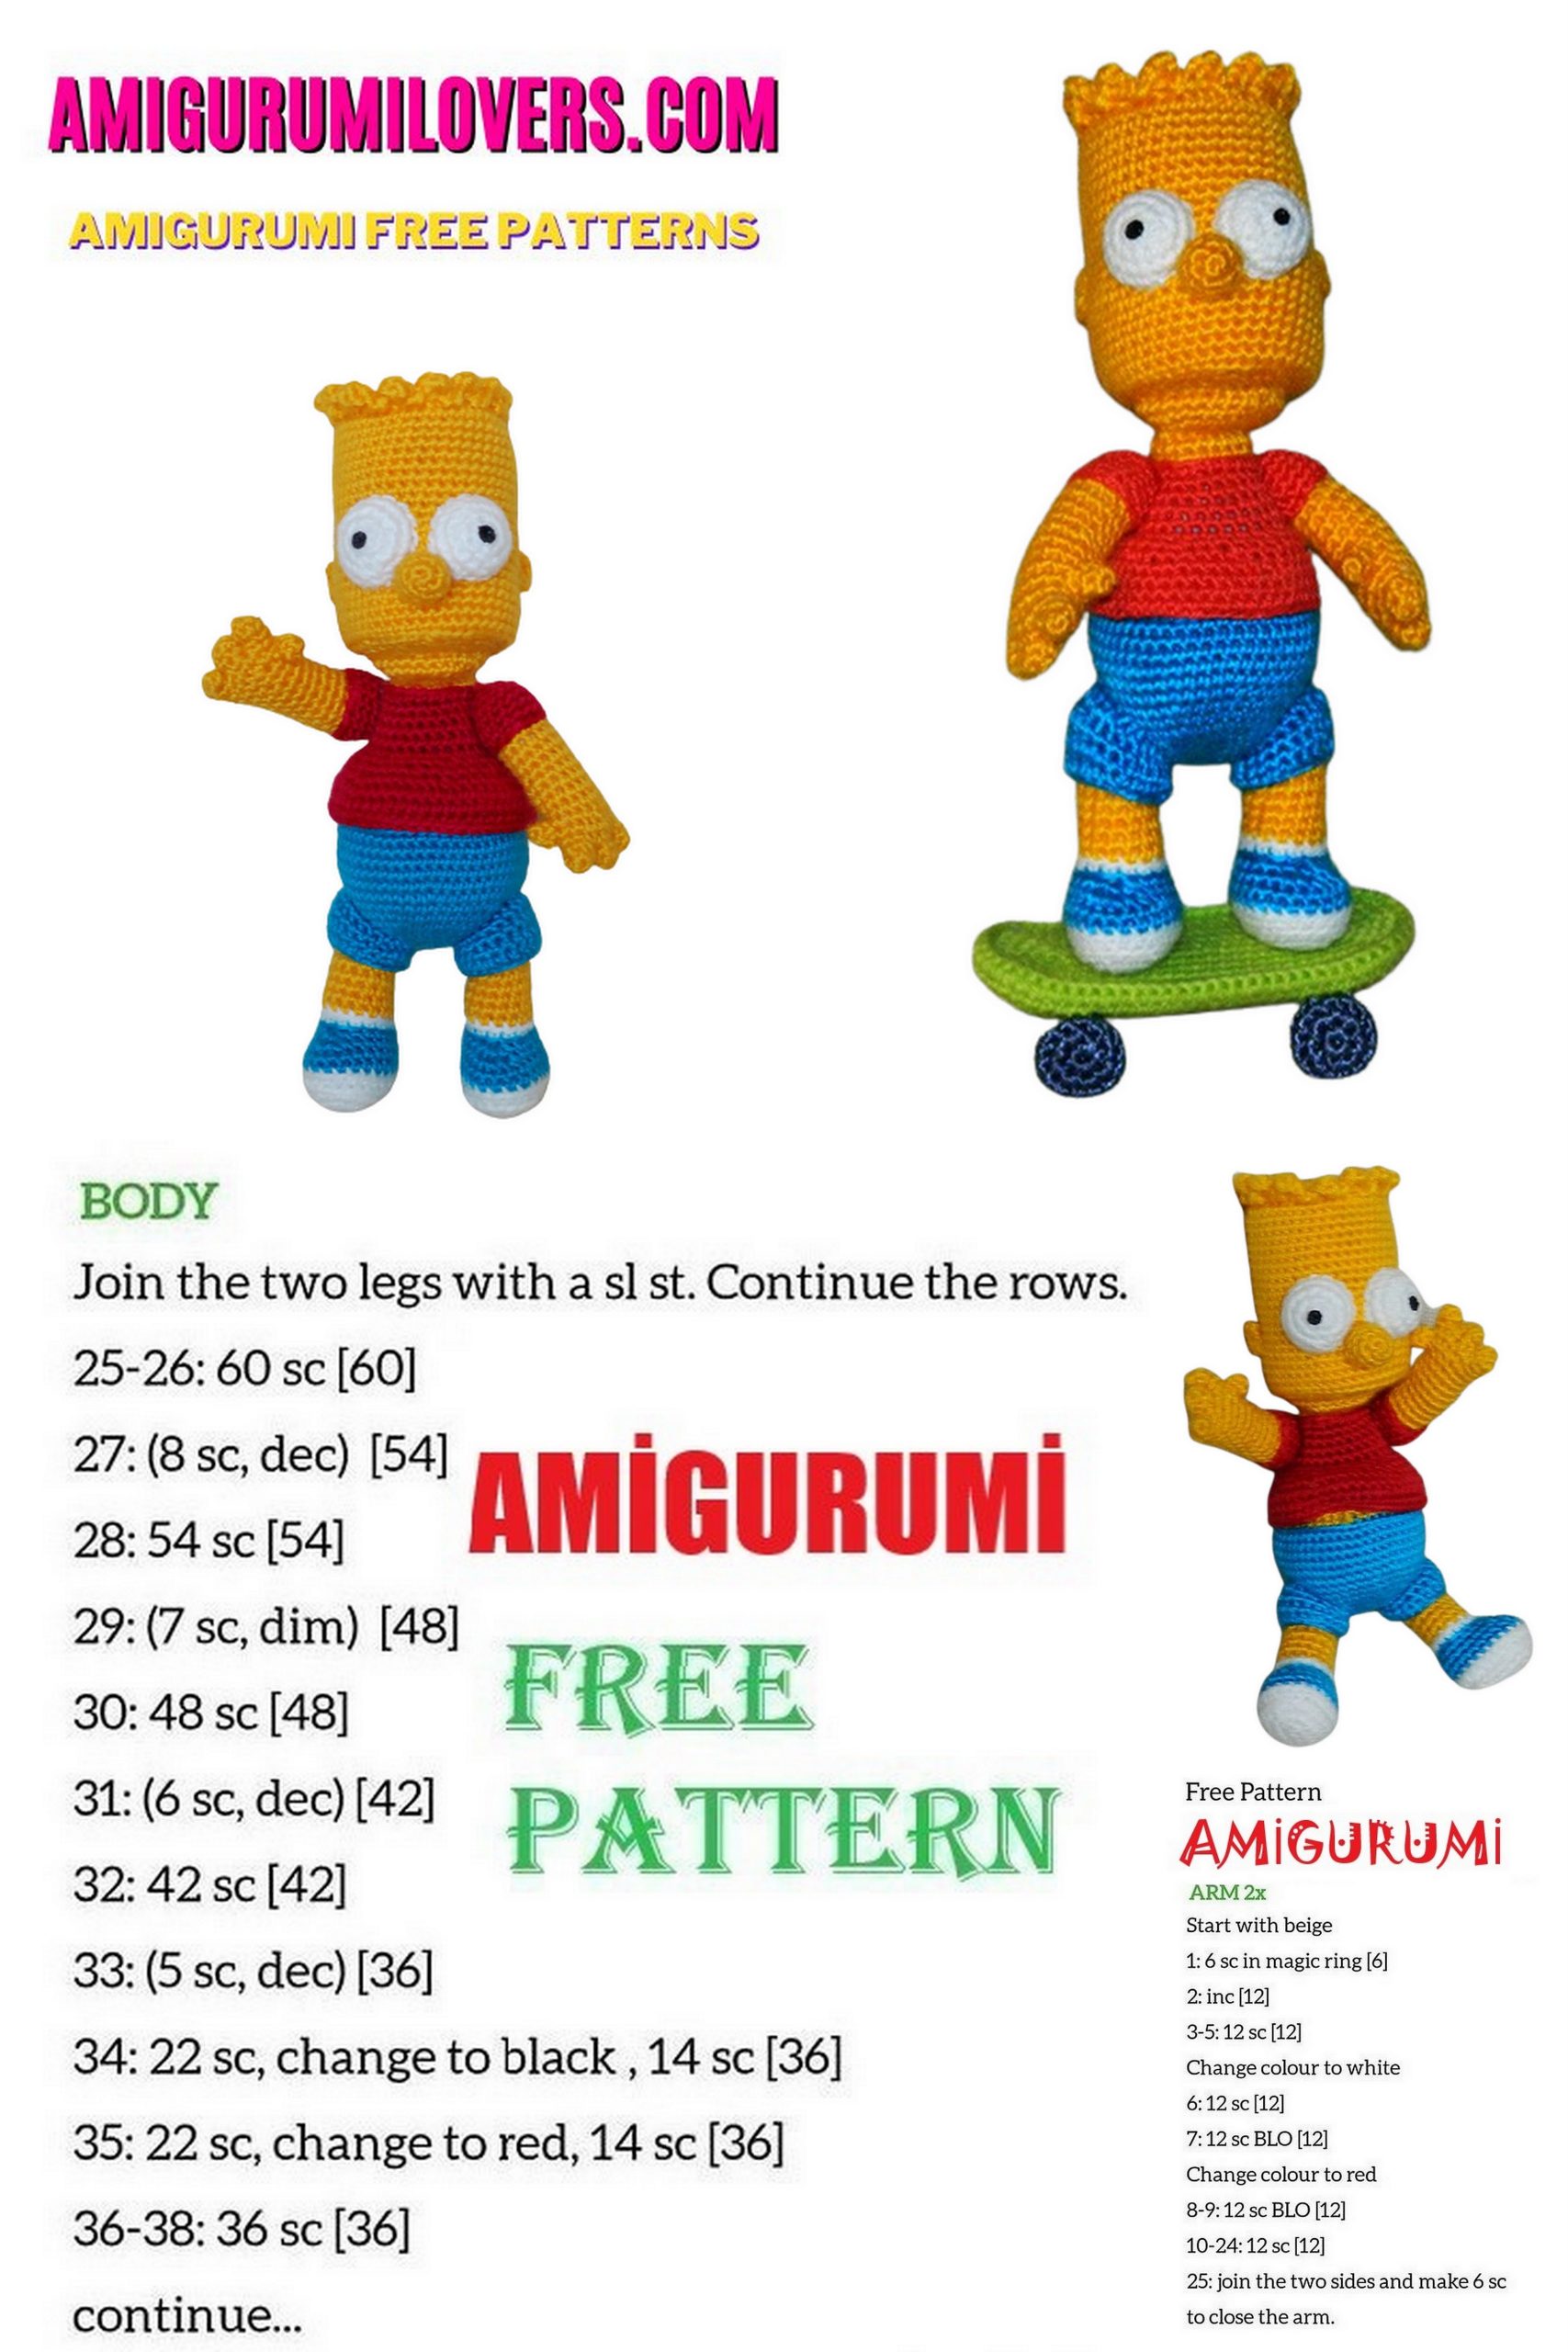
Body:
First detail. Crochet blue, yellow and red threads circular.
Start to crochet with blue thread.
1 round – amigurumi ring, 8 Sc (8)
2 round –8 Inc (16)
3 round – (1 Sc, 1 Inc) rep 8 times (24)
4 round – (2 Sc, 1 Inc) rep 8 times (32)
5 round – (3 Sc, 1 Inc) rep 8 times (40)
6 round – (4 Sc, 1 Inc) rep 8 times (48)
7 round – Unchanged (48)
8 round – 19 Sc, 1 Inc, 7 Sc, 1 Inc, 20 Sc (50)
9 round – 16 Sc, 1 Inc, 8 Sc, 1 Inc, 8 Sc, 1 Inc, 15 Sc (53)
10 round – 27 Sc, 1 Inc, 25 Sc (54)
11 – 12 rounds – Unchanged (54)
13 round – 1 Dec, 7 Sc, 1 Dec, 34 Sc, 1 Dec, 7 Sc (51)
14 round – 1 Dec, 6 Sc, 1 Dec, 33 Sc, 1 Dec, 6 Sc (48)
Change thread on yellow.
15 round – (6 Sc, 1 Dec) rep 6 times (42)
16 round – (5 Sc, 1 Dec) rep 6 times (36)
17 round – (4 Sc, 1 Dec) rep 6 times (30)
18 – 20 rounds – Unchanged (30), Sl st.
Finish crochet with yellow thread. Break off yarn and fasten it.
Second detail. Crochet red thread.
Cast on 48 Chs, close to the ring and crochet circular.
1 – 3 rounds – 48 Sc (48)
4 round – (6 Sc, 1 Dec) rep 6 times (42)
5 round – (5 Sc, 1 Dec) rep 6 times (36)
6 round – (4 Sc, 1 Dec) rep 6 times (30)
Put red detail on the first detail and crochet next round capturing loops of both details at the same time.
7 round – 30 Sc (30) – connect the two details together
8 – 9 rounds – Unchanged (30)
10 round – 6 Sc, 2 Dec, 11 Sc, 2 Dec, 5 Sc (26)
11 round – 6 Sc, 1 Dec, 11 Sc, 1 Dec, 5 Sc (24)
12 round – (6 Sc, 1 Dec) rep 3 times front loop only (21)
Finish crochet with yellow thread. Break off yarn and fasten it.
Then crochet yellow thread.
Fasten yellow thread at the 11th round of the red detail by the free back loop and crochet the round:
12* round – (6 Sc, 1 Dec) rep 3 times back loop only (21)
13 – 14 rounds – 21 Sc (21).
Finish crochet, break of yarn, leaving a long end for sewing to the head.
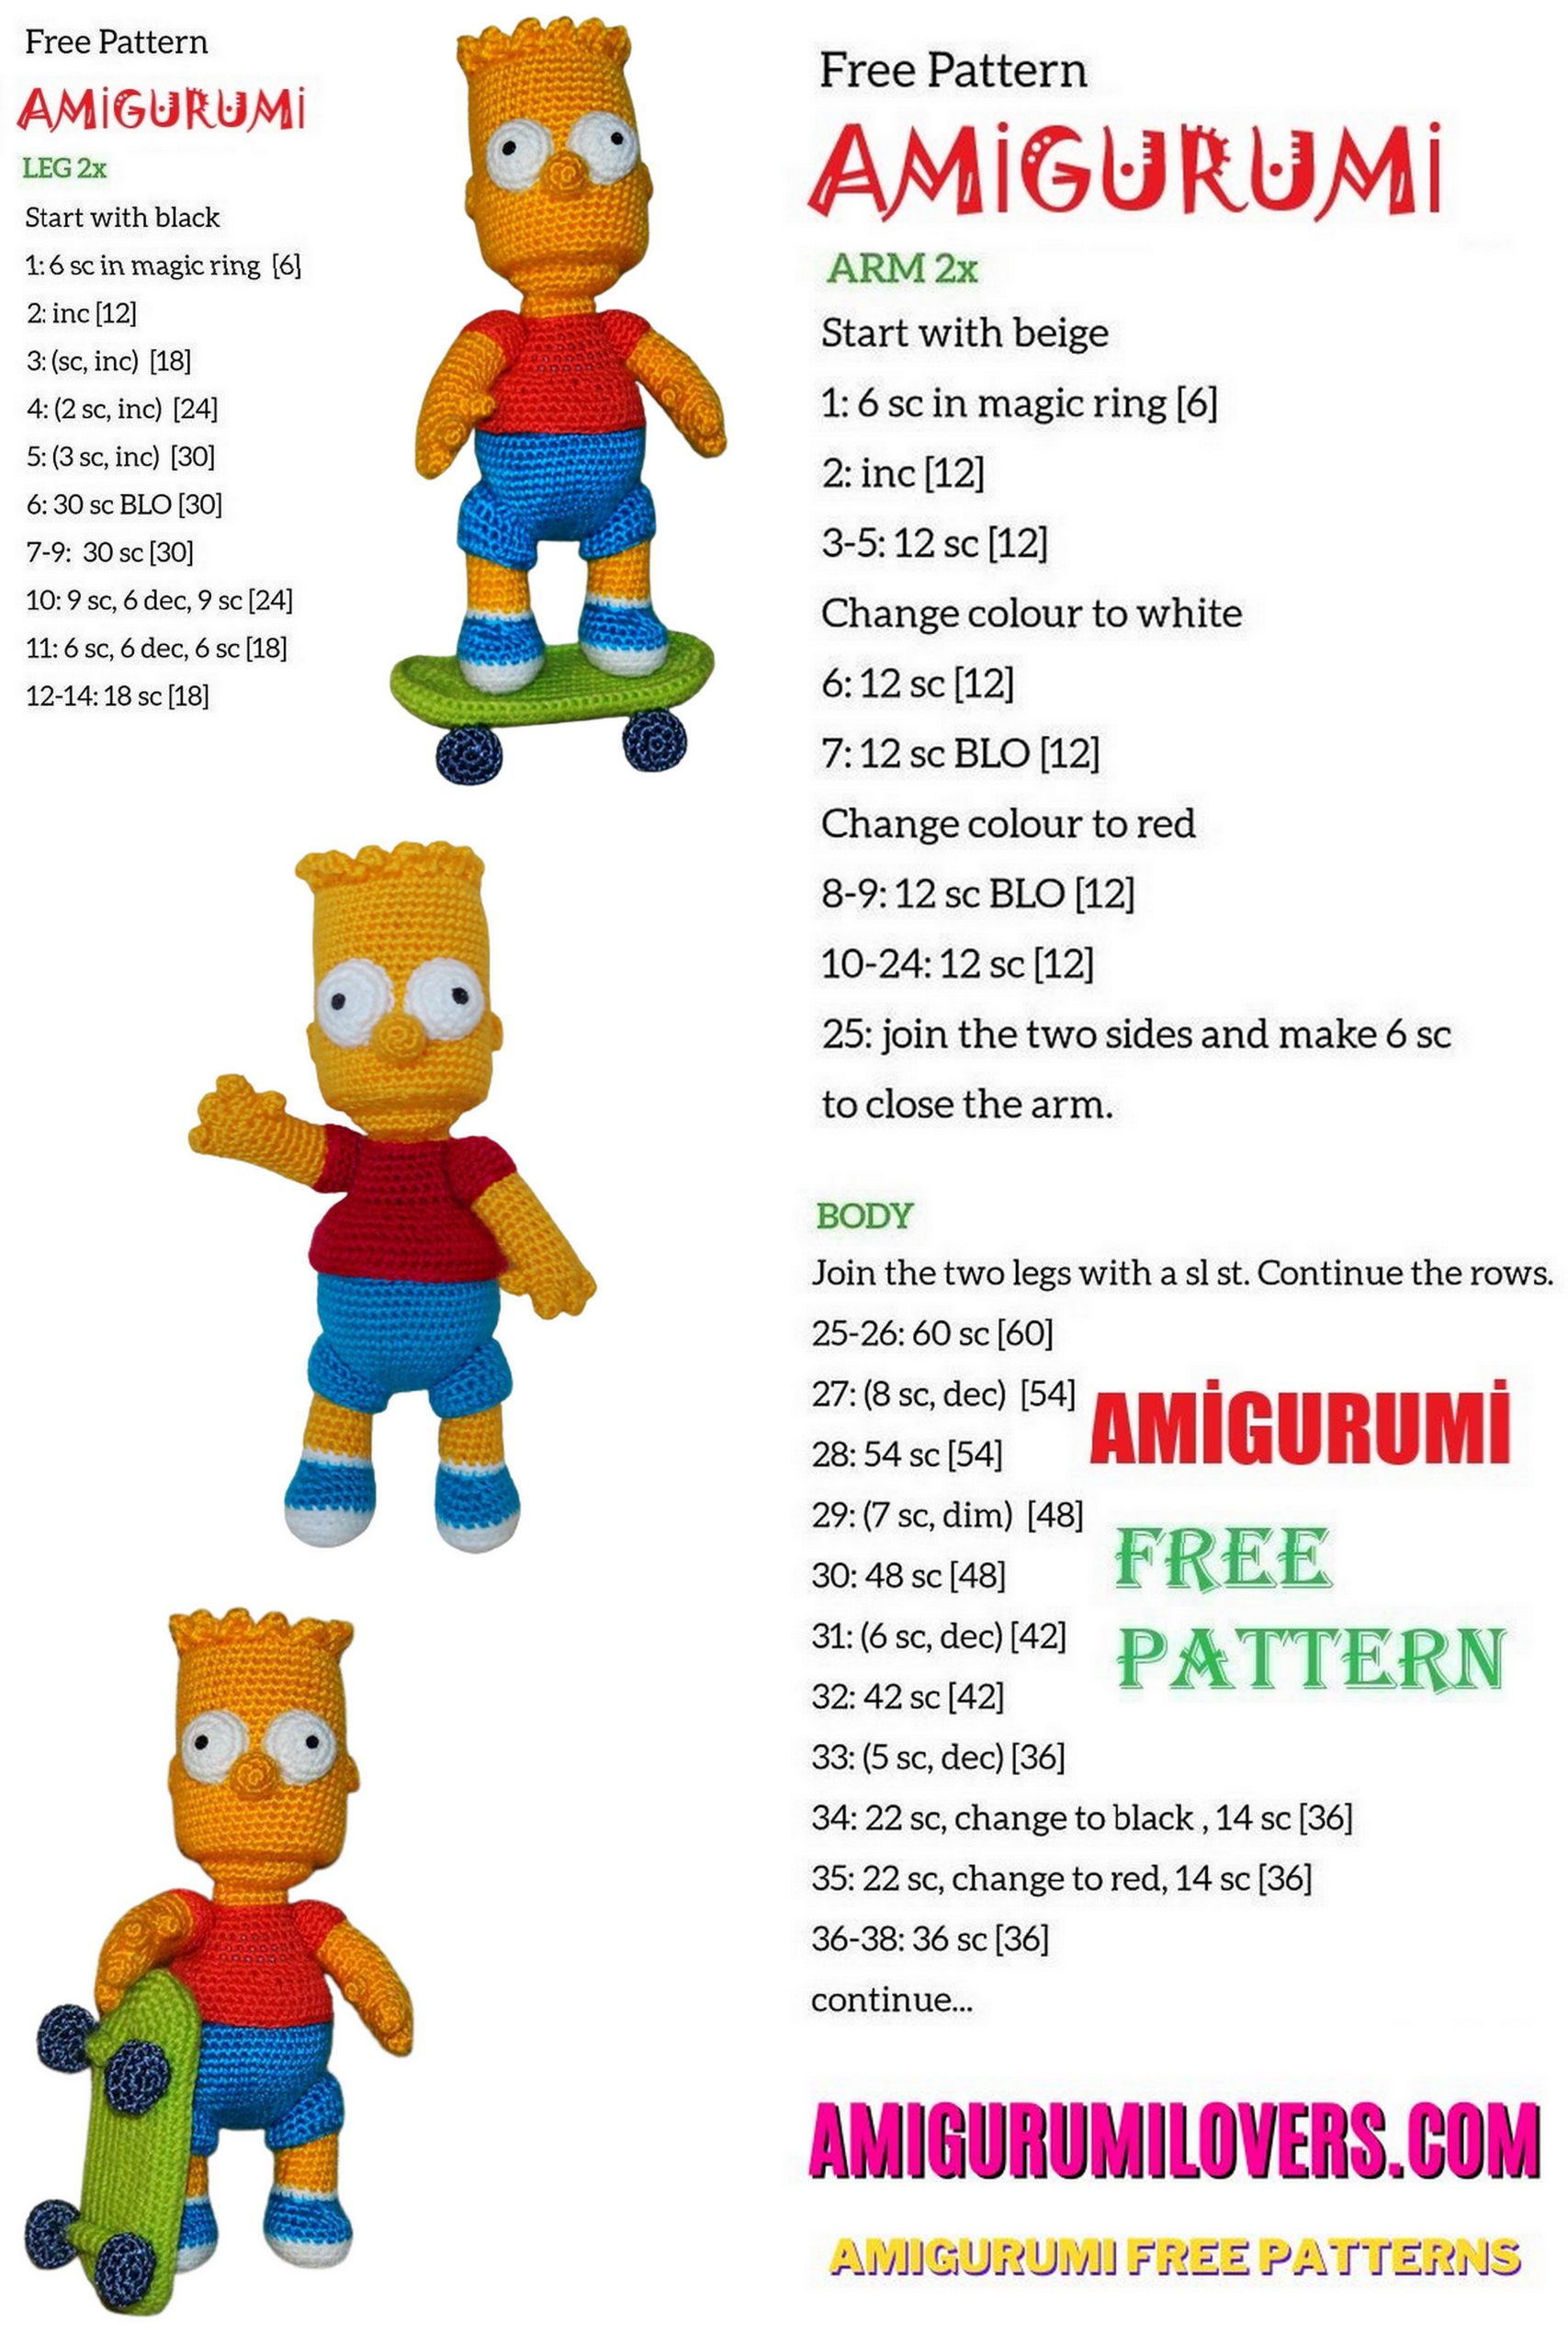
Legs (2 pieces):
Crochet white, blue and yellow threads circular.
Start to crochet with white thread.
1 round – cast on 5 Chs, 3 Sc beginning from the second loop from the hook, 3 Sc in the last loop of chain, turn the crochet clockwise, 2 Sc, 2 Sc in the last loop of round (10)
2 round – 1 Inc, 2 Sc, 3 Inc, 2 Sc, 2 Inc (16)
3 round – 1 Sc, 1 Inc, 2 Sc, (1 Sc, 1 Inc) rep 3 times, 2 Sc, (1 Sc, 1 Inc) rep 2 times (22)
4 round – 22 Sc back loop only (22)
Change thread on blue.
5 round – 22 Sc back loop only (22)
6 round – 22 Sc (22)
7 round – 7 Sc, 3 Dec, 7 Sc, 1 Dec (18)
8 round – 7 Sc, crochet 3 Sc of the previous round together, 6 Sc, 1 Dec (15)
Change thread on white.
9 round – 15 Sc back loop only (15)
Change thread on yellow.
10 round – 13 Sc, 1 Dec – back loop only (14)
11 – 17 rounds – Unchanged (14)
18 round – (1 Sc, 1 Dec) rep 4 times, 2 Sc (10)
19 round – 5 Dec.
Finish crochet, sew up the hole.
Trouser-legs (2 pieces):
Crochet blue thread. Cast on 20 Chs, close to the ring and crochet circular.
1 round – 5 Sc, 10 Hdc, 5 Sc (20)
2 round – 2 Sl st, 3 Sc, 10 Hdc, 3 Sc, 2 Sl st (20)
3 – 4 rounds – 3 Sl st, 2 Sc, 10 Hdc, 3 Sc, 2 Sl st (20).
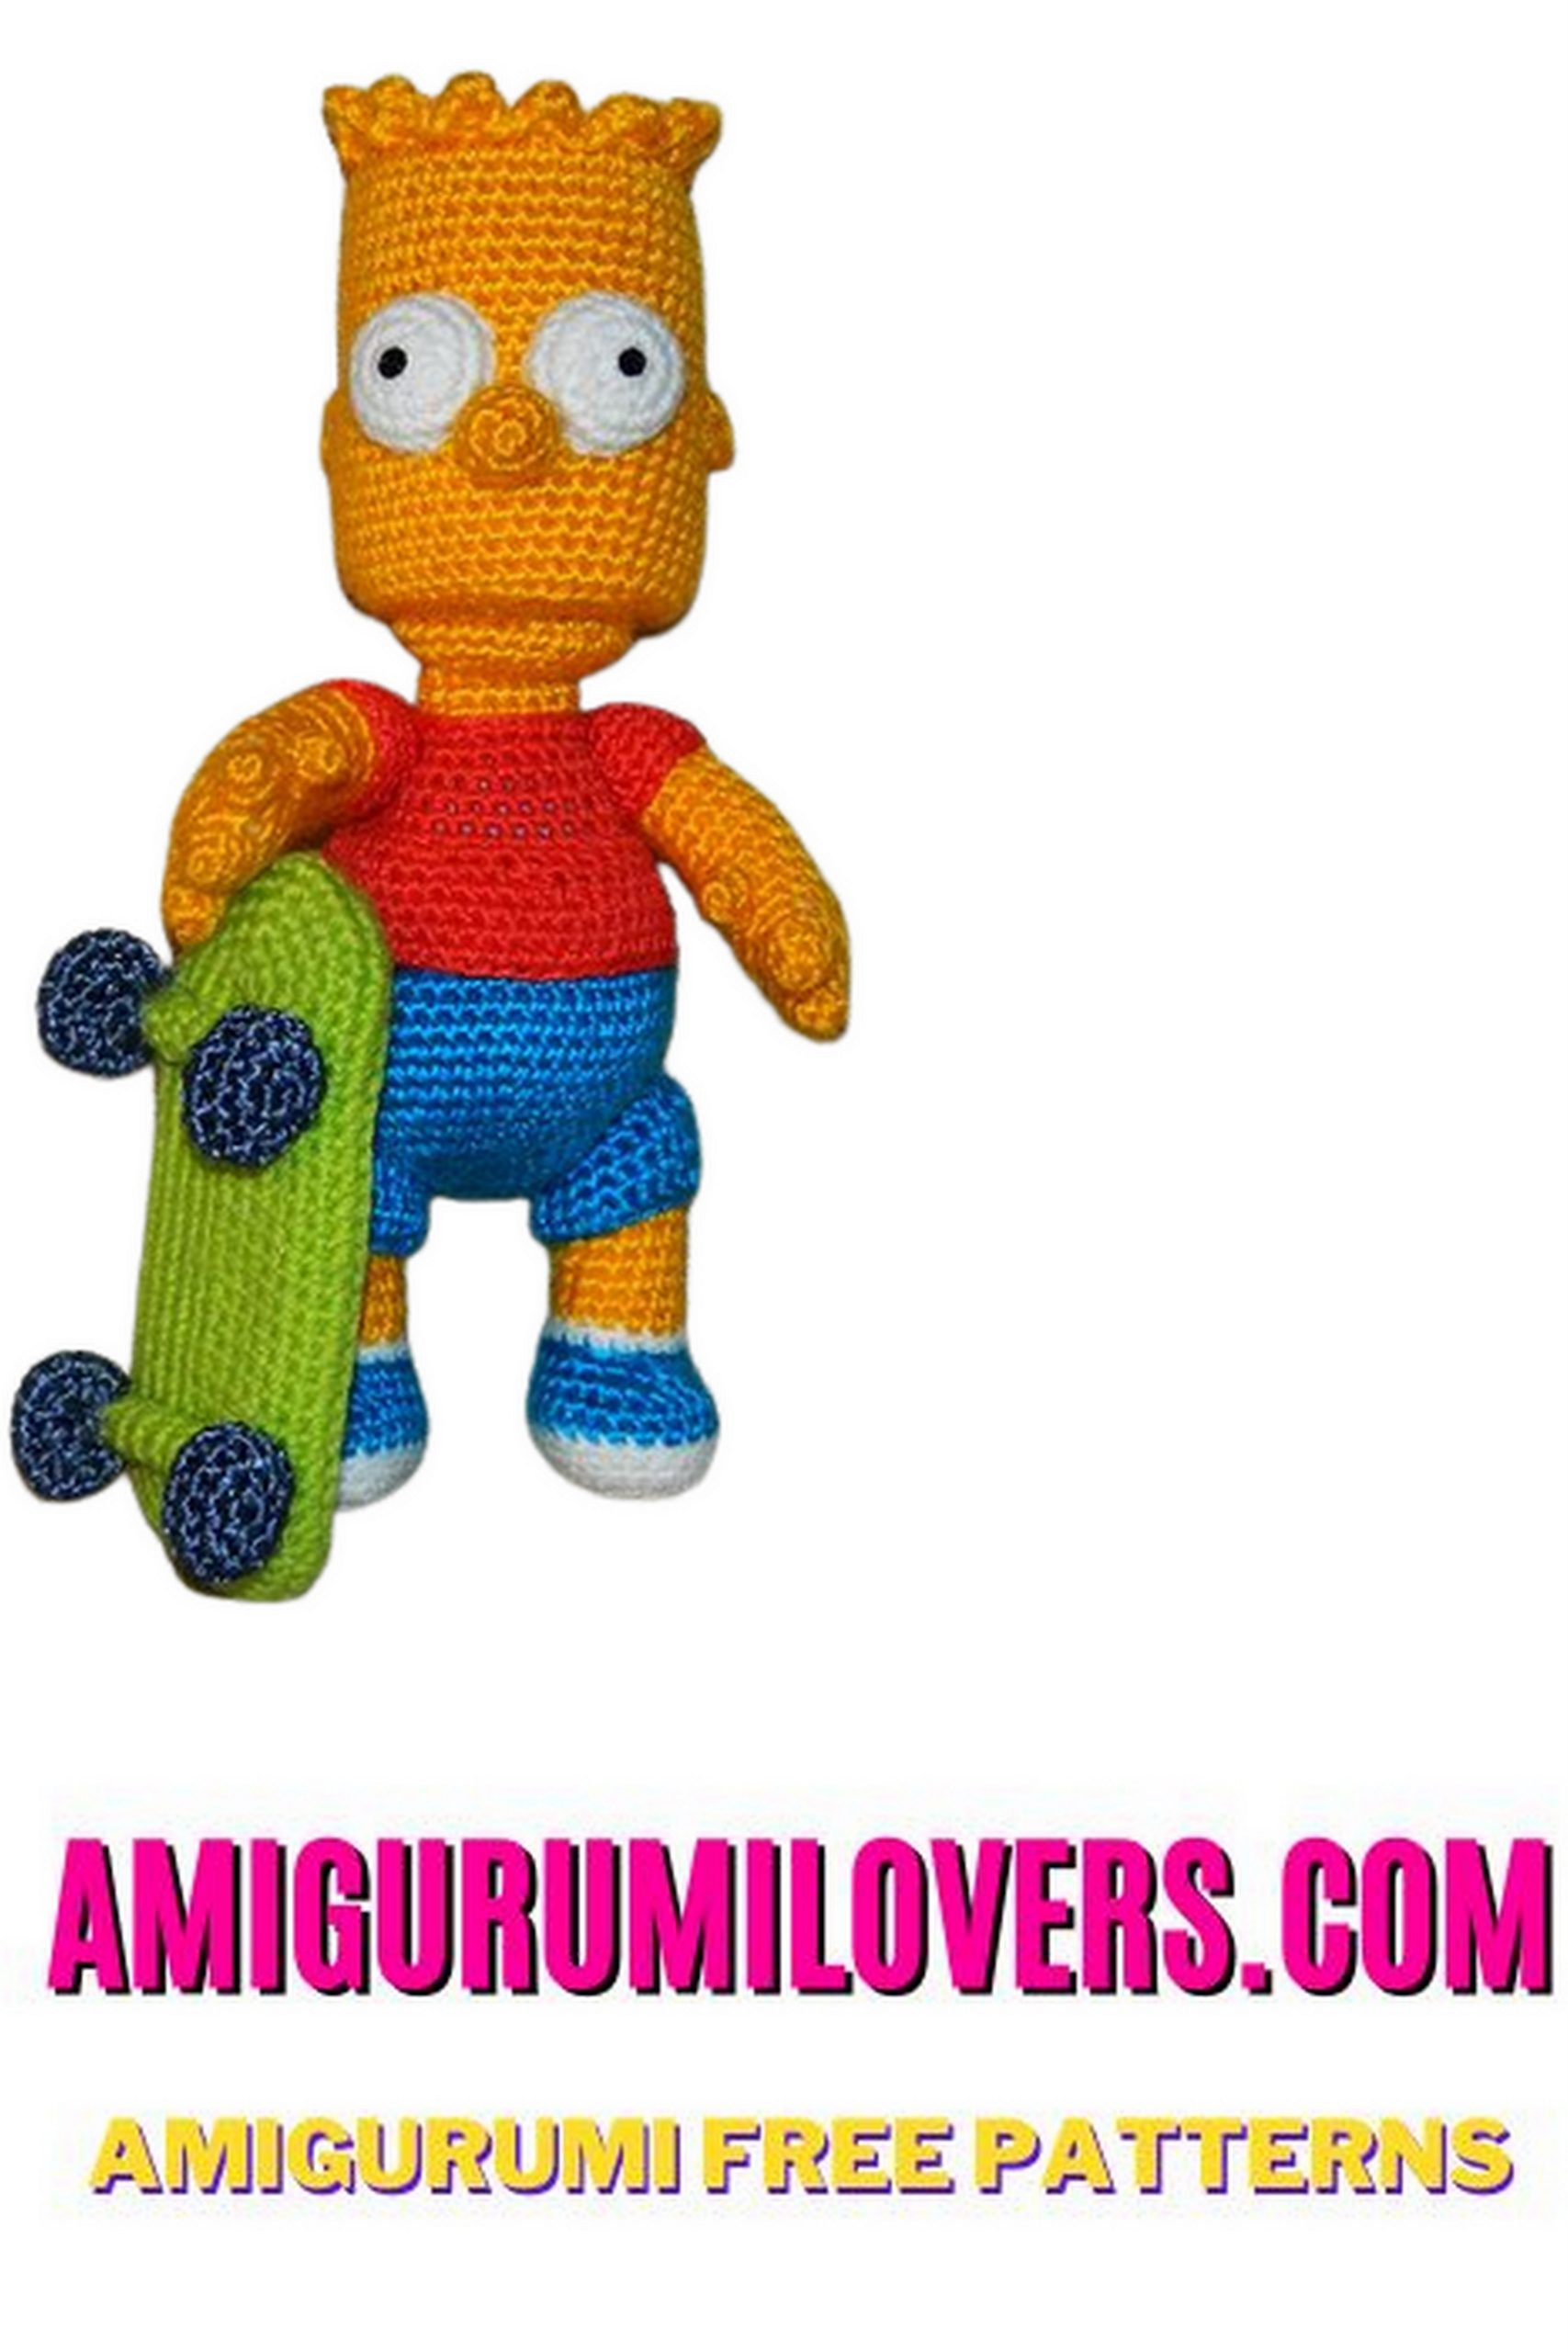
Finish crochet, break of yarn, leaving a long end for sewing to the body. Put trouser-legs on the legs as shown in a picture.
Sew the legs with the body hinged follows: insert a needle with a thread behind the stitch of 17th round of the right leg, insert the needle from right to left in the 6th round of the body, then insert a needle with a thread behind the stitch of 17th round of the left leg (first picture), insert the needle from left to right in the body back (second picture).
Strongly pull the thread ends, tie a knot and hide it in the body. Sew the trouser-legs to the body.
Hands (2 pieces):
Crochet yellow thread circular.
You need to crochet 4 fingers for each hand first.
1 round – amigurumi ring, 5 Sc (5)
2 round – 5 Sc (5).
Fill the fingers of padding polyester. Break off and hide the thread (two fingers). Break off the thread and leave a long end for sewing (1 finger), do not break off the thread (1 finger).
Connect 3 fingers in the next round.
3 round – crochet 3 Sc of the first finger, 3 Sc of the second finger, 5 Sc of the third finger, 3 Sc of the second (middle) finger, 3 Sc of the first finger. Finally you must have round with 16 Sc.
4 round – 16 Sc (16).
5 round – 4 Sc, 1 Dec, 6 Sc, 1 Dec, 2 Sc (14)
6 – 9 rounds – 14 Sc (14)
10 round – 1 Dec, 12 Sc (13)
11 – 14 rounds – 13 Sc (13)
15 round – 1 Dec, 11 Sc (12)
16 round – (1 Sc, 1 Dec) rep 4 times (8)
17 round – 4 Dec (4).
Finish crochet. Break off yarn, sew up the hole. Fill the hand of padding polyester tightly.
Sew the fourth finger to the handbreadth. Make left and right hands.
Sleeves (2 pieces):
Crochet red thread circular.
1 round – amigurumi ring, 5 Sc (5)
2 round – 5 Inc (10)
3 round – (1 Sc, 1 Inc) rep 5 times (15)
4 – 6 rounds – Unchanged (15)
Finish crochet, break of yarn, leaving a long end for sewing to the hands.
Put sleeves on the hands and sew it.
Sew the hands with the body hinged too.
Sew the head to the body.
Ears (2 Pieces):
Crochet yellow thread.
1 round – cast on2 Chs, crochet in the second loop from the hook 1 Sc, 1 Hdc, 2 Dc, 1 Hdc, 1 Sc.
Finish crochet, break of yarn, leaving a long end for sewing to the head. Sew it.
Paint eyes with black acrylic (see pictures).
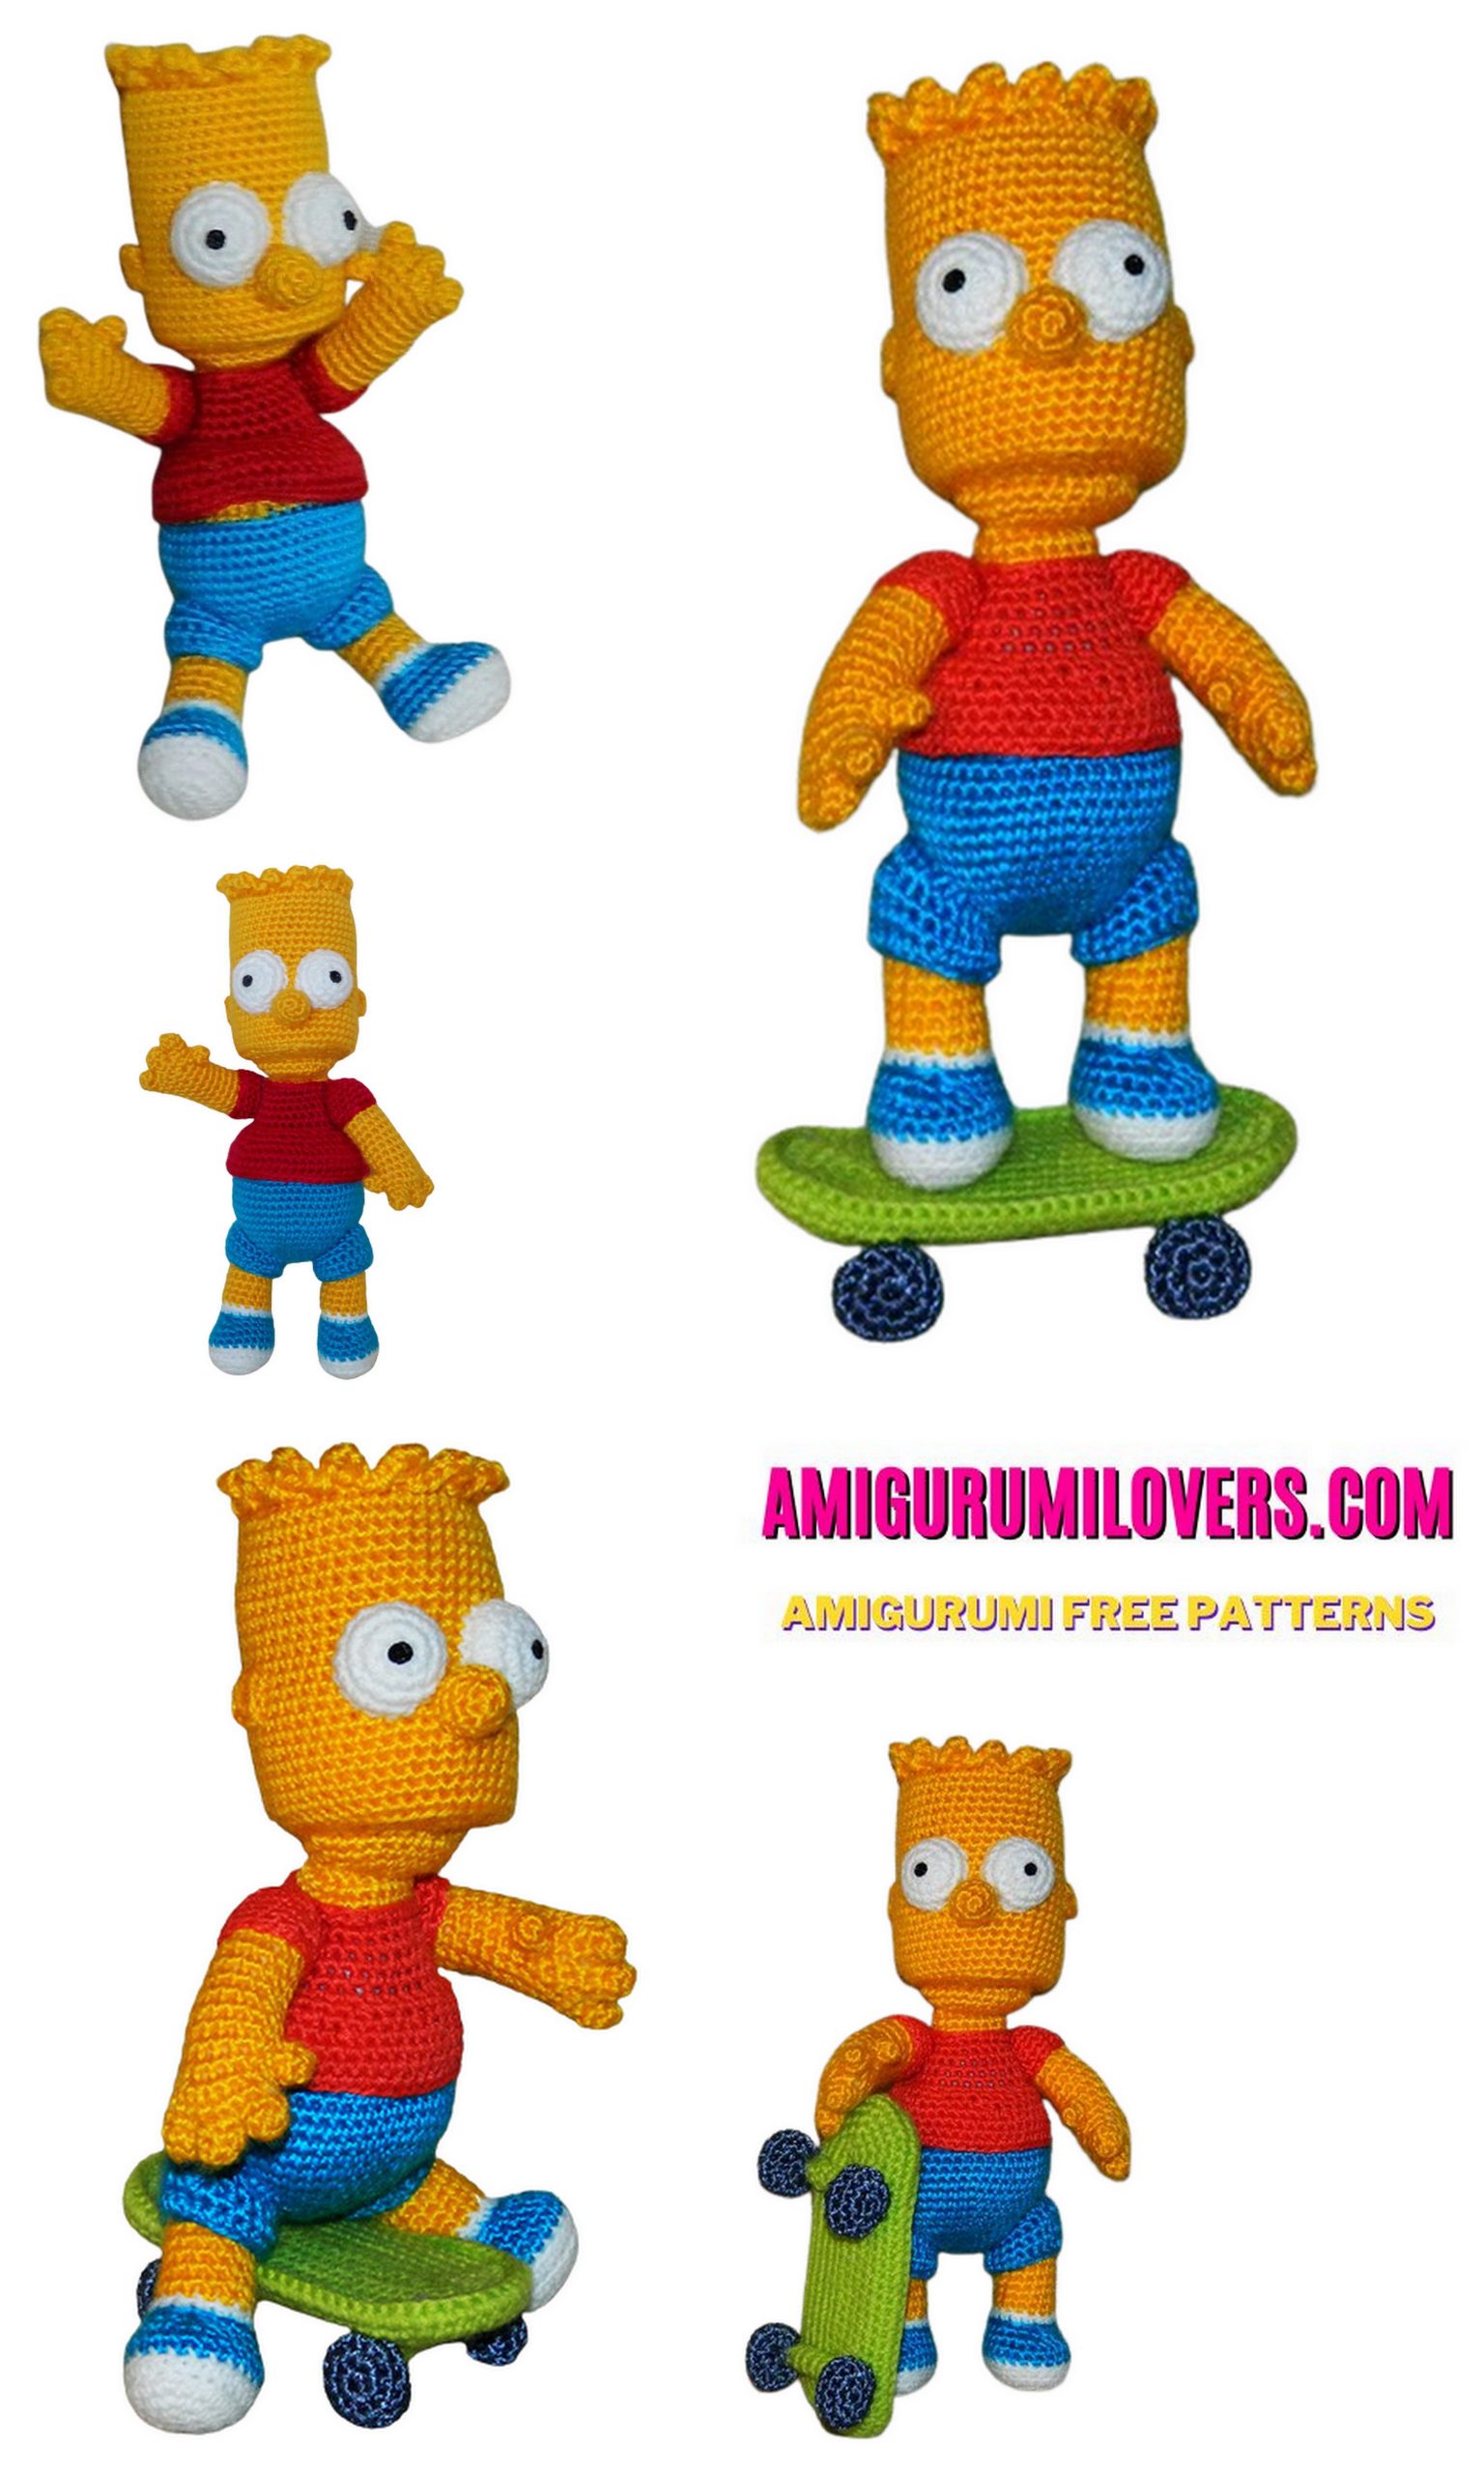
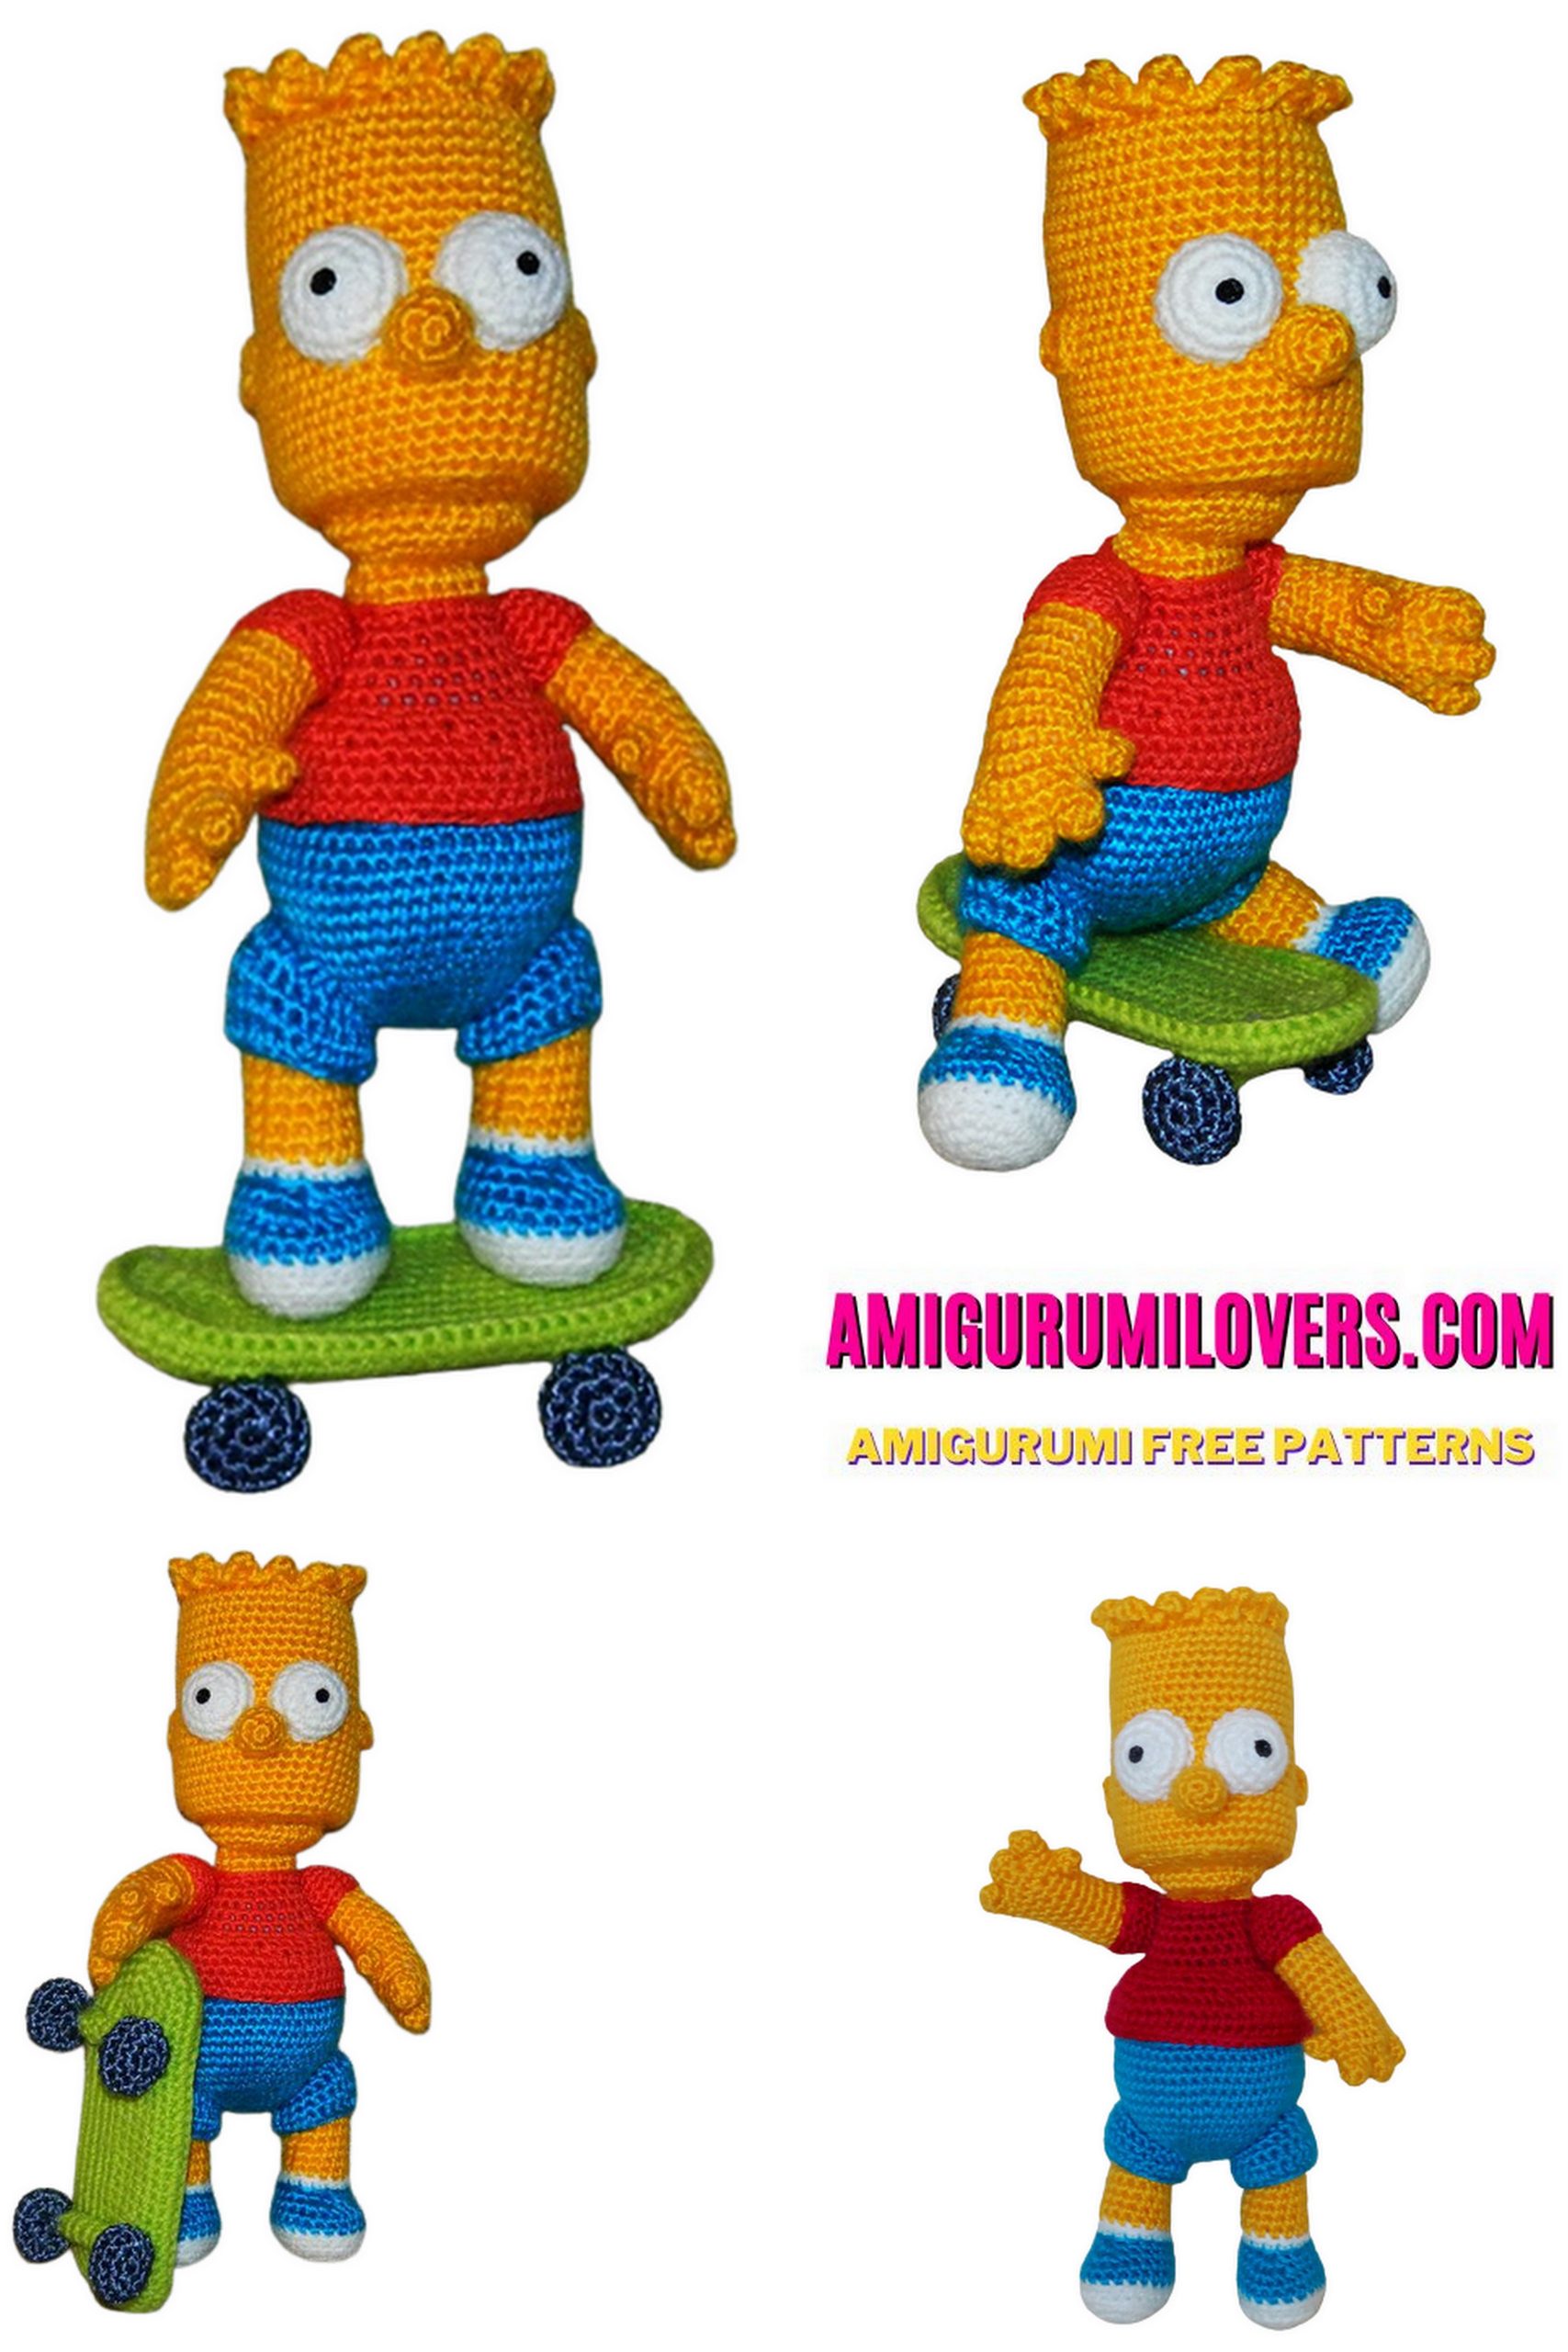
Your Bart Simpson is ready!
Before you leave, make sure to check out more free amigurumi crochet patterns and discover new ideas for your next project.
You can also browse our full amigurumi pattern archive for hundreds of beginner-friendly designs.