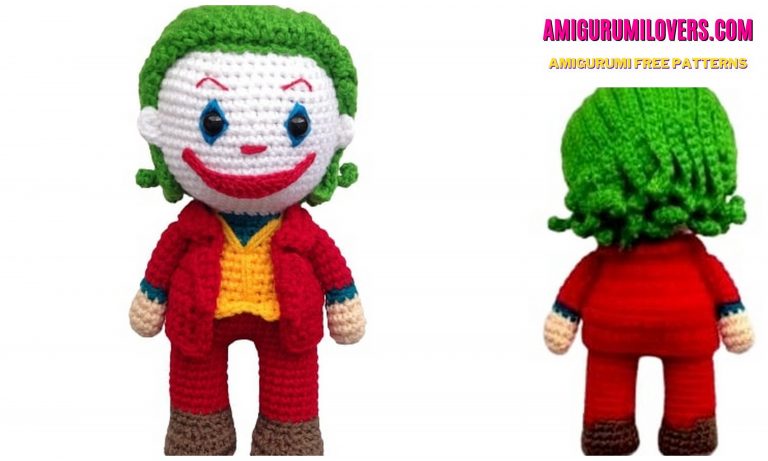
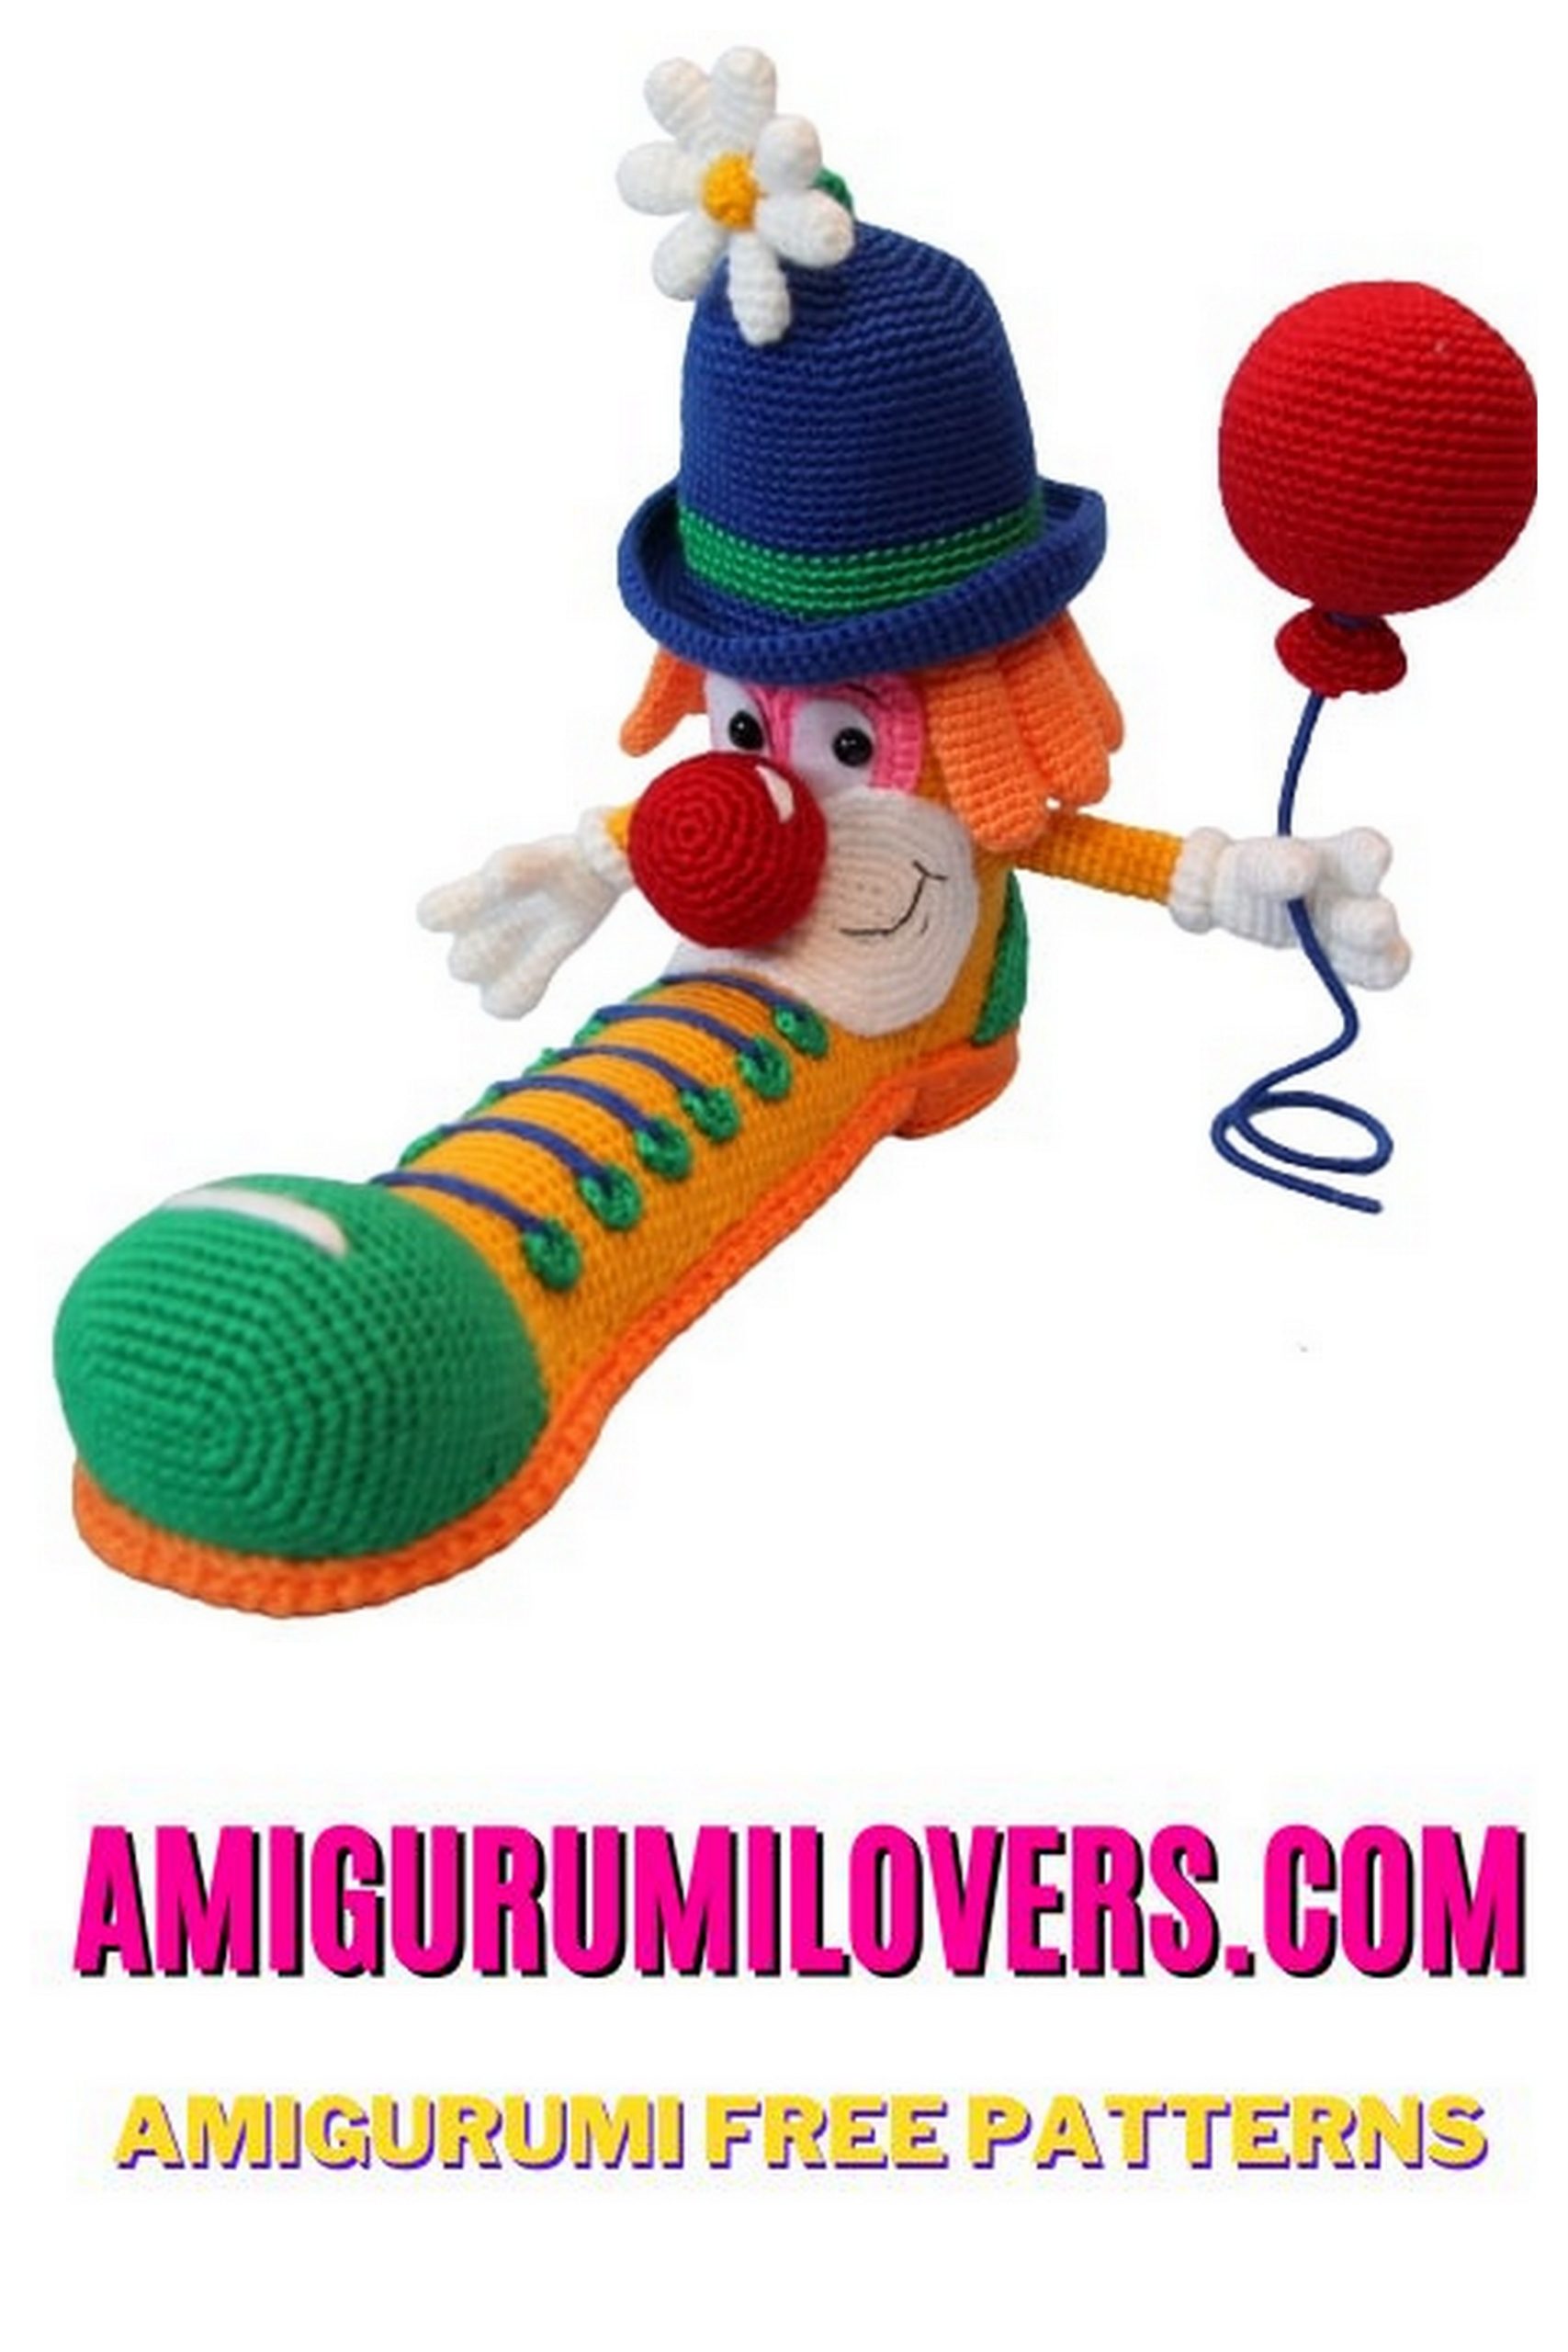
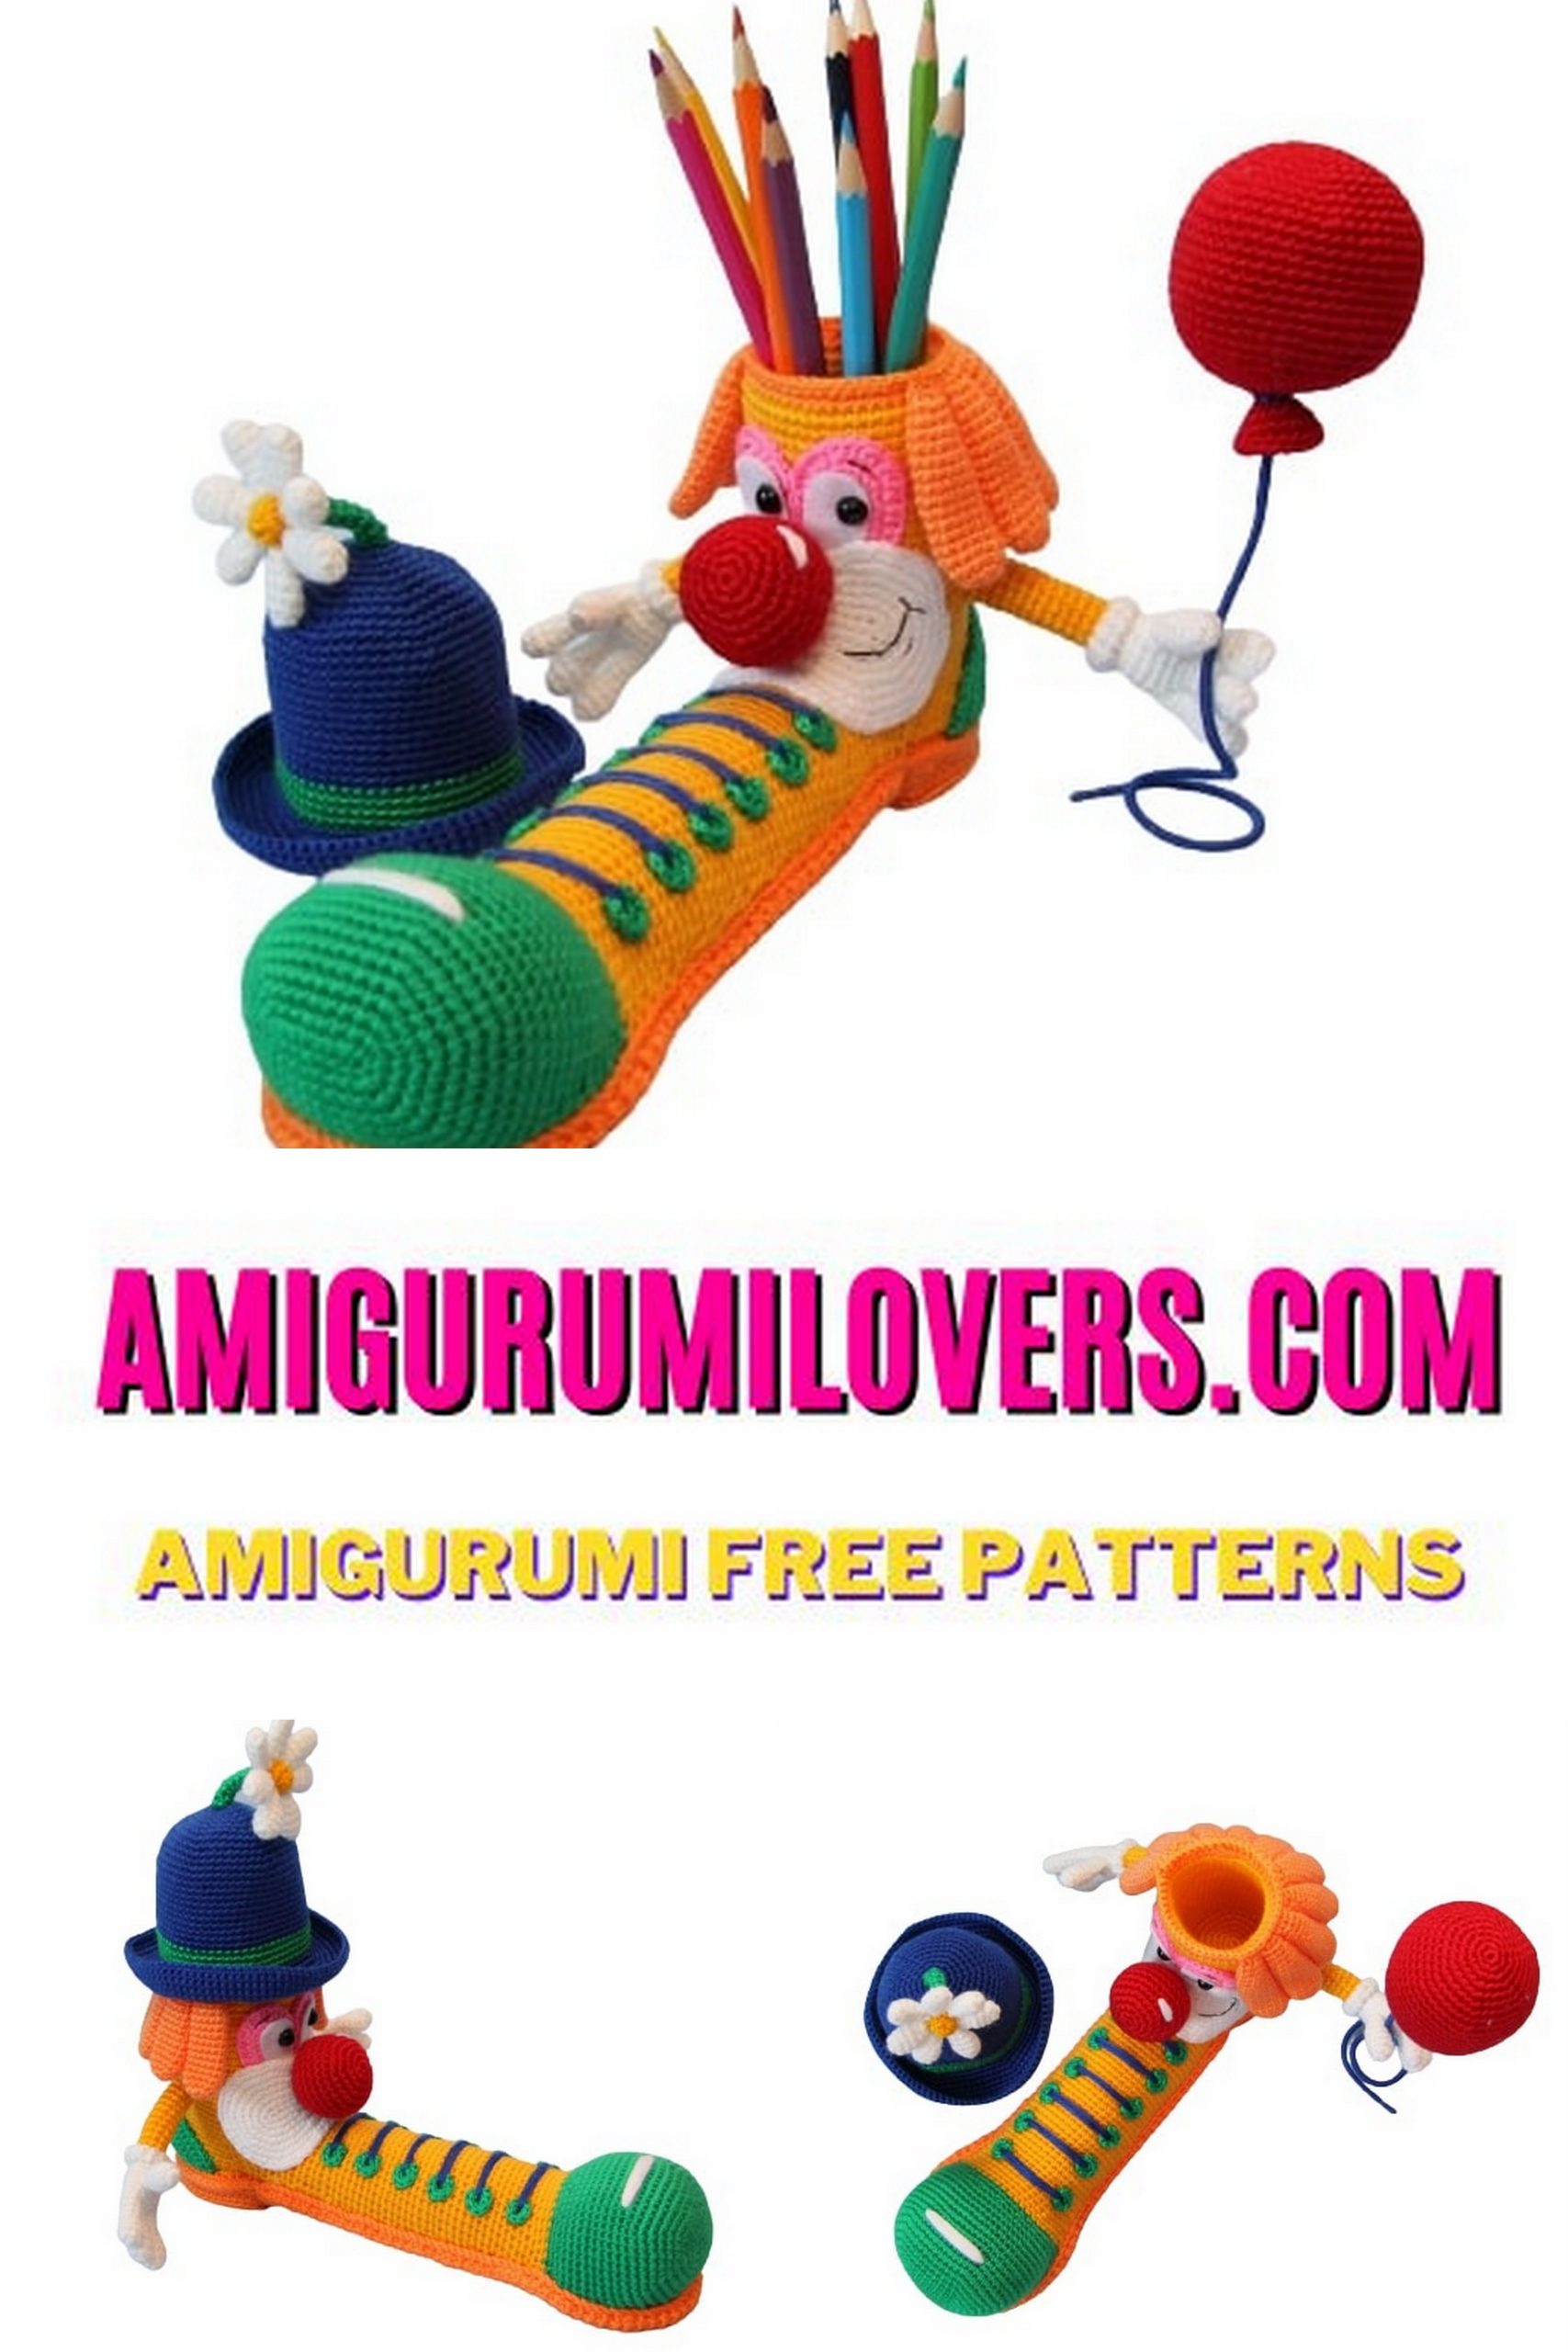
Craft a Smile with the Amigurumi Clown Pencil Holder Free Crochet Pattern
You may also enjoy exploring our free amigurumi patterns and other popular amigurumi animal patterns available on our website.
Welcome to our crochet corner, where creativity meets functionality! If you’re looking for a delightful project that adds a pop of joy to your workspace, you’ve come to the right place. Today, we’re excited to share our free crochet pattern for an Amigurumi Clown Pencil Holder. This charming little fellow is not only a fun way to organize your writing tools but also serves as a whimsical decoration that can brighten up any desk or craft area.
Amigurumi, the art of crocheting small, stuffed toys, has gained massive popularity among crafters of all ages. Its playful nature and endless possibilities for customization make it a beloved choice for beginners and experienced crocheters alike. This clown pencil holder is an ideal project for those new to amigurumi as it incorporates basic crochet techniques while offering opportunities to explore your creativity. With easy-to-follow instructions and a colorful design, you’ll be crafting a smile in no time!
One of the best aspects of working with amigurumi is that it encourages you to experiment with colors and textures. For our clown pencil holder, we’ve chosen a vibrant palette inspired by classic circus themes, but feel free to let your imagination run wild! Whether you want to create a pastel clown or a more traditional style, this pattern can easily accommodate your personal flair. Don’t worry if you’re not yet a master crocheter; this project is perfect for honing your skills while having fun!
Crafting this amigurumi clown pencil holder can provide not just a delightful finished product but also a sense of accomplishment as you watch it come to life, stitch by stitch. Plus, it’s a wonderful way to introduce children or beginners to the world of crochet, as they can join you in this festive project. By creating something both functional and adorable, you will soon find a new favorite piece on your desk.
In addition to being a great addition to your own workspace, the clown pencil holder makes a thoughtful and unique gift for friends, family, or even fellow crafters. Imagine how perfect it would be to present it as a gift, filled with colorful pens and pencils! It’s a simple yet heartfelt gesture that is sure to bring a smile to anyone’s face.
So, grab your yarn, hook, and some colorful embellishments, and let’s dive into the whimsical world of amigurumi! With our easy-to-follow directions, you’ll be well on your way to crafting your very own clown pencil holder. Let’s get started on this joyful crochet adventure that will undoubtedly bring a smile not just to your face, but to everyone around you!
Step right up to a crochet project that will brighten your crafting space and keep you organized! Our Amigurumi Clown Pencil Holder Free Crochet Pattern is the perfect blend of fun and functionality. Whether you’re a seasoned crochet artist or a newcomer to the craft, this project promises a delightful experience. Join us as we guide you through creating this adorable and practical clown-inspired pencil holder.
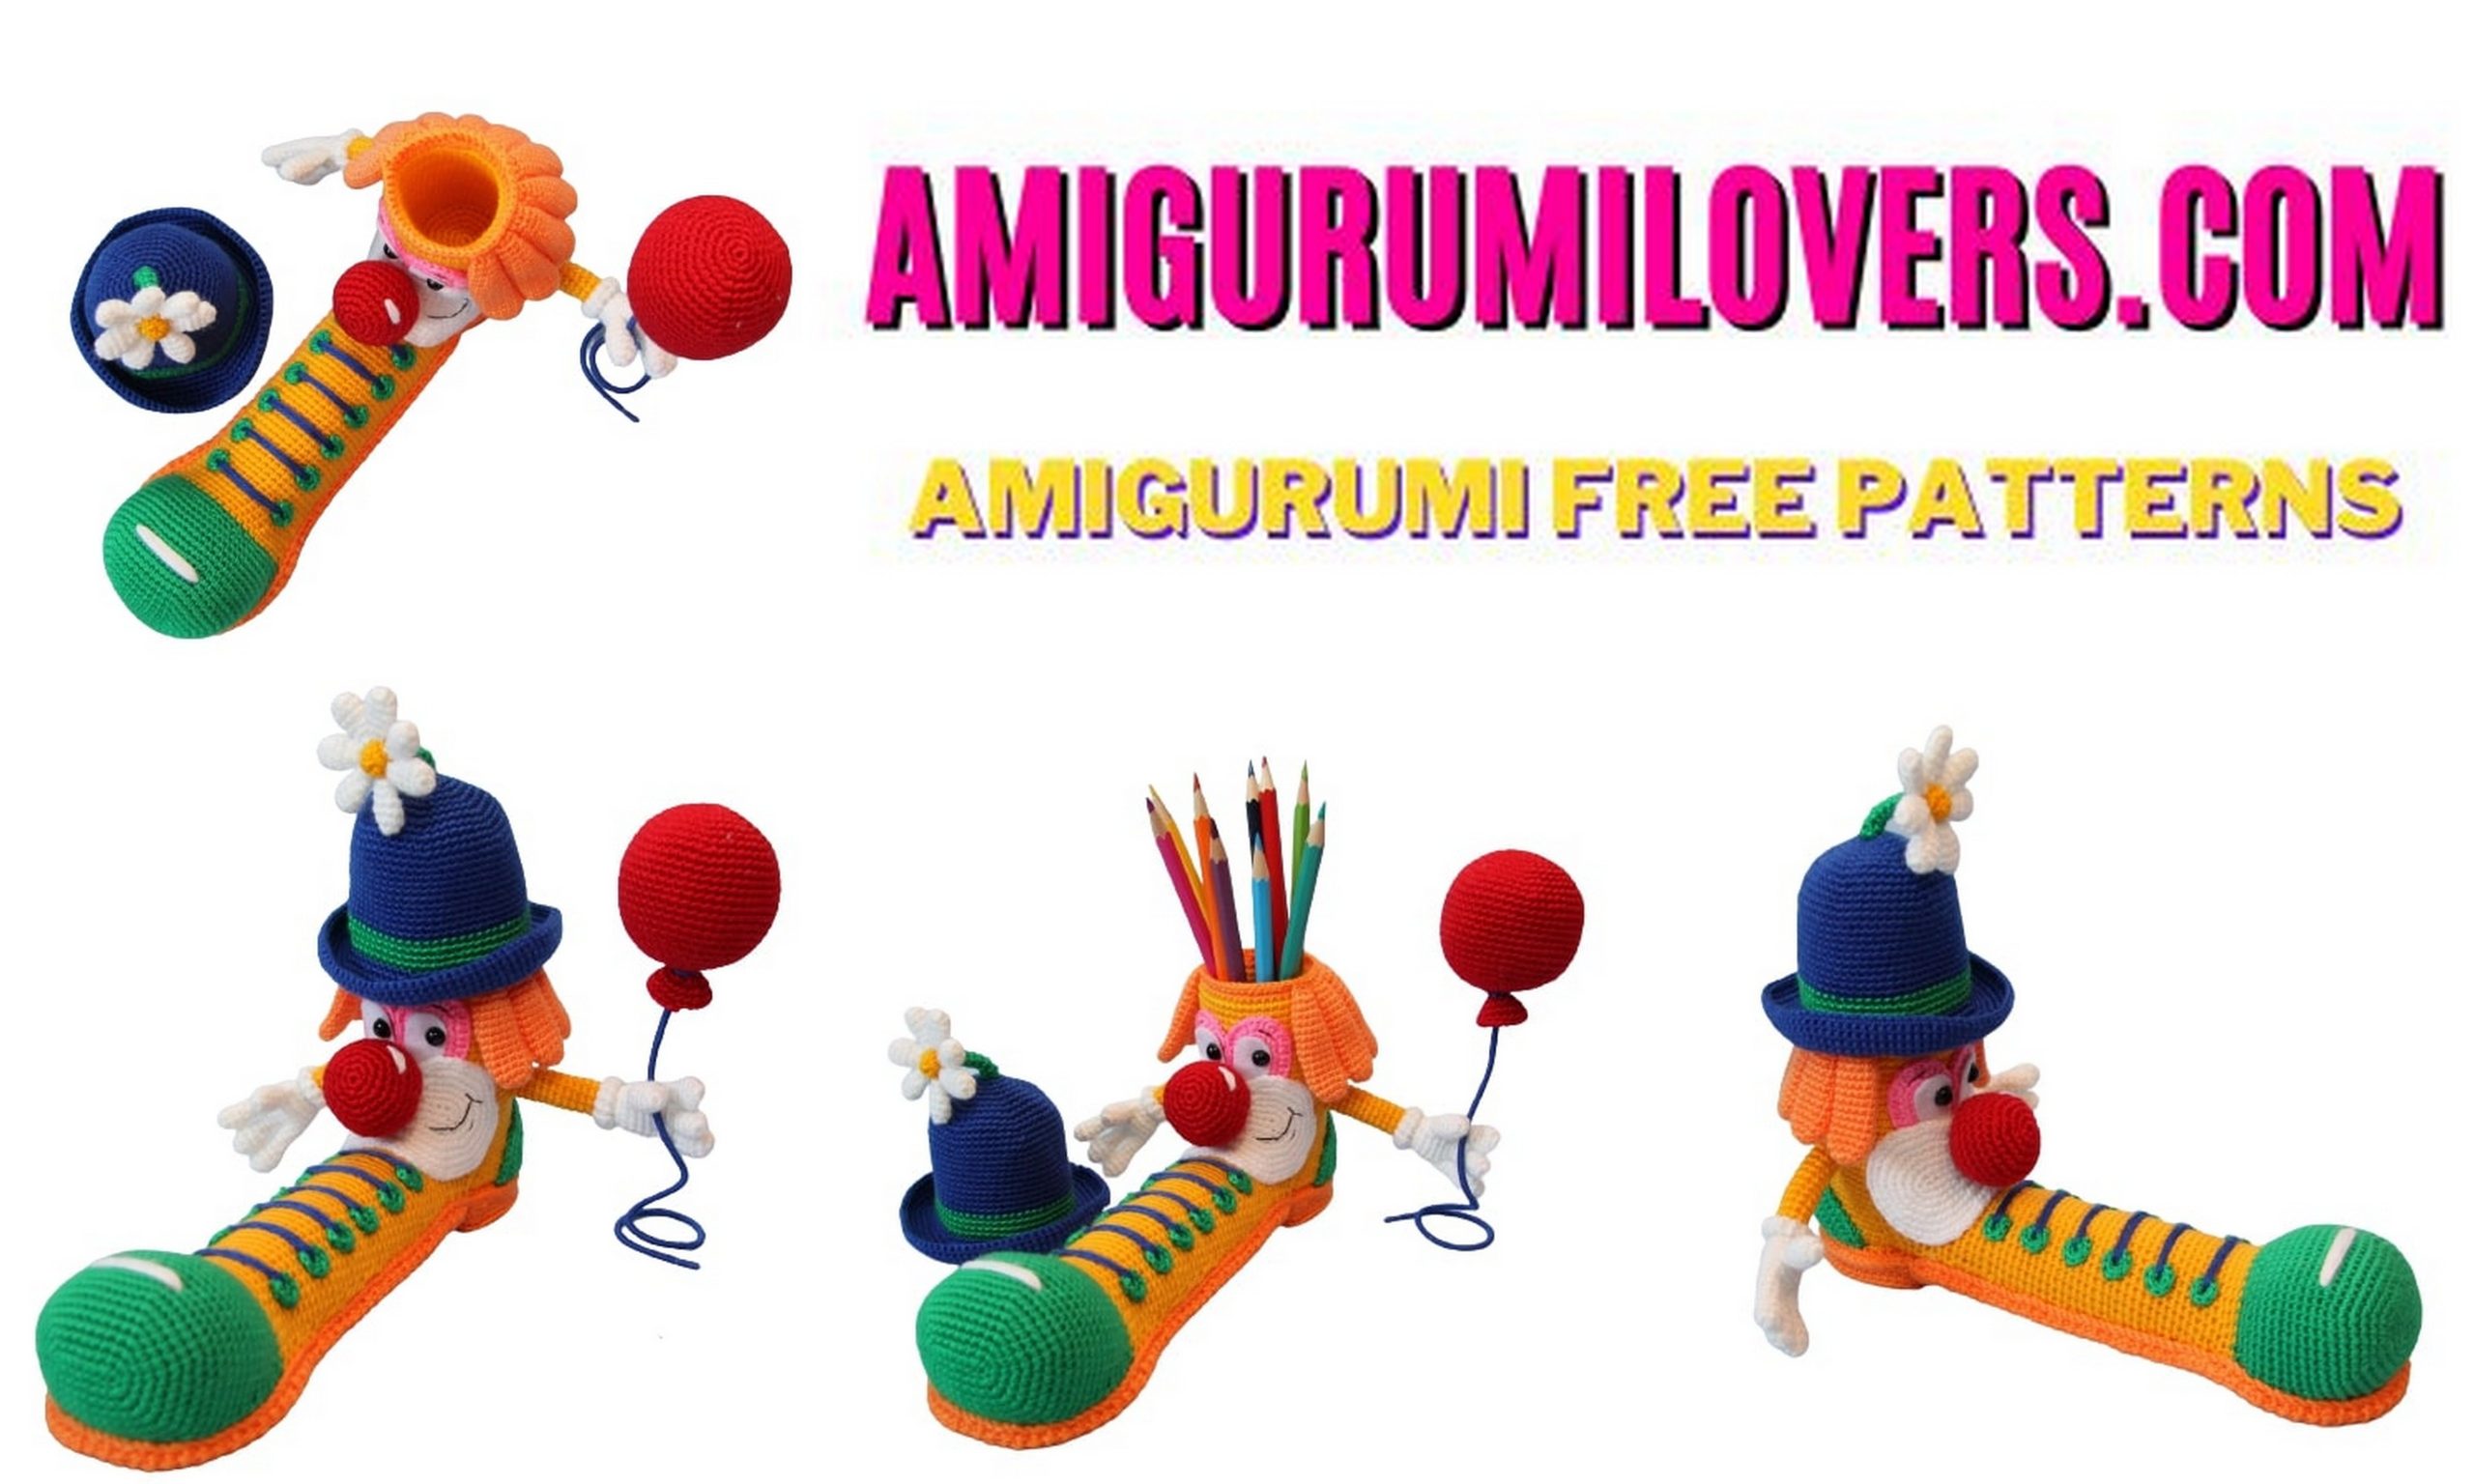
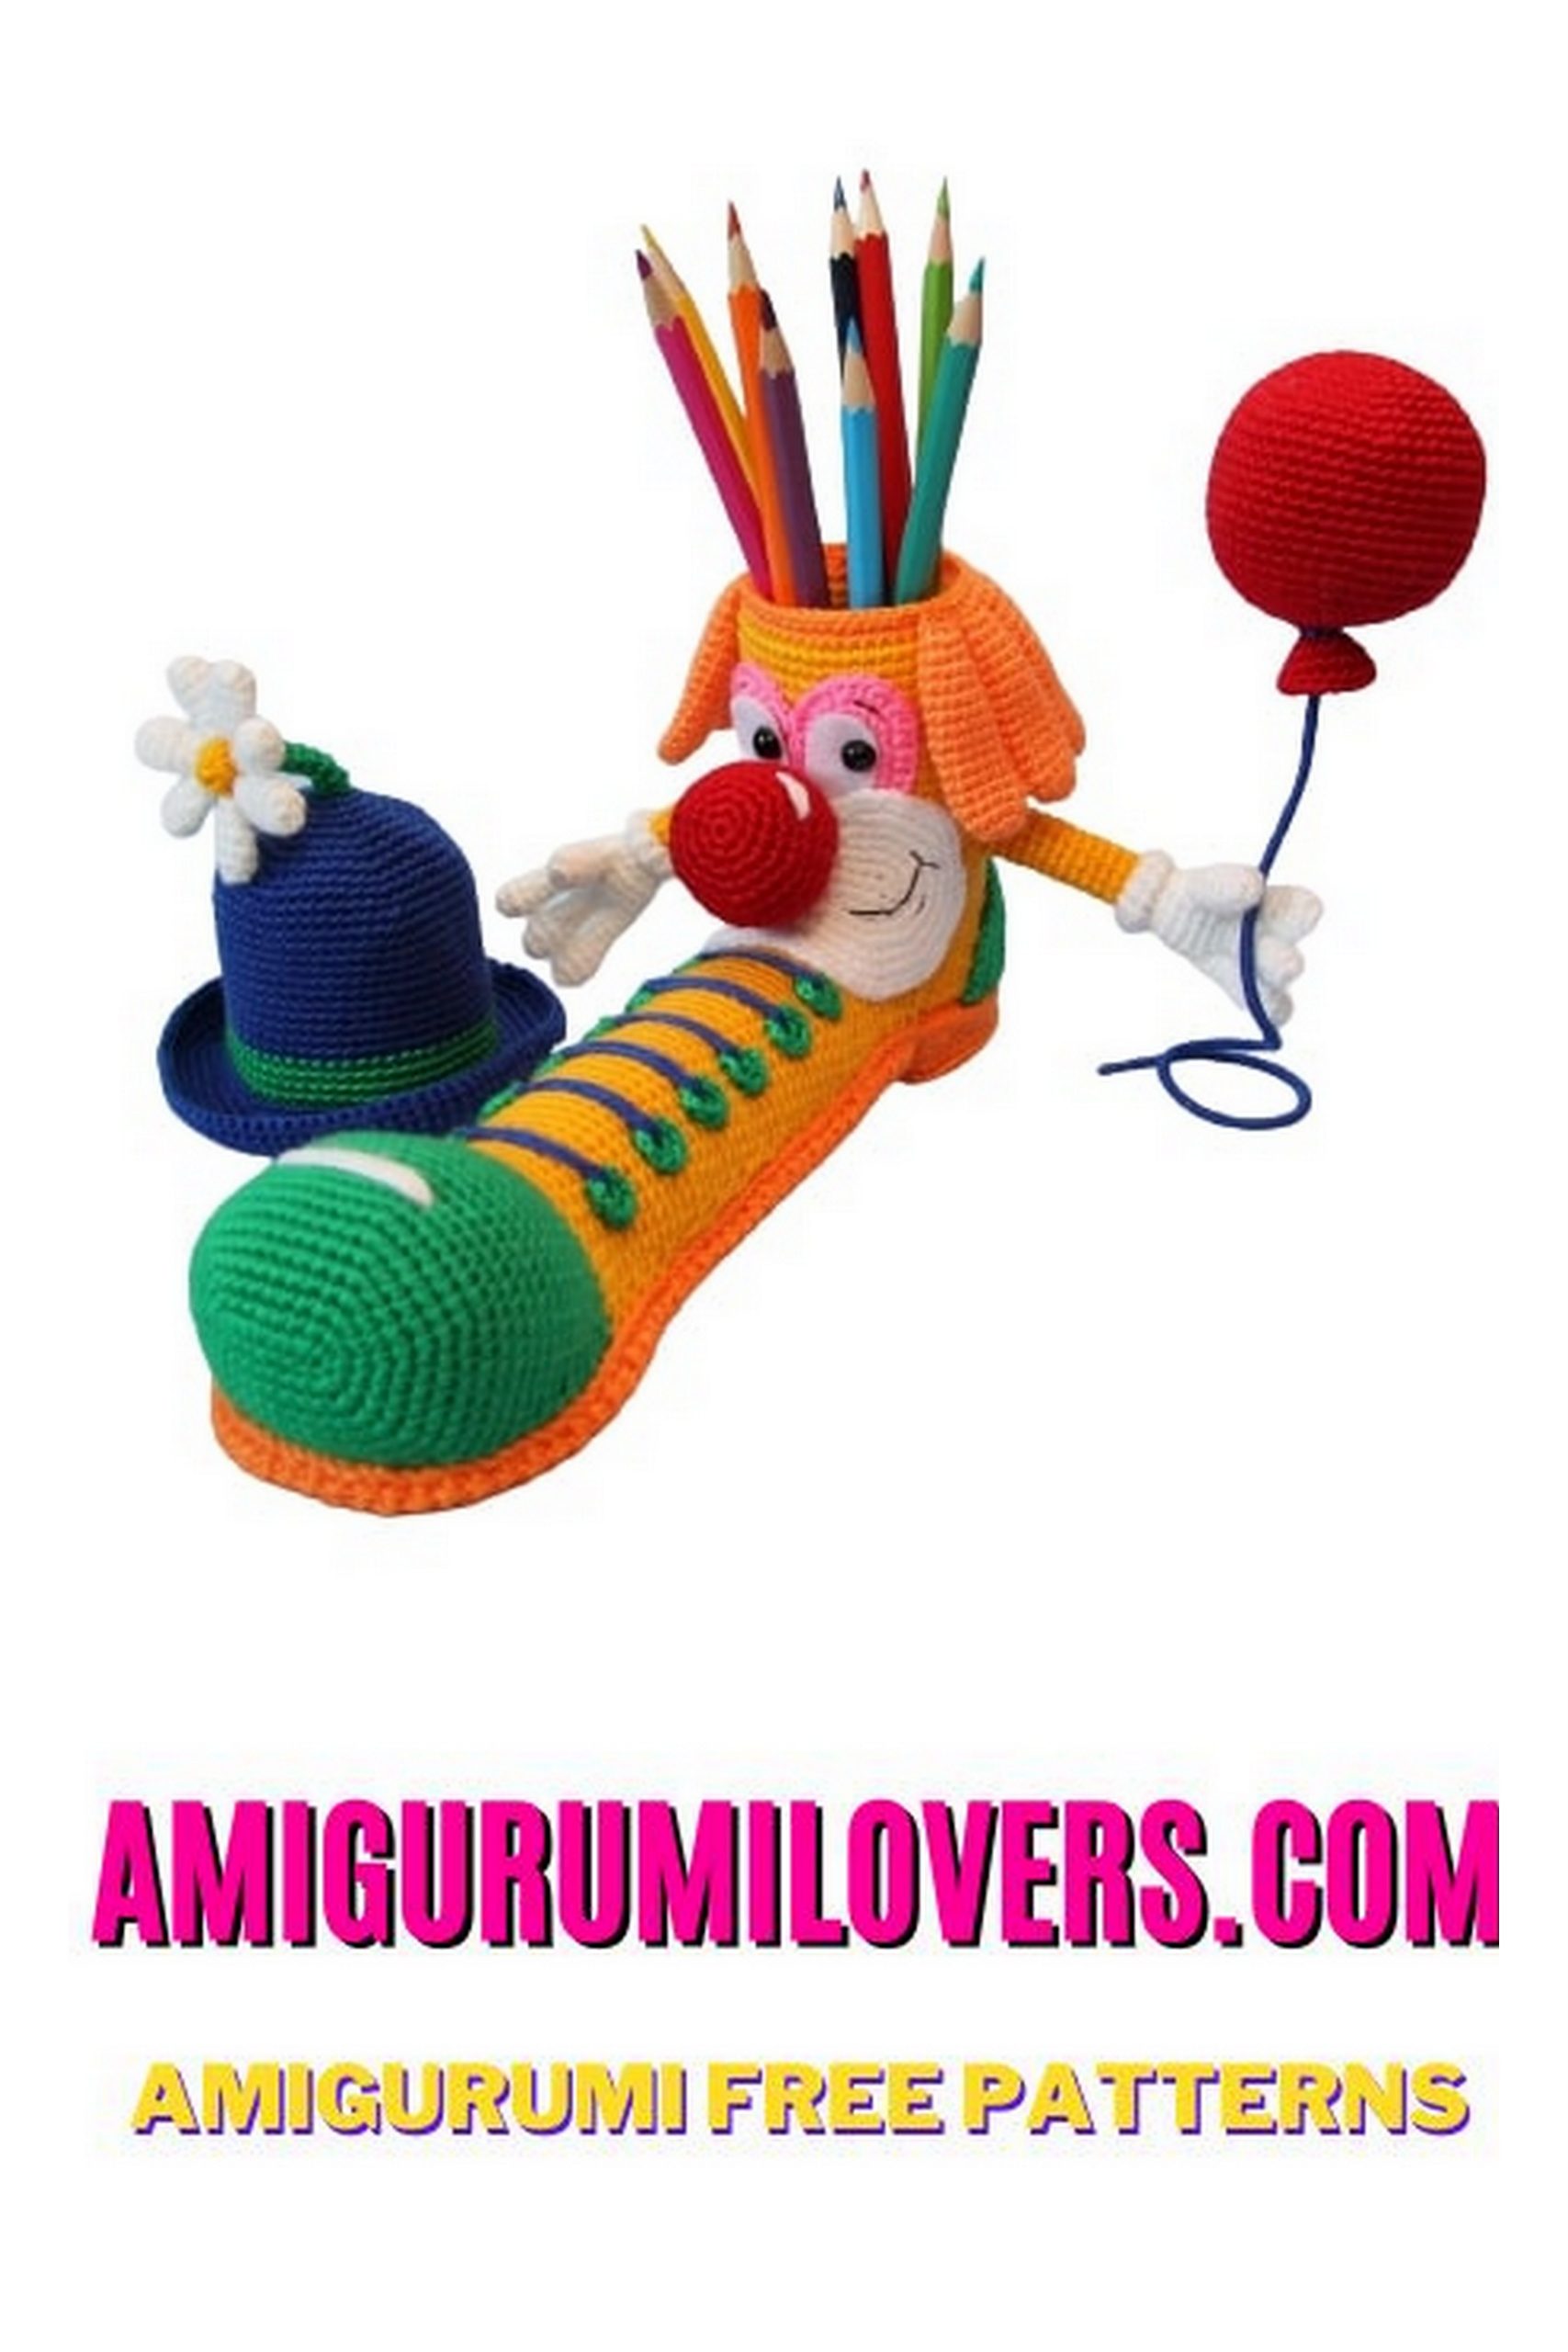
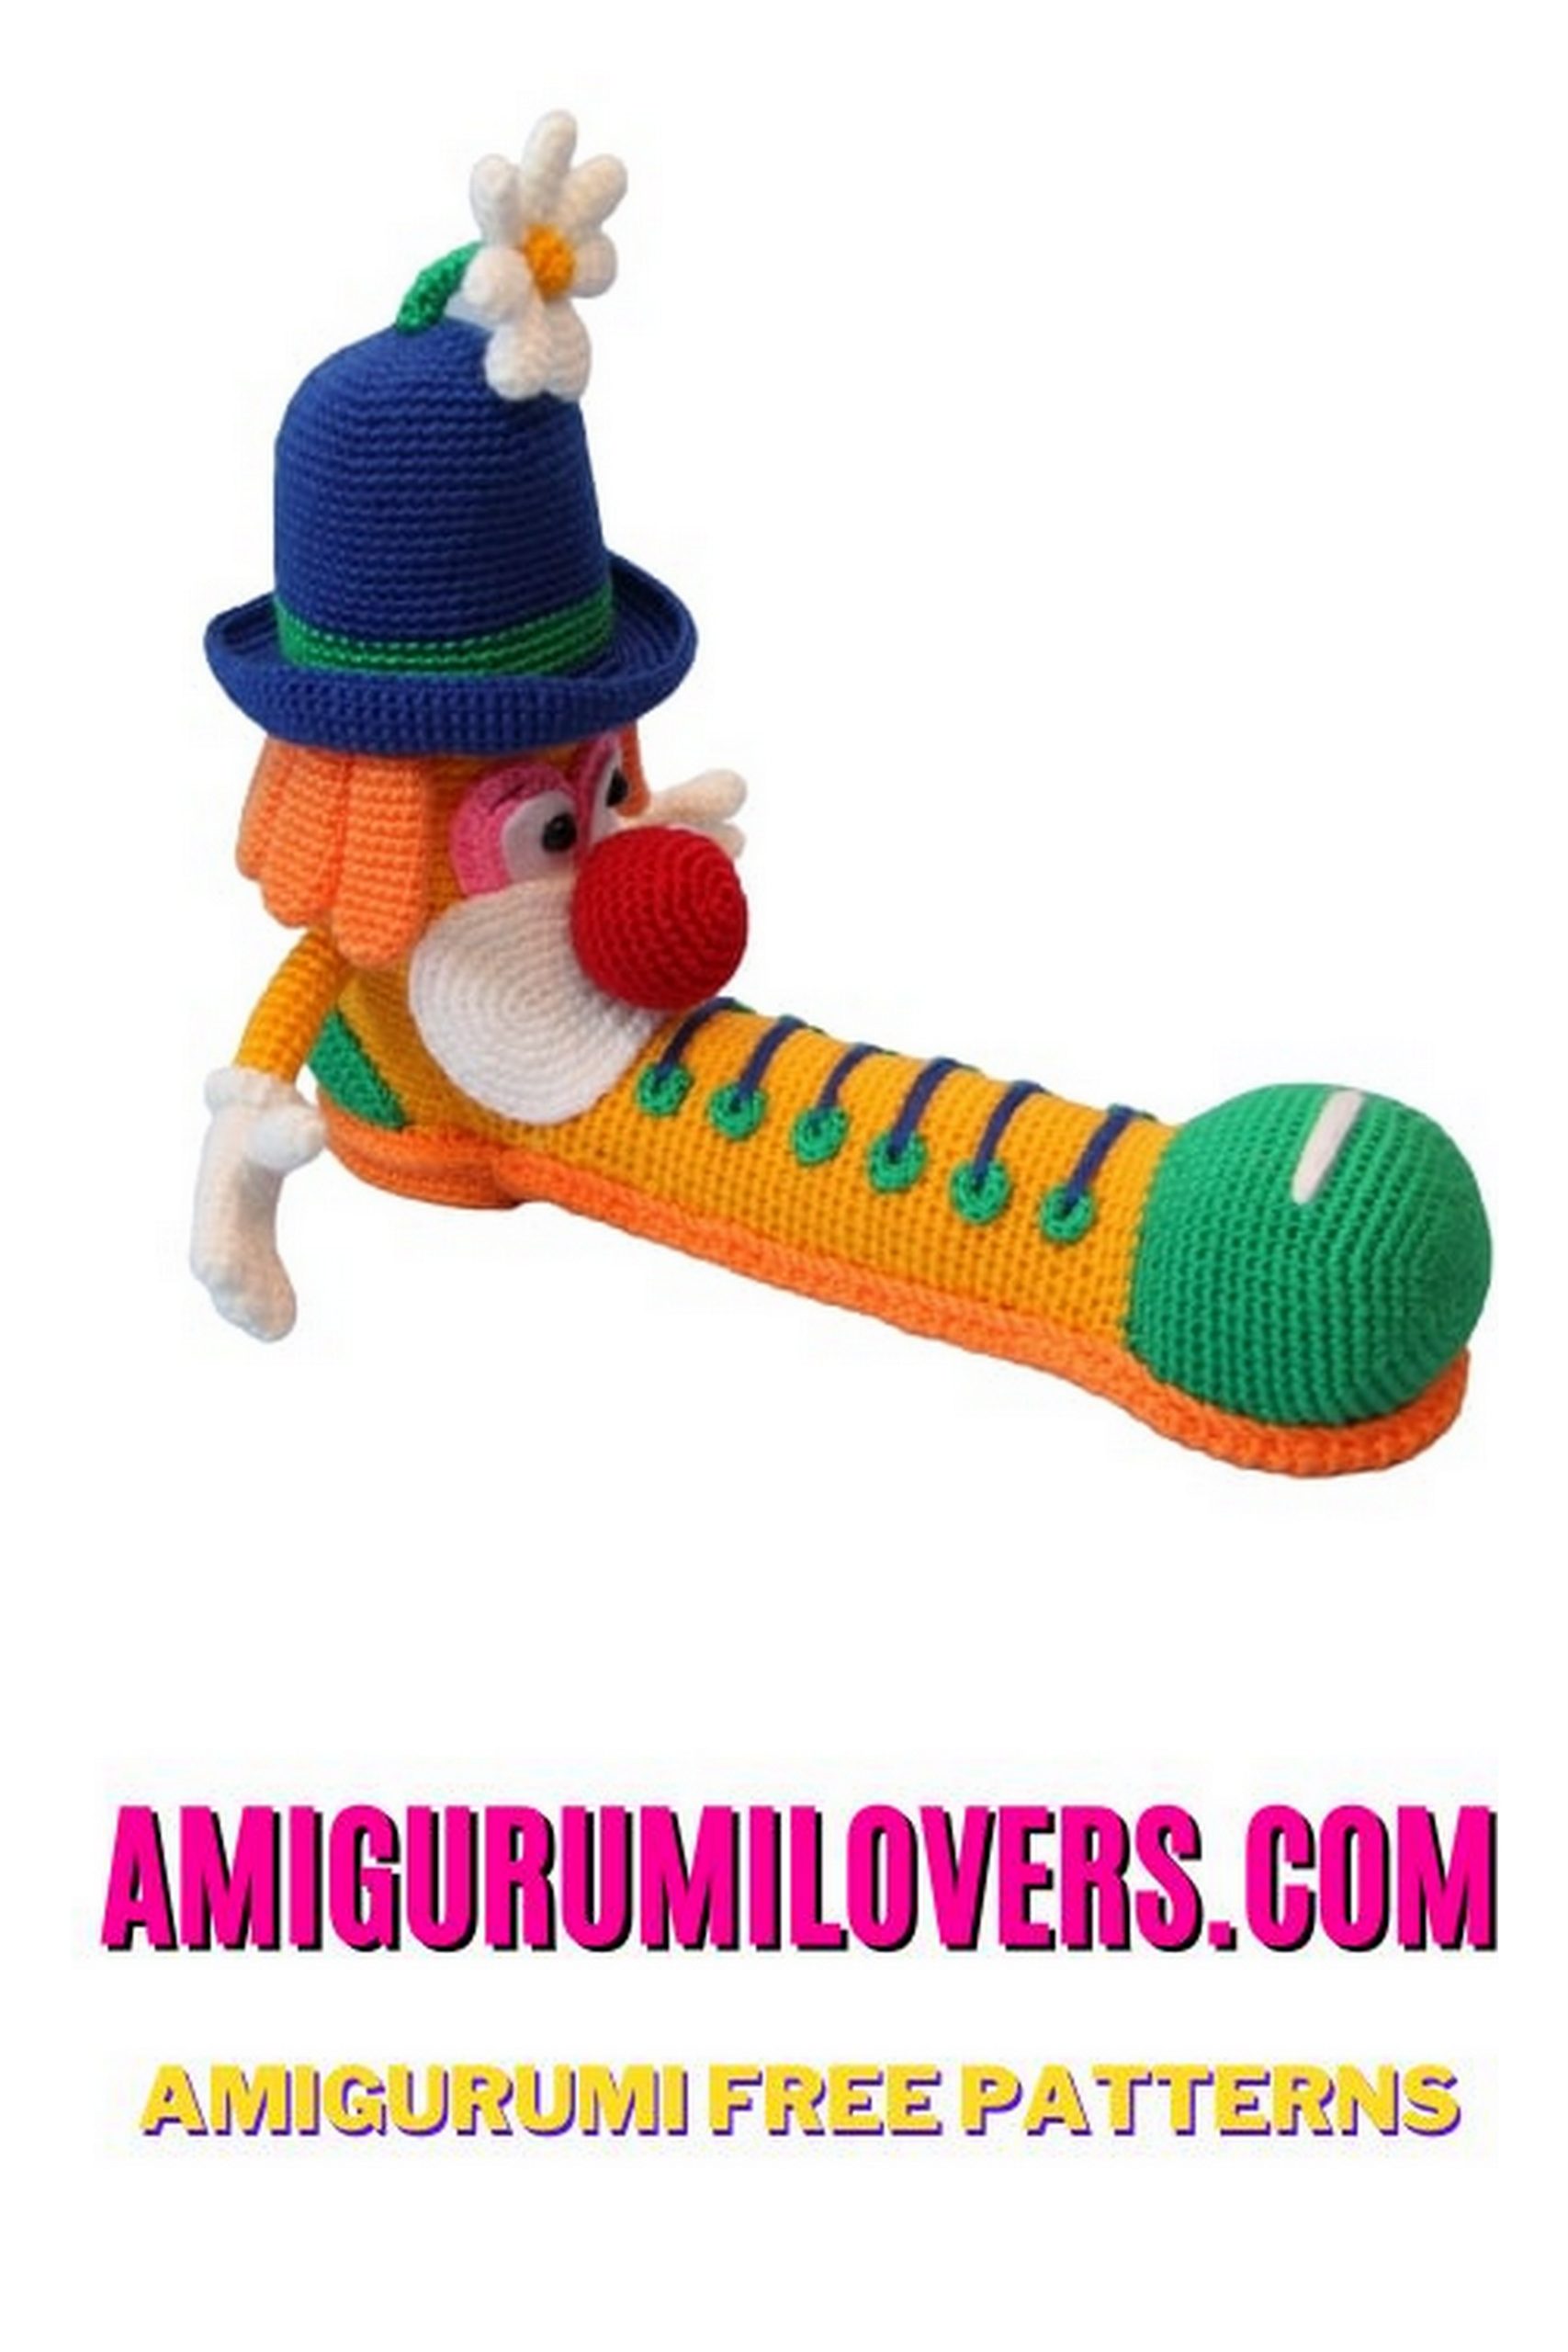
The Amigurumi Clown Pencil Holder Free Crochet Pattern is your ticket to a whimsical and organized workspace. This pattern includes detailed, easy-to-follow instructions that cater to crocheters of all skill levels. As you crochet your way through this project, you’ll bring to life a cheerful clown character designed to hold your pens, pencils, or art supplies. This playful accessory is not only functional but also adds a touch of joy to your crafting or study area. Whether you’re making it for yourself or as a thoughtful gift, this amigurumi pencil holder is sure to put a smile on your face. Grab your crochet hooks and let the crafting carnival begin!
Length – 23 cm, height (with hat) – 20 cm
Materials:
1. Acrylic yarn (300m / 100g): yellow – 100 g, orange – 60 g, green – 30 g, blue – 30g, red – 20 g, white- 30 g, a little pink
2. Crochet needle 1.25
3. Silicone fiber
4. Felt (white)
5- Tapestry needle for sewing
6. Adhesive tape
7. Black beads – 2 pcs.
8. Thick card (plastic)
9. Rigid wire – 35-40 cm.
10. Sewing thread (black)
11. Empty toilet paper roll
ABBREVIATIONS:
ch -chain
sc – single crochet
inc – increase
dec – decrease
hdc – half double crochet
dc -double crochet
* -repeat the specified number of times
The size of the amigurumi depends on the thickness of the thread and the density of your stitch. Work in a spiral without additional hoists. Clown pencil holder.
(Place a marker in the center at the top, so you can to orient yourself when sewing the pieces)
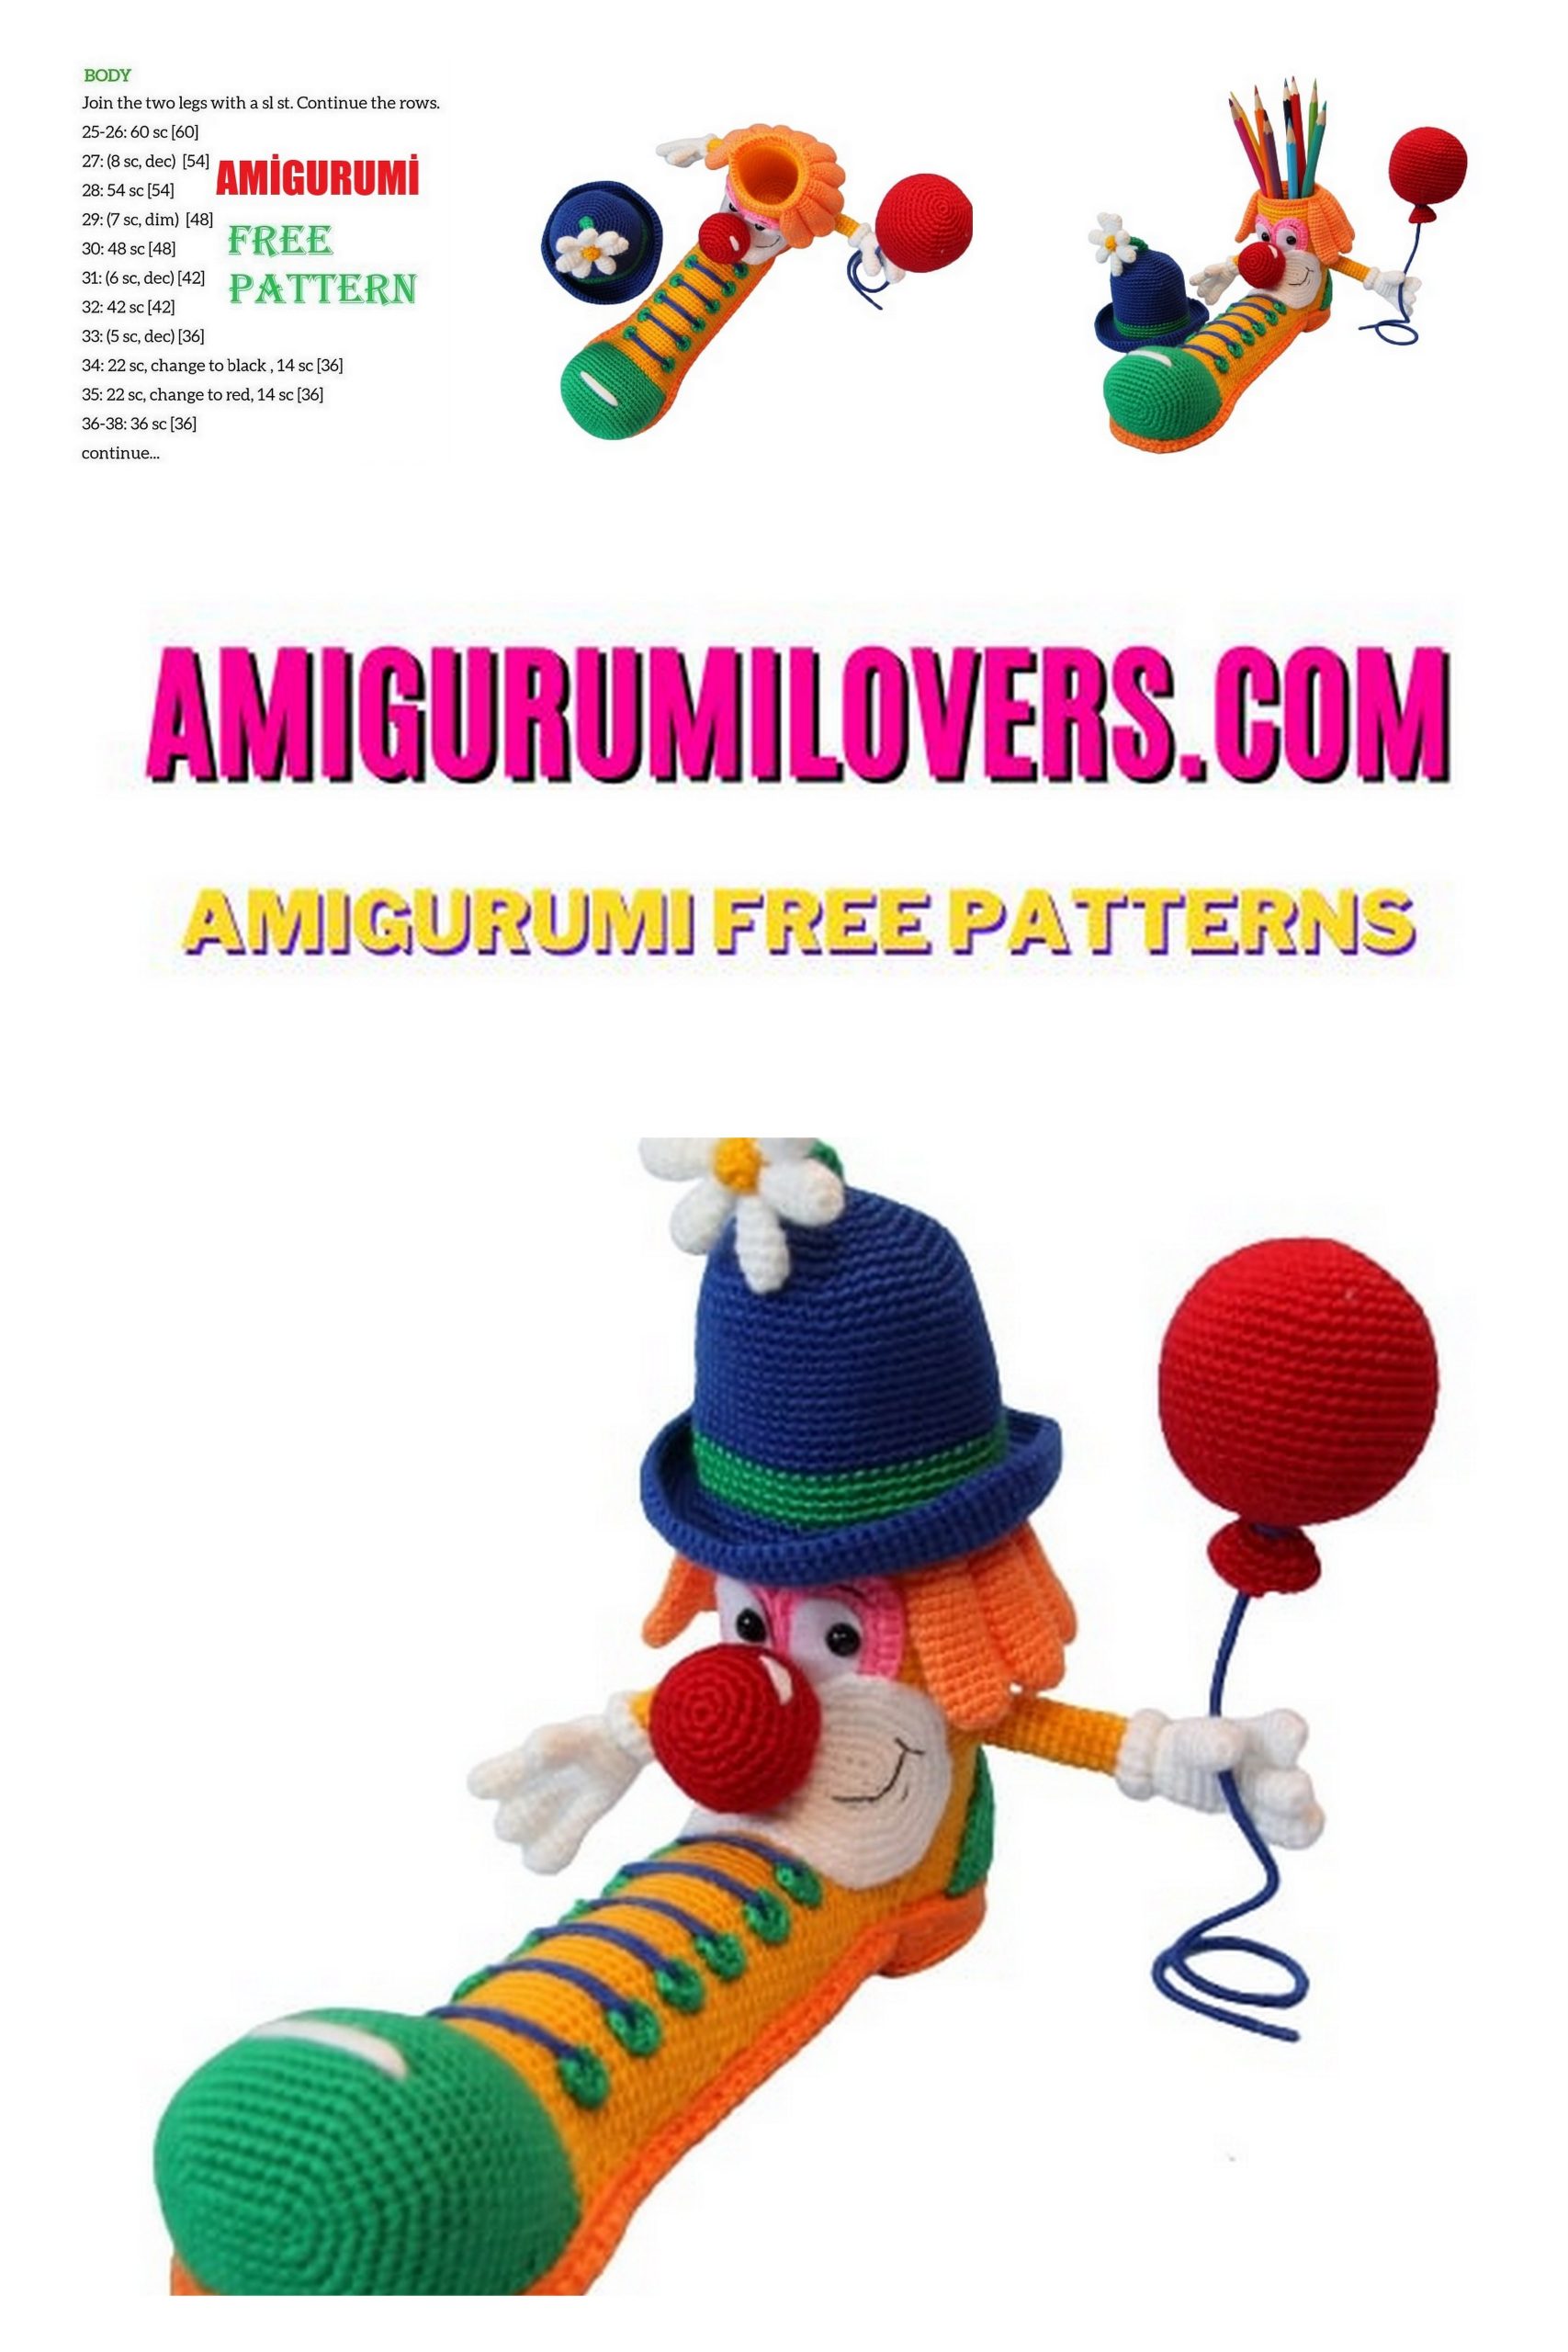
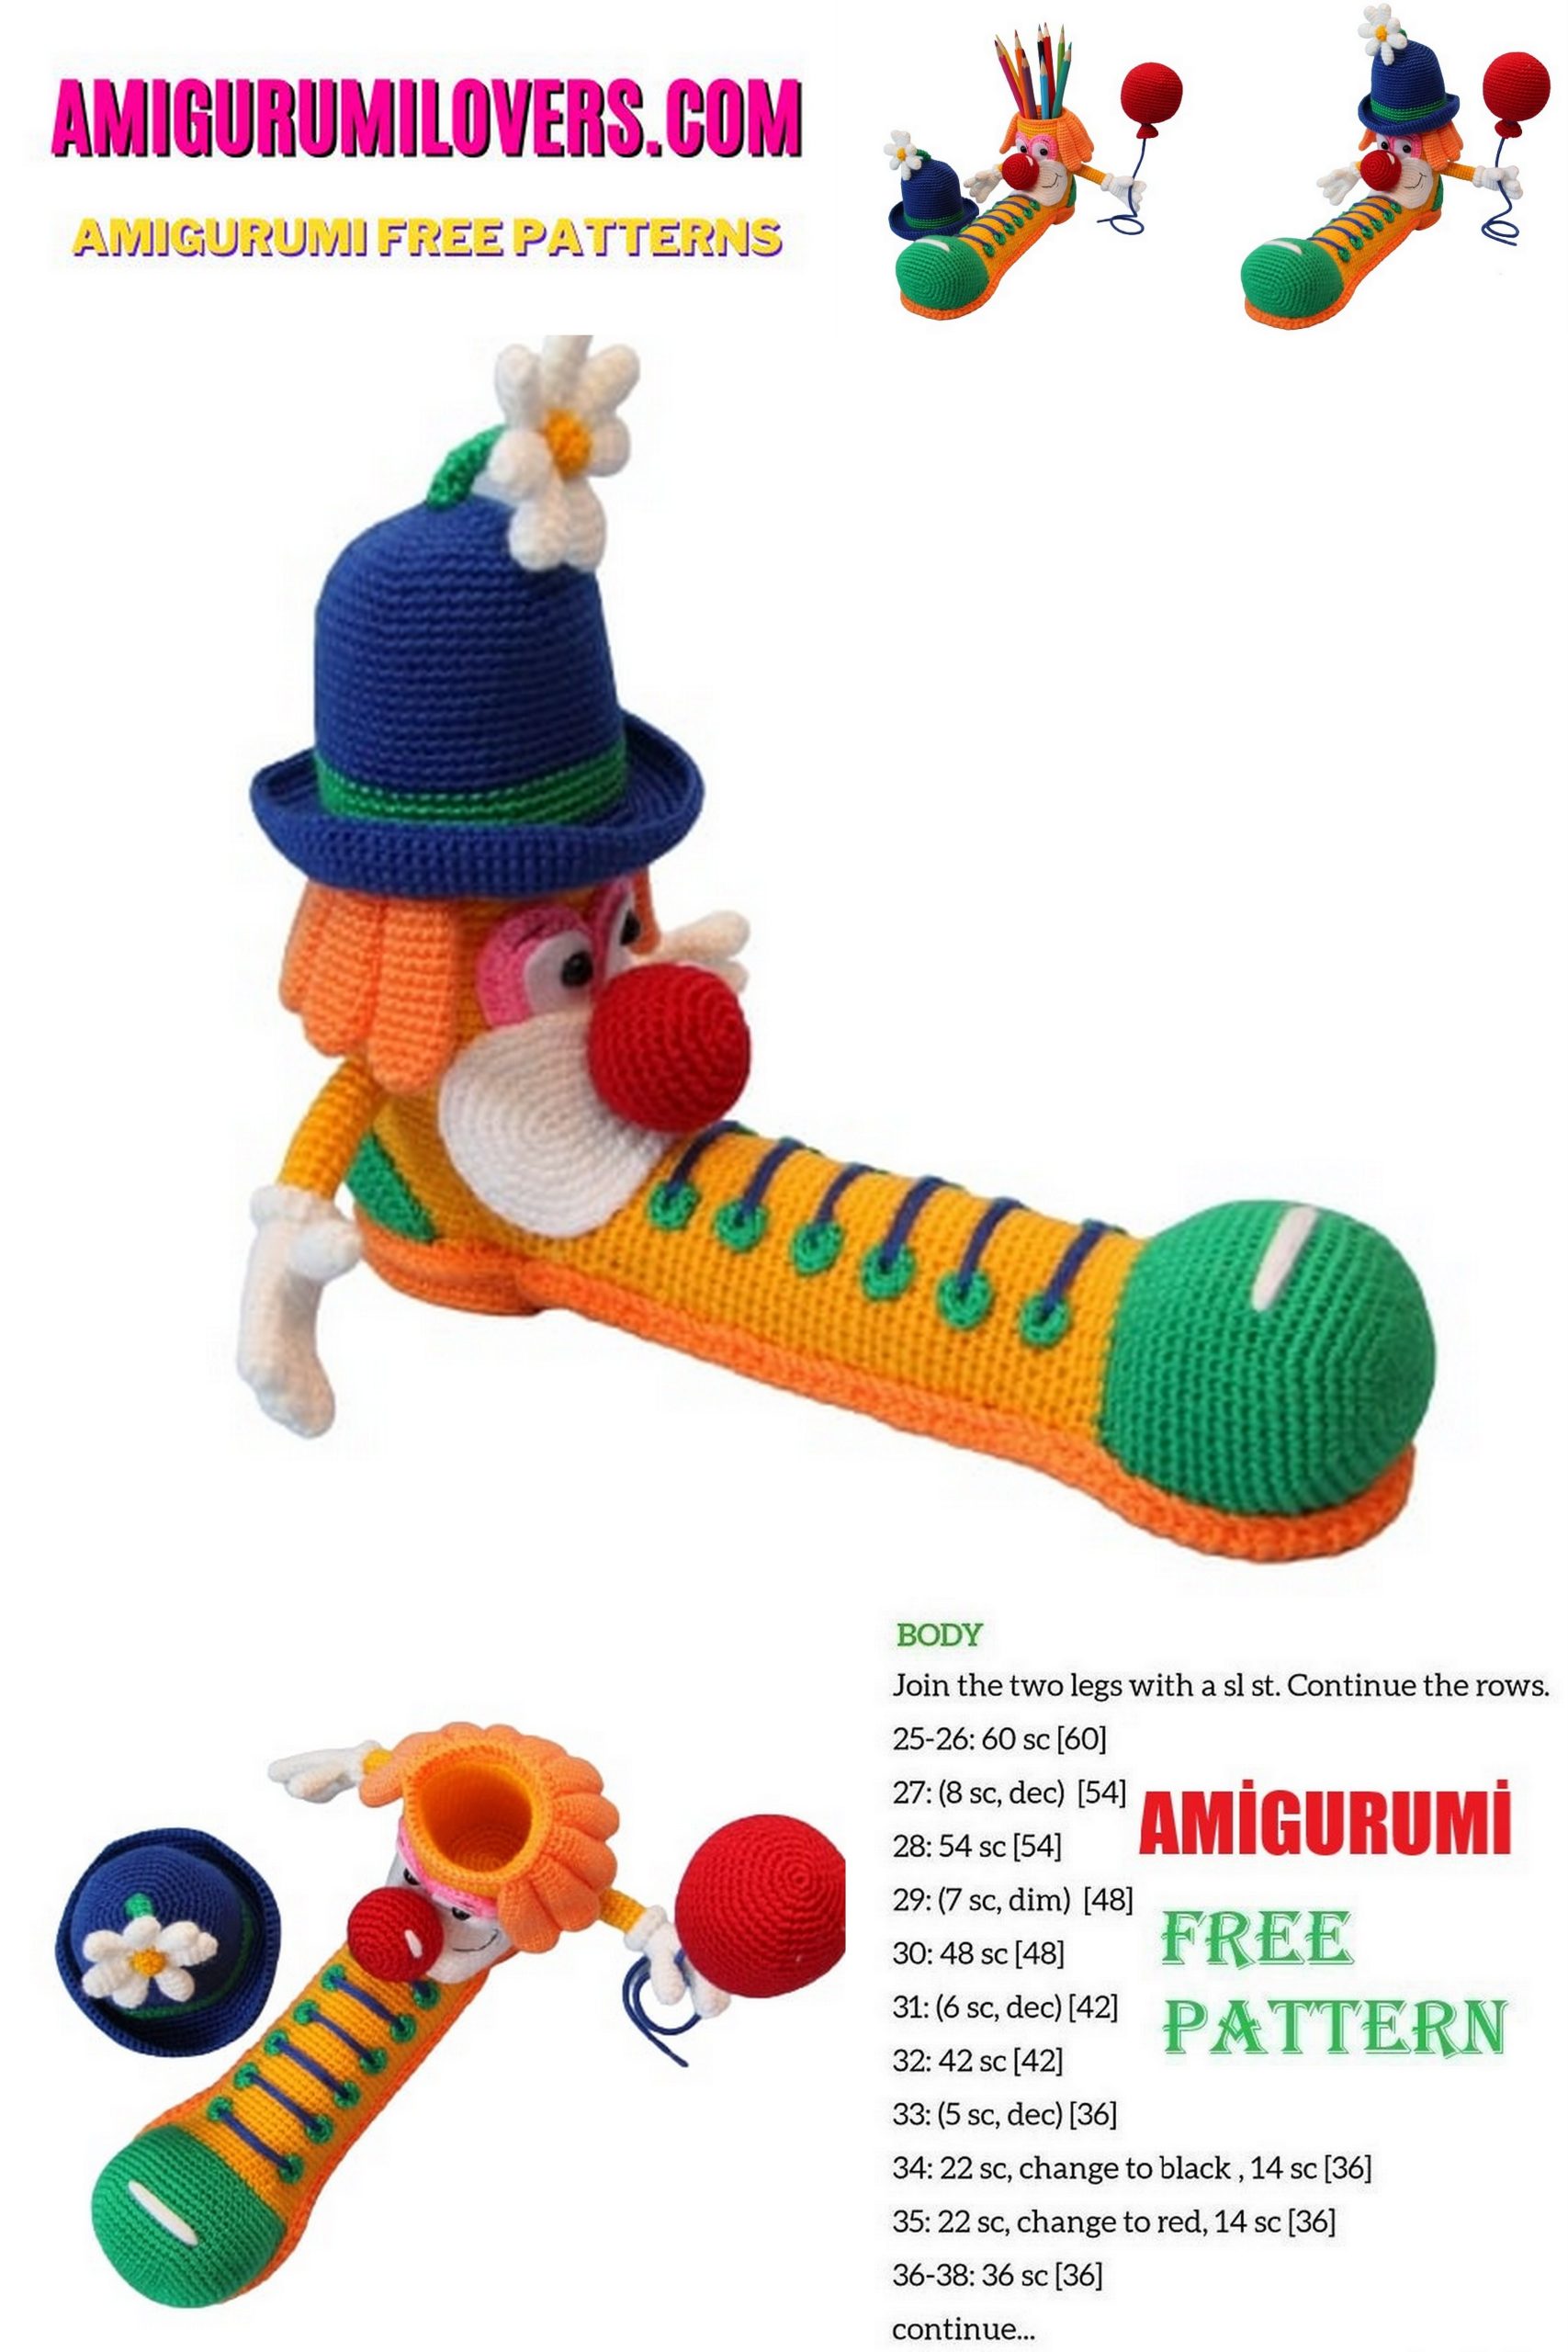
Head + Body
(yellow wire)
External part: work in a spiral
1: 6 sc in the magic ring,
2: 6 inc (12)
3: (sc, inc) * 6 (18)
4: (2 sc, inc) * 6 (24)
5: (3 sc, inc) * 6 (30)
6: (4 sc, inc) * 6 (36)
7: (5 sc, inc) * 6 (42)
8: (6 sc, inc) * 6 (48)
Use the crochet piece as measure and circulate a cardboard (plastic) and cut.
9: in BLO 48sc
10-38: 48p
Tailpiece leaving wire to sew
Sock
start with green
1: 9 ch, from the second ch: 7 sc, 3 sc together, on the other side, 6 sc, inc (18) Keep working in a spiral
2: inc, 6 sc, 3 inc, 6 sc, 2 inc (24)
3: sc, inc, 6 sc, (sc, inc) * 3, 6 sc, (sc, inc) * 2 (30)
4: 2 sc, inc, 6 sc, (2 sc, inc) * 3, 6 sc, (2 sc, inc) * 2 (36)
5: 3 sc, inc, 6 sc, (3sc, inc) * 3, 6 sc, (3 sc, inc) * 2 (42)
6: 4 sc, inc, 6 sc, (4 sc, inc) * 3, 6 sc, (4 sc, inc) * 2 (48)
7: 5 sc, inc, 6 sc, (5 sc, inc) * 3, 6 sc, (5 sc, inc) * 2 (54)
8: 6 sc, inc, 6 sc, (6 sc, inc) * 3, 6 sc, (6 sc, inc) * 2 (60)
9-18: 60 sc
19: (2 sc, dec) * 2, (put marker), 12 sc, (place marker), (2 sc, dec) * 10 (48)
20: 4 sc, dec, 12 sc, (dec, 4 sc) * 2, dec, 8 sc, dec, 4 sc, dec (42)
Change the line to yellow.
21: 42sc
22: (12 sc, dec) * 3 (39)
23: (11 sc, dec) * 3 (36)
24 to 62: sc on all laps (36)
63: 28 sc, 2 hdc together, (dc, 2 dc together) * 3, dc (40)
64: dc, (2 dc together, dc) * 3, 2 hdc together, 19 sc, 2 hdc together, 12 dc (45)
65: 12 dc, 2 hdc together, 17 sc, 2 hdc together, 13 dc, 2 dc together (48)
66: 2 dc together, 13 dc, 2 hdc together
(there should be stitches left) Finish off, leave thread to sew
Internal detail: WORK IN SPIRAL Finish and hide the thread
1: 6sc in the magic ring (6)
2: 6 inc (12)
3: (sc, inc) * 6 (18)
4: (2 sc, inc) * 6 (24)
5: (3 sc, inc) * 6 (30)
6: (4 sc, inc) * 6 (36)
7: (5 sc, inc) * 6 (42)
8: in BLO 42sc
9-35: 42 sc
36: (6 sc, inc) * 6 (48)
Finish off the cut and hide the thread. The front part should be inside and the wrong side outside. Before sewing, attach the sock to the body of the head with pins (see photo). Insert the cut-out circle of cardboard into the head, then the stocking on the paper roll hygienic. Attach the orange wire and close the two parts in a circle.
Sew.
Sole
(orange)
1: 6 ch, on the second ch, 2 sc, 3 hdc, 6 dc together, across the street: 3 hdc, 2 sc (16), turn Continue to work in a roundtrip
2: ch, 2 sc, 3 hdc, (2 hdc together) * 6, 3 hdc, 2 sc (22), turn
3: ch, 2 sc, 3 hdc, (hdc, 2 hdc together) * 6, 3 hdc, 2 sc (28), turn
4: ch, 2 sc, 3 hdc, (2 hdc, 2 hdc together) * 6, 3 hdc, 2 sc (34), turn
5: ch, 2 sc, 3 hdc, (3 hdc, 2 hdc together) * 6, 3 hdc, 2 sc (40)
Don’t finish
Unfold and knit until:
1: ch, 11 sc, turn
2: ch, inc, 9 sc, inc (13), turn
3 to 38:: ch, 13 sc, turn
39: ch, inc, 11 sc, inc (15), turn
40: ch, 15 sc, turn
41: ch, inc, 13 sc, inc (17), turn
42: ch, 17 sc, turn
43: ch, inc, 15 sc, inc (19), turn
44-50: ch, 19 sc, turn
51: ch, dec, 15 sc, dec (17), turn
52: ch, 17 sc, turn
53: ch, dec, 13 sc, dec (15), turn
54: ch, 15 sc, turn
55: ch, 12 sc, sl-st, turn
56: ch, 10 sc, sl-st, turn
57: ch, 8 sc, end with sl-st.
Finish and hide the thread. Circle the part in thick cardboard (I used a box of shoes) and cut. In this step, sew the cardboard soles inside the worked soles
Join the two parts of the sole with the wrong side one on the other, insert the cut cardboard and close the two parts with sc.Finish but do not cut the thread. Fix the piece, make 1 ch and fasten with sl-st (no tight). finish and hide the thread
Heel
1: 6 ch, on the second ch, 2 sc, 3 hdc, 6 dc together, on the other side of the ch: 3 hdc, 2 sc (16), turn Keep working in roundtrip
2: ch, 2 sc, 3 hdc (2 hdc together) * 6, 3 hdc, 2 sc (22), turn
3: ch, 2 sc, 3 hdc, (hdc, 2 hdc together) * 6, 3 hdc, 2 sc (28), turn
4: ch, 2 sc, 3 hdc, (2 hdc, 2 hdc together) * 6, 3 hdc, 2 sc (34), turn
5: ch, 2 sc, 3 hdc, (3 hdc, 2 hdc together) * 6, 3 hdc, 2 sc (40)
Adjust the heel with the sole and work: ch, 11 sc, turn
Do not cut the thread. Circle the cardboard part thick and cut it. Also circulate over the foar or you can use any other material improvised, for example EVA in two layers (see the photo).
6: in BLO 51 sc
7: 51 sc
End leave thread to sew. Insert the parts cut on the heel. Sew the heel to the sole.
Upper view:
Jump seen tenth. Sew the sole of the foot and head and body. sew the yellow dameia part with green line (see parts of the photo). sew as pictured
Unique detail (orange thread) 5 sc in the magic ring
Make as many cars as needed to get a detail of 38-39 ??. Go measuring to around the shoe while working Sew the detail on the sole around the toe from foot to heel (if necessary, add or remove lines)
Back part
(green thread)
1: 11 ch, starting on the second level of the needle, 2 inc, 6 sc, 2 inc (14), turn Work in roundtrip
2: ch, 2 inc, 10 sc, 2 inc (18) turn
3: ch, 2 inc, 14 sc, 2 inc (22) turn
4: ch, 2 inc, 18 sc, 2 inc (26) turn
5: ch, inc, 24 sc, inc (28), turn
6: ch, inc 26sc, inc (30), turn
7: ch, inc, 28 sc, inc (32), turn
8: ch, inc, 30 sc, inc (34), turn
9: ch, inc, 32 sc, inc (36)
To finish. Finish and leave wire for to sew.
Face patch
(White color)
1: 17 ch, from the second ch, 15 sc, 3 sc together, on the other side, 14 sc, inc (34) Continue knitting in a circle.
2: 2 inc, 2 sc, 8 sl-st, 2 sc, 5 inc, 2 sc, 8 sl-st,
2 sc, 3 inc (44)
3: (sc, inc) * 2, 12 sc, (sc, inc) * 5, 12 sc,
(sc, inc) * 3 (54)
4: (2 sc, inc) * 2, 2 sc, 8 sl-st, 2 sc, (2 sc,
inc) * 5, 2 sc, 8 sl-st, 2 sc, (2 sc, inc) * 3 (64)
5: (3 sc, inc) * 2, 12 sc, (inc, 3sc) * 5, 12 sc,
(3 sc, inc) * 3 (74)
6: (4 sc, inc) * 2, 2 sc, 8 sl-st, 2 sc, (inc, 4
sc) * 5, 2 sc, 8 sl-st, 2 sc, (4 sc, inc) * 3 (84)
7: 5 sc, inc, 28 sc, (inc, 5 sc) * 3, 20 sc,
(5 sc, inc) * 2 (90)
End with sl-st leave a thread for sewing.
Nose
(red thread)
1: 6 sc in the magic ring
Continue to knit in a circle.
2: 6 inc (12)
3: (sc, inc) * 6 (18)
4: (2 sc, inc) * 6 (24)
5: (3 sc, inc) * 6 (30)
6-10: 30sc
11: (3 sc, dec) * 6 (24)
12: (2 sc, dec) * 6 (18)
13: (sc, dec) * 6 (12)
Finish, fill and leave wire for to sew
Eyes (2 pieces)
Eyelids
(pink thread)
1: 9 ch, from the second ch, 7 sc, 3 sc together, across the floor, 7 sc (17), turn Continue in roundtrip
2: ch, 3 sc, 3 dc, (5 inc dc) *, 3 dc, 3sc (22), turn
Circle the piece on paper (this will be standard for eyes).
3: ch, 3sc, 3pa, (dc, dc inc) * 5, 3 dc, 3 sc (27)
To finish off leaving thread to sew With white felt, cut the whites for the eyes using a mold
4: Sew the eyelids, glue the white part of the eyes. Sew the white overlay (see photo). Sew the nose and embroider a detail with thread white. In black embroider a smile.See photos.
Hair strands (10 pieces)
(in orange)
1: 6sc on the magic ring Work on spiral
2: 6 inc (12)
3-11: 12 sc
12: (4 sc, dec) * 2 (10)
13:10 sc
14: (3 sc, dec) * 2 (8)
15: 8sc
16: (2 sc, dec) * 2 (6)
17-18: 6sc
Tailpiece leaving wire for to sew, Sew the hair parts. Tailpiece leaving thread to sew Pin the hair with pins on your head (see photo). Finish and hide the threa.
Cord holes (12 pieces)
(green)
6 sc in the magic ring pull, finish leaving long thread to sew Secure the pin holes in the shoe tip,
distributing them evenly throughout the length.
Glue half black pearls in place of the pupils and embroider the eyebrows with black fine line.
Sew. Embroider the laces with a blue thread, making 3-4 points through the holes (see photo).
Hands
(in blank)
Thumb
1: 6 sc in the magic ring work in a spiral
2: (sc, inc) * 3 (9)
3-5: 9 sc
6: (sc, dec) * 3 (6)
7: 6 sc
Fill, finish leaving enough thread to sew
1st, 2nd and 3rd fingers:
1: 6 sc at the magic level keep working in a spiral
2: (sc, inc) * 3 (9)
3-4: 9 sc
5: (sc, dec) * 3 (6)
6-8: 6 sc
Fill, finish
Do not cut the thread only on the third finger. Putting your fingers together.
1: 3 sc (third finger), 3 sc (second finger), 6 sc (first finger), 3 sc (second finger), 3 sc (third finger) (18)
Continue knitting in a spiral
2-5: 18 sc
6: (sc, dec) * 6 (12)
Start filling your hand.
7: (4 sc, dec) * 2 (10)
8: 10 sc
Change the line to yellow.
9-21: 10 sc
Tailpiece leaving thread to sew the thumb Sew hands to body
Handle (2 pieces)
(in blank)
1: 5 sc in the magic ring Continue to
working in spiral
2: in BLO 5 sc
3-12: in FLO 5 sc
Tailpiece leaving thread for sewing. Sew the cuffs on the arm as shown in the photo
Hat
(blue thread)
1: 6 sc in the magic ring
Work on espital.
2: 6 inc (12)
3: (sc, inc) * 6 (18)
4: (2 sc, inc) * 6 (24)
5: (3 sc, inc) * 6 (30)
6: (4 sc, inc) * 6 (36)
7: (5 sc, inc) * 6 (42)
8: (6 sc, inc) * 6 (48)
9: 48 sc
10: (7 sc, inc) * 6 (54)
11-21: 54sc
Change to green.
22-25: 54sc
Change to blue.
26: in FLO (8 sc, inc) * 6 (60)
27: (9 sc, inc) * 6 (66)
28: (10 sc, inc) * 6 (72)
29: (11 sc, inc) * 6 (78)
30: (12 sc, inc) * 6 (84)
31-34: 84 sc
Tailpiece leaving thread to sew Stem of buttercup
(start with green line)
Stem:
1: leave thread to sew at first, 2 ch, and start working from the second ch 5sc Work in a spiral
2: in BLO 5sc
3-8: in FLO 5sc
9: in FLO 5 inc (10)
Change the line to yellow.
10: in BLO 10 sc
11: 5 dec (5)
Pass the thread through the front halves of the loops the last carr. Finish and hide the thread, no to fill.
Petals (7 pieces)
(white thread)
1: 6 sc in the magic ring Continue to work in a spiral
2: (sc, inc) * 3 (9)
3-4: 9sc
5: (sc, dec) * 3 (6)
6: 6 sc
Finish off. Pass the thread through the halves of the front of the loops of the last carr and Close. Leave thread to sew, do not fill. Sew the petals onto the flower. Sew a flower on the first carriage of the hat.
Bladder
(in red)
1: 6 sc in the magic ring
2: 6 inc (12)
3: (sc, inc) * 6 (18)
4: (2 sc, inc) * 6 (24)
5: (3 sc, inc) * 6 (30)
6: (4 sc, inc) * 6 (36)
7: (5 sc, inc) * 6 (42)
8: 42sc
9: (6 sc, inc) * 6 (48)
10-19: 48sc
20: (6 sc, dec) * 6 (42)
21: 42sc
22: (5 sc, dec) * 6 (36)
23: (4 sc, dec) * 6 (30)
24: (3 sc, dec) * 6 (24)
25: (2 sc, dec) * 6 (18) Fill.
26: (sc, dec) * 6 (12)
do not cut the wire Prepare the wire (35 cm).
Twist the wire on one side and wrap the twist with adhesive tape (see photo). Cover the wire with blue thread. Wrap to cover the wire Secure the ends of the wires with Glue.
Insert one end of the wire (with a loop) on the ball and continue knitting:
27: dec * 6 (6)
28: in BLO 6 inc (12)
29: (sc, inc) * 6 (18)
30-31: 18sc Shot and hide the thread
Before you leave, make sure to check out more free amigurumi crochet patterns and discover new ideas for your next project.
You can also browse our full amigurumi pattern archive for hundreds of beginner-friendly designs.