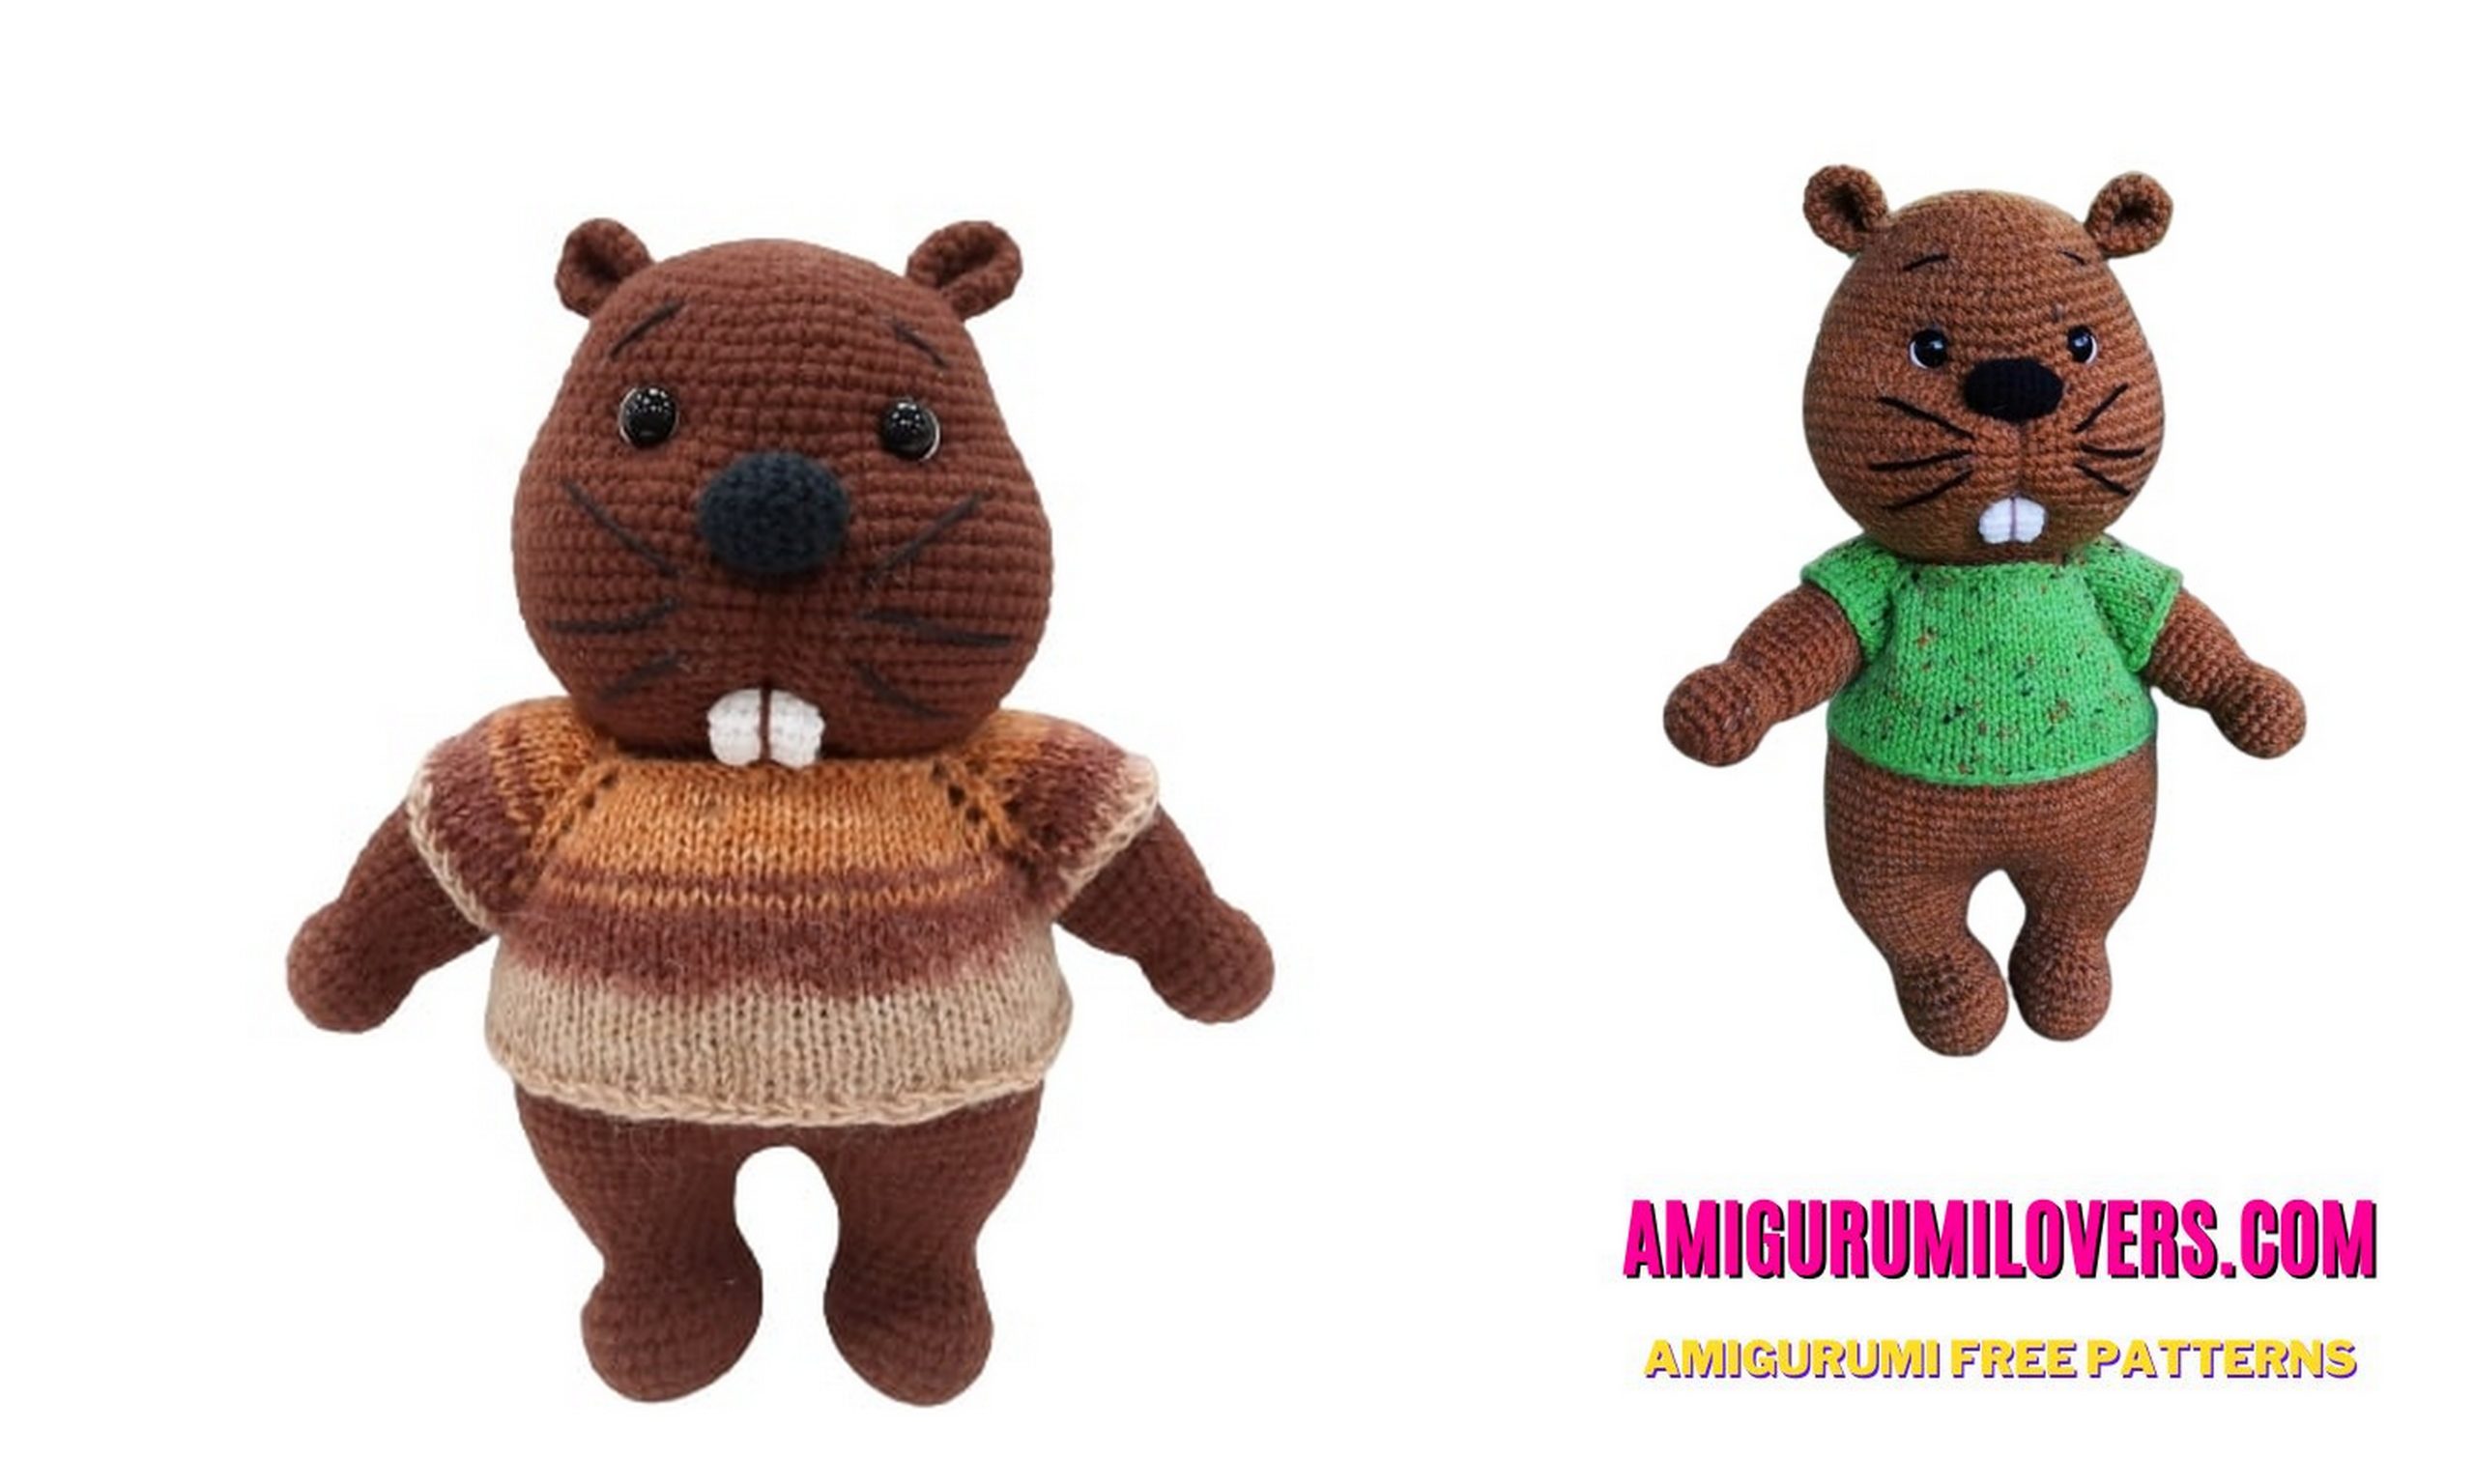
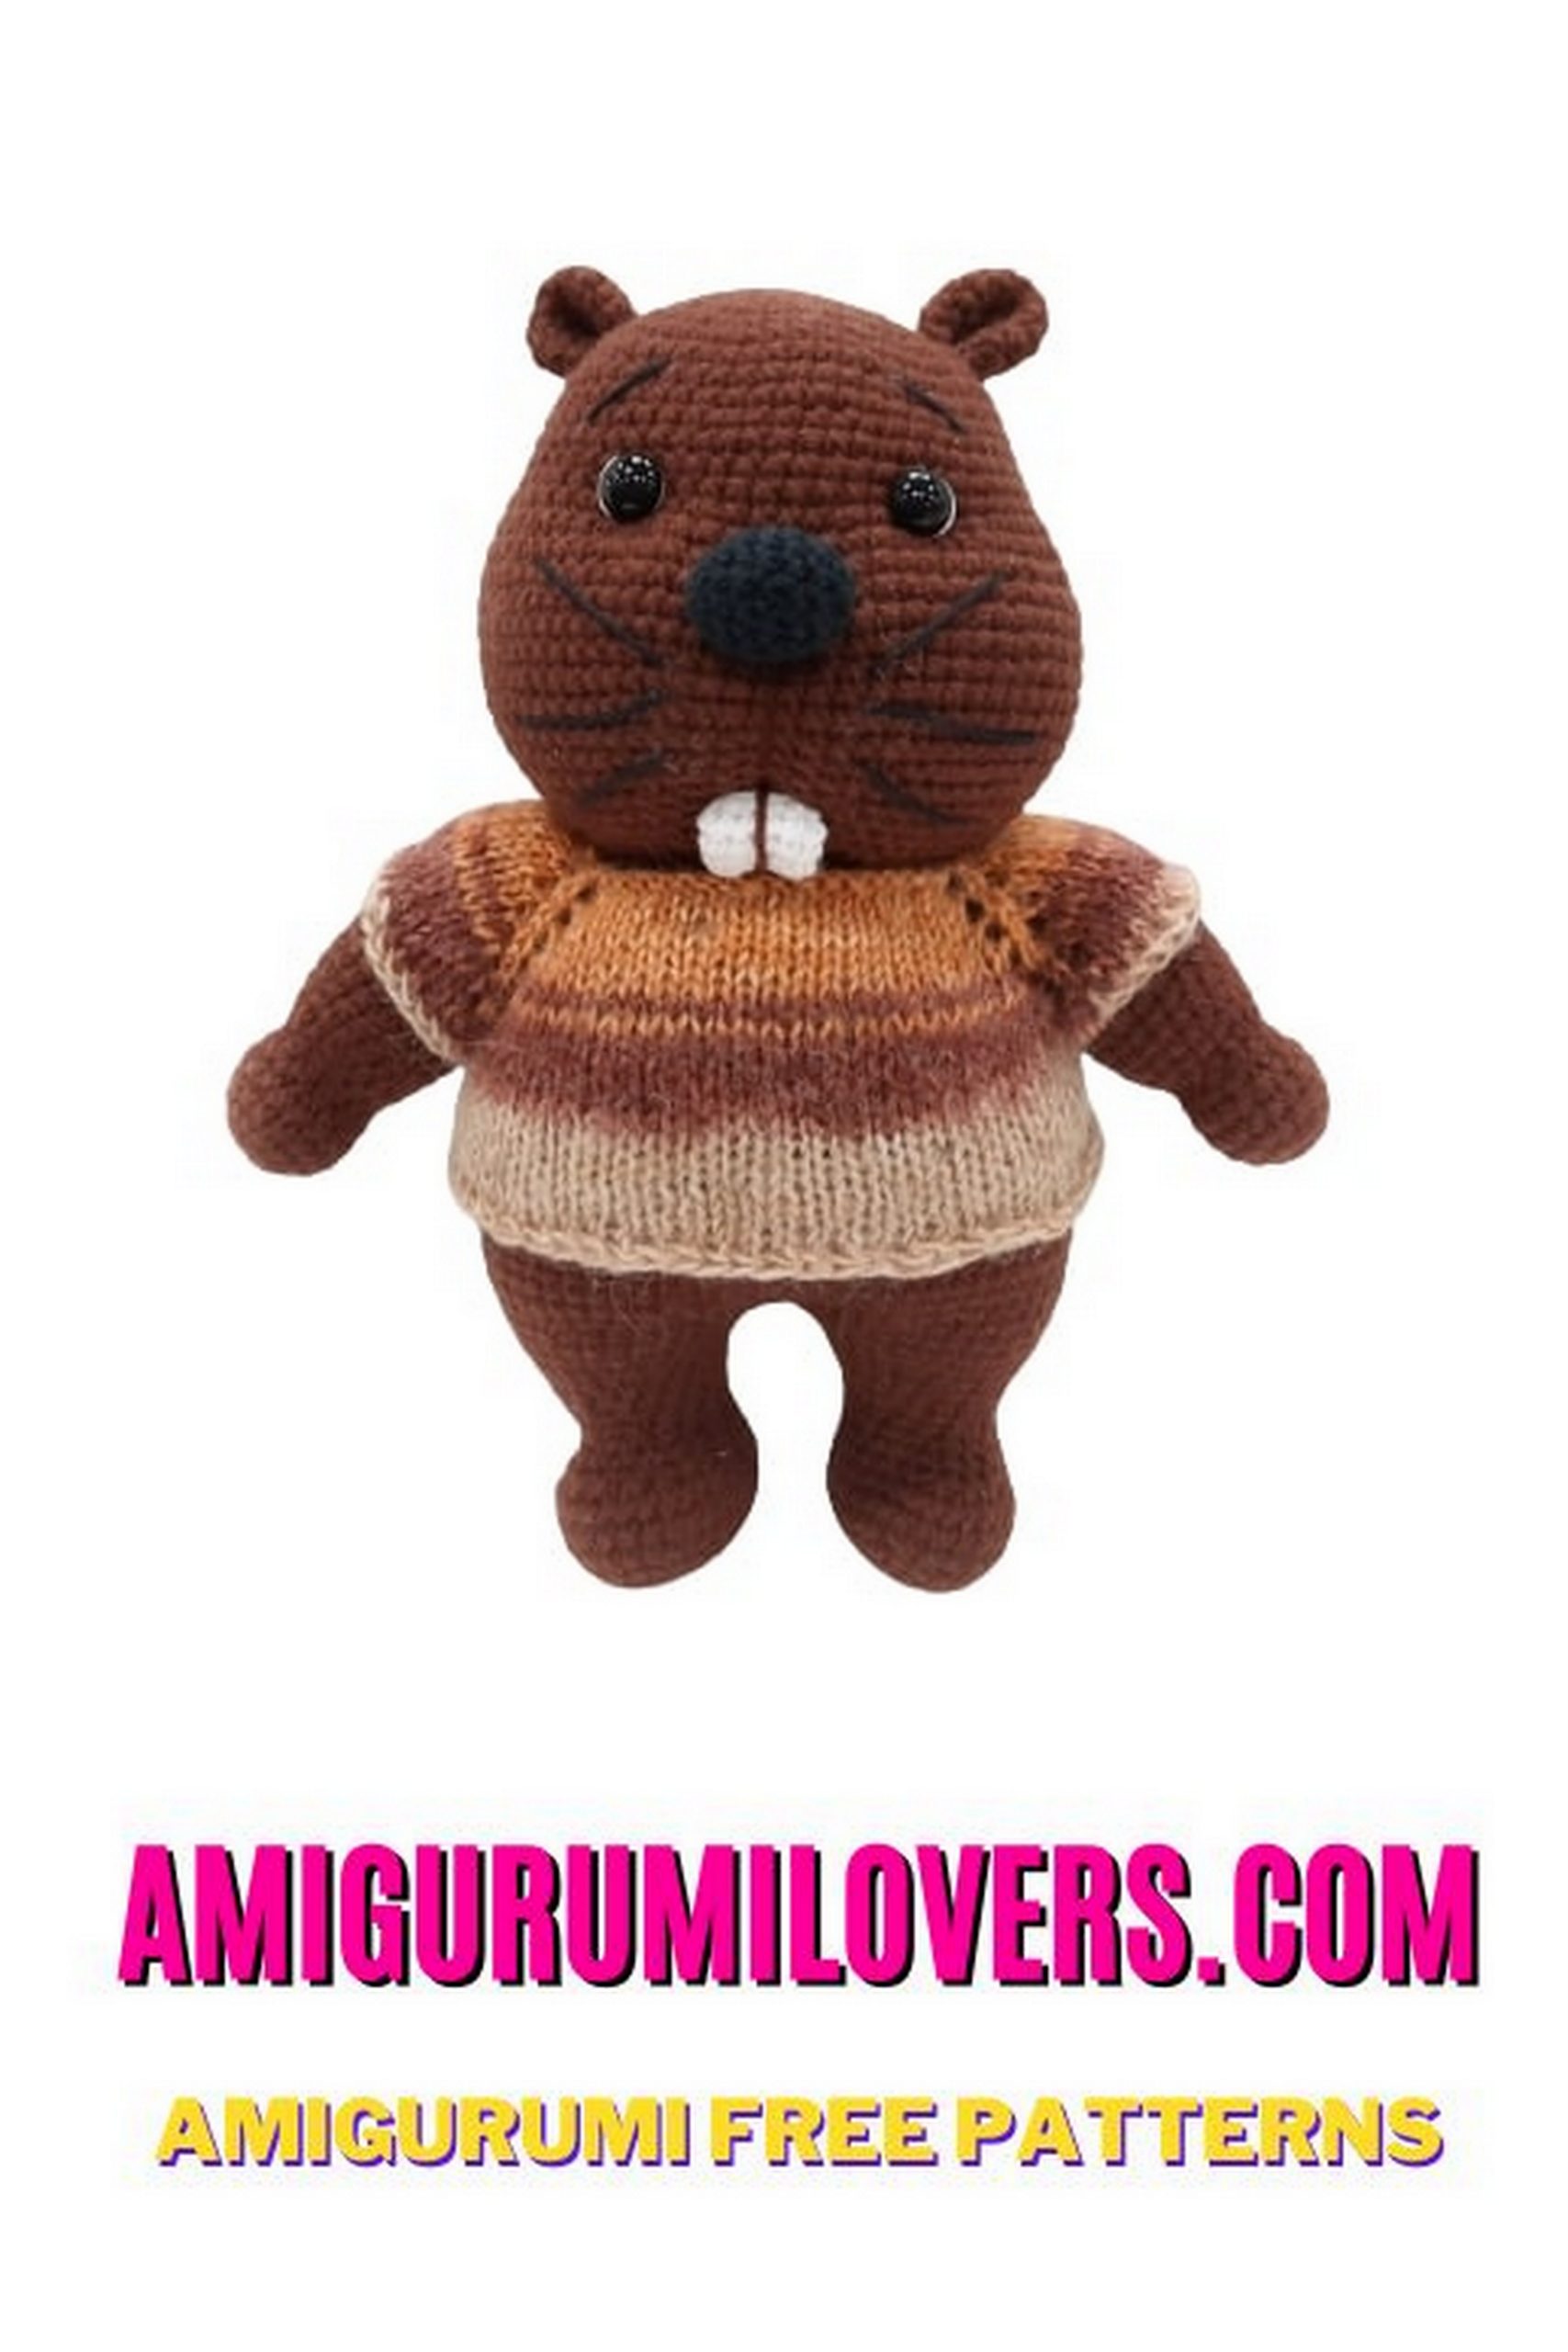
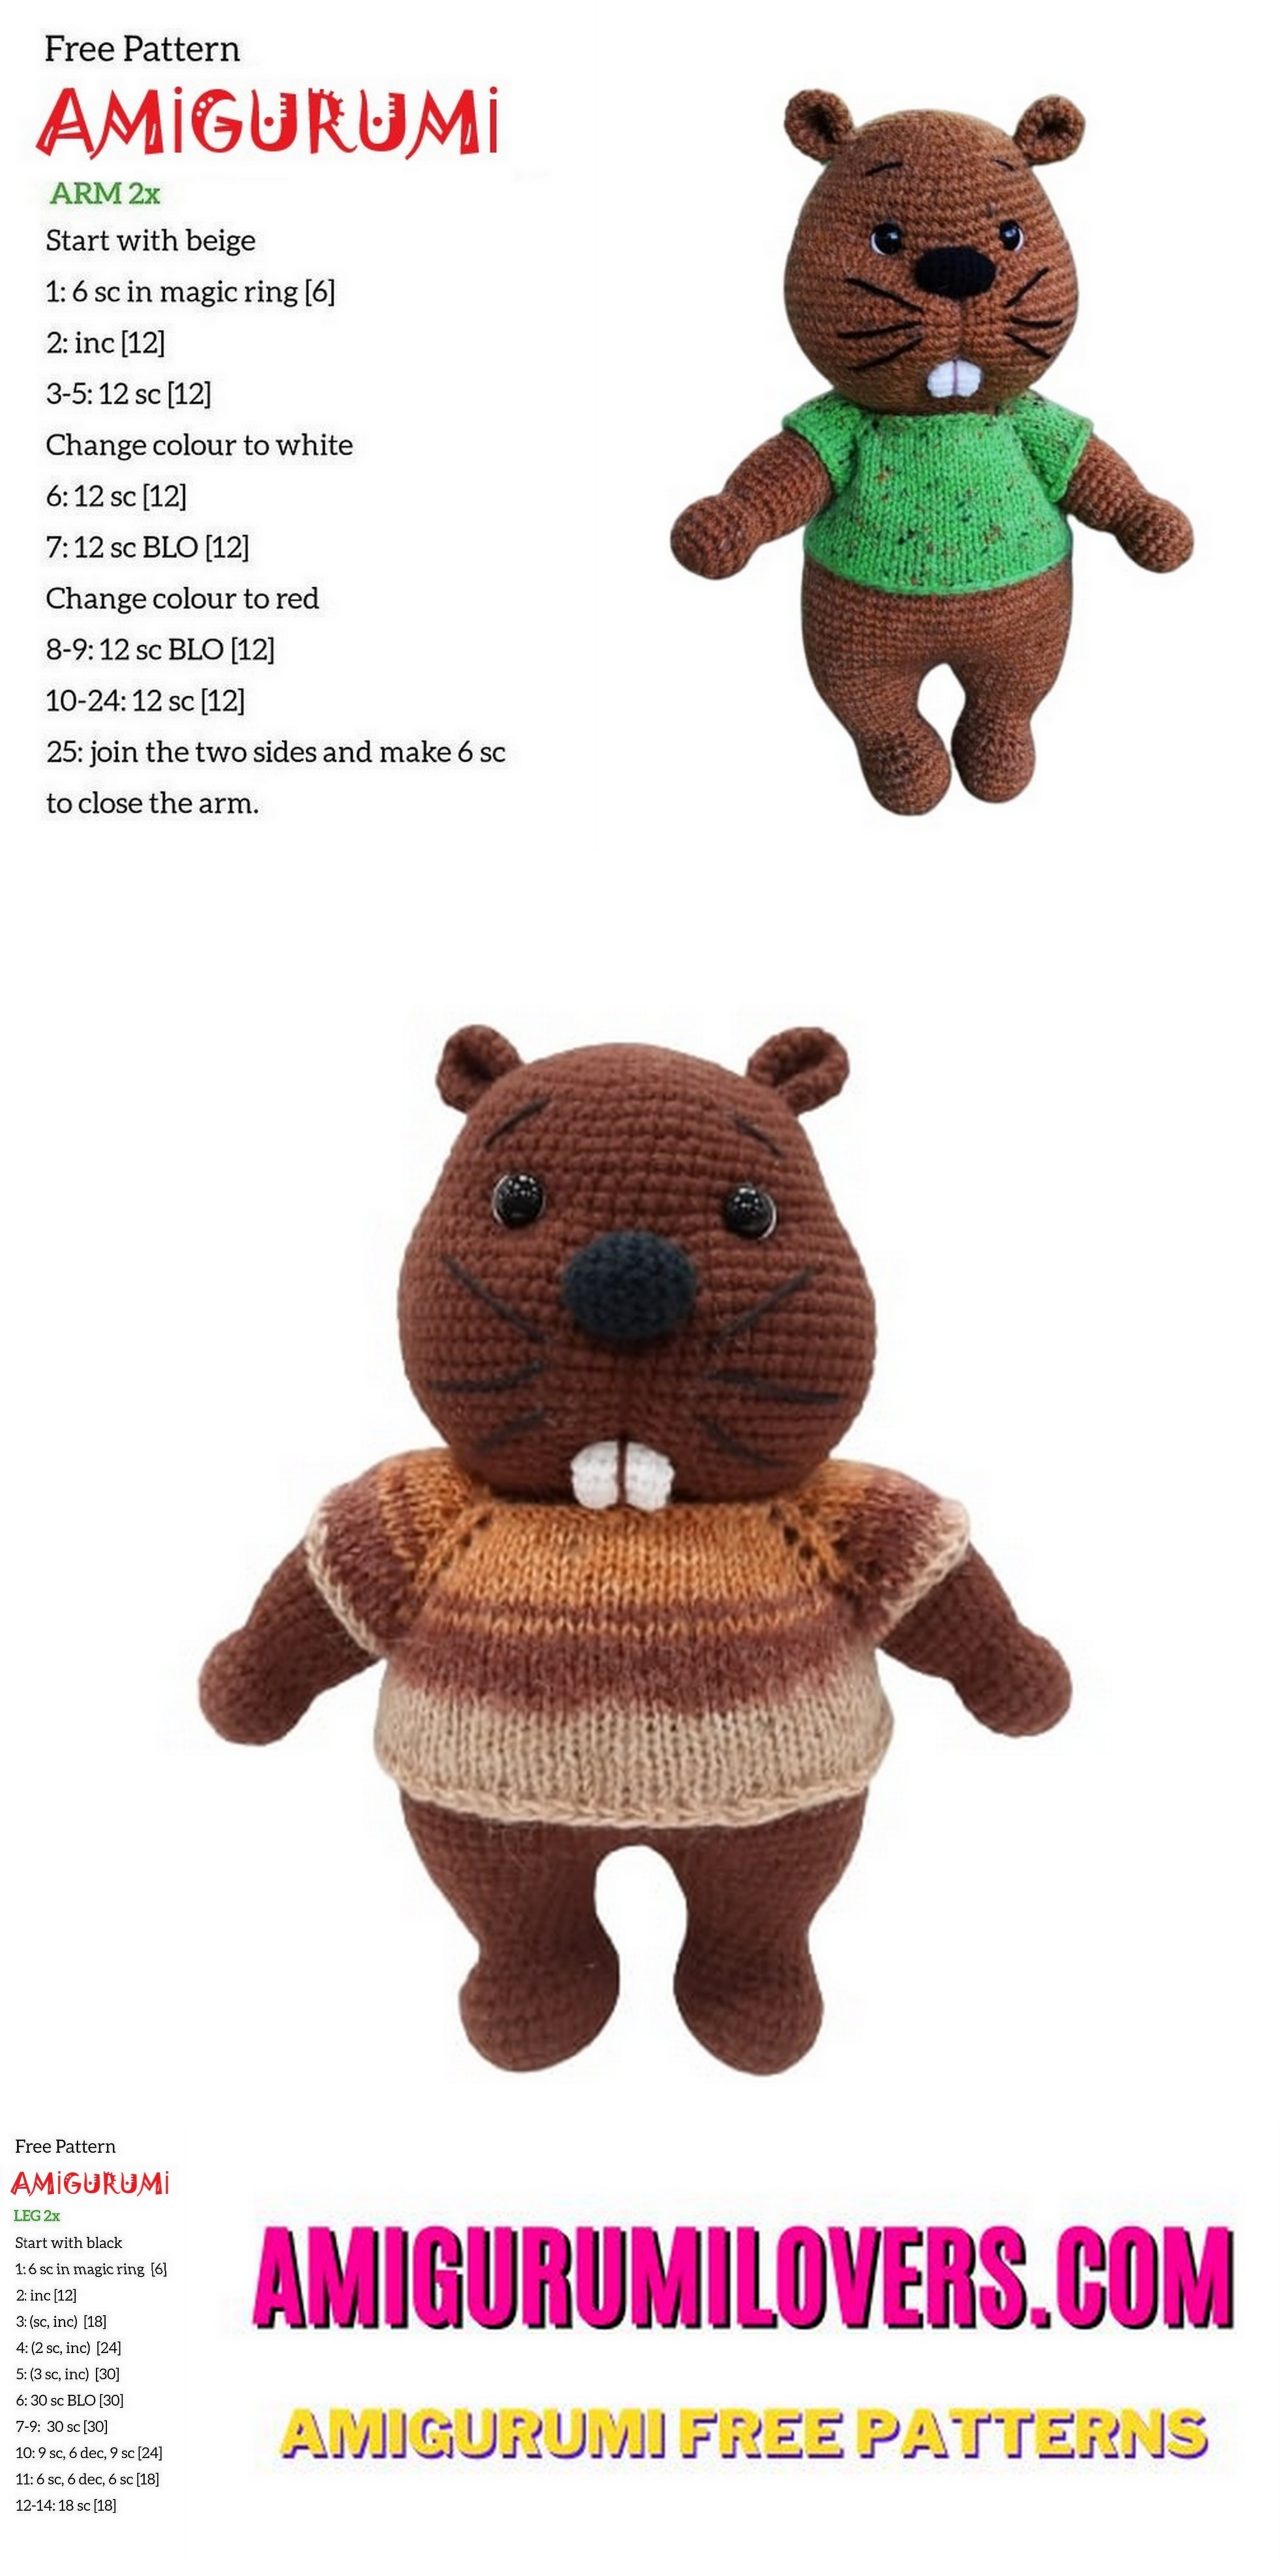
Amigurumi Cute Beaver Free Pattern
You may also enjoy exploring our free amigurumi patterns and other popular amigurumi animal patterns available on our website.
If you’re on the lookout for an adorable crochet project that will bring joy to both you and those who receive it, you’re in the right place! In this blog post, we’ll be sharing a delightful free pattern for creating an amigurumi cute beaver, perfect for beginners and experienced crocheters alike. Amigurumi, the Japanese art of knitting or crocheting small stuffed animals, has captured the hearts of many crafting enthusiasts around the world. It’s a fun and rewarding way to bring your yarn to life, allowing you to create charming little companions for yourself or gifts for your loved ones.
Creating an amigurumi beaver is not only a fantastic way to practice your crochet skills, but it’s also a great opportunity to experiment with different yarn colors and textures. This pattern is designed to be accessible for those who may be new to crocheting, ensuring that even the most inexperienced crafters can follow along with ease. We’ll provide step-by-step instructions, along with helpful tips to guide you through the process, making it a perfect project to dive into as you explore the wonderful world of crochet.
The beauty of amigurumi lies in its versatility. You can customize your cute beaver in countless ways by adjusting the yarn color, adding accessories, or even using different crochet stitches to create unique patterns. Whether you’re aiming for a classic look or something more whimsical, you’ll find that the possibilities are endless. So gather your supplies, find a cozy spot, and let your creativity flow as you embark on this delightful project.
As you make your way through the pattern, keep in mind that the most important aspect of any crochet project is to enjoy the process. It can be easy to focus solely on the end result, but each stitch you make is an opportunity to hone your skills and embrace the calming rhythm of crochet. Plus, by making your own amigurumi cute beaver, you’ll have a delightful handmade creation that’s filled with your personal touch, sharing not just the item itself but also the love and effort that went into crafting it.
Whether you’re crocheting for fun, for a special occasion, or simply as an exercise in creativity, this amigurumi beaver project will surely bring a smile to your face. So, grab your crochet hook and yarn, and let’s get started on making this cute little beaver together! You’ll quickly see why amigurumi has become such a beloved form of expression among crafters everywhere, and who knows? You might even find yourself with a new hobby that you can enjoy for years to come.
The cutest amigurumi animal patterns are on this site for you. In this article, very cute amigurumi beaver pattern is waiting for you.
Necessary materials:
Yarn: Pekhorka “Sock” (30); “Tiny” from Troitsk black (0140), super white (0235), light marble (1663)
Hook 2.0 mm
Black half-beads for eyes (12 mm)
Scissors
Large sewing needle
Glue
Filler (holofiber)
Amigurumi Beaver Pattern
Abbrevations:
ch – chain
sc – single crochet
inc – increase
dec- decrease
PATTERN
Legs (2 parts)
1) 8 sc into magic ring
2) inc into second loop from hook, 5 sc, 4 sc into one loop, 5 sc, inc (18)
3) 1 sc, inc, 5 sc, inc, 2 sc, inc, 5 sc, inc, 1 sc (22)
4) inc, 7 sc, inc, 4 sc, inc, 7 sc, inc (26)
5) 9 sc, inc, 6 sc, inc, 9 sc (28)
6-8) 28 sc
9) dec, 7 sc, 5 dec, 7 sc, dec (21)
10) 8 sc, dec, 1 sc, dec, 8 sc (19)
11) 7 sc, dec, 1 sc, dec, 7 sc (17)
12) 17 sc
13) inc, (3 sc, inc) * 4 (22)
14) 22 sc
15) (inc, 10 sc) * 2 (24)
16) (5 sc, inc) * 4 (28)
17) (6 sc, inc) * 4 (32)
18) 32 sc
Stuff as you knit. Cut the thread, fasten.
We knit the second leg in the same way. We do not cut the thread.
We continue to knit the body.
Body
19) 9 sc first leg, 32 sc second leg, 23 sc first leg (64)
20) 64 sc
21) inc, 7 sc, 2 inc, 7 sc, inc, 7 sc, inc, 7 sc, inc, 6 sc, 2 inc, 7 sc, inc, 7 sc, inc, 6 sc (74)
22-31) 74 sc
32) 30 sc, 2 dec, 32 sc, 2 dec, 4 sc (70)
33) (5 sc, dec) * 10 (60)
34-35) 60 sc
36) (8 sc, dec) * 6 (54)
37-39) 54 sc
40) (4 sc, dec) * 9 (45)
41) 45 sc
42) (3 sc, dec) * 9 (36)
43-45) 36 sc
46) (4 sc, dec) * 6 (30)
Stuff as you knit.
Head
1) 6 sc into magic ring
2) 6 inc (12)
3) (1 sc, inc) * 6 (18)
4) (2 sc, inc) * 6 (24)
5) (3 sc, inc) * 6 (30)
6) (4 sc, inc) * 6 (36)
7) (5 sc, inc) * 6 (42)
8) (6 sc, inc) * 6 (48)
9) (7 sc, inc) * 6 (54)
10-12) 54 sc
13) (8 sc, inc) * 6 (60)
14-16) 60 sc
17) (4 sc, inc) * 12 (72)
18) 72 sc
19) (8 sc, inc) * 9 (81)
20-26) 81 sc
27) (7 sc, dec) * 9 (72)
28) 72 sc
29) (6 sc, dec) * 9 (63)
30) 63 sc
31) (5 sc, dec) * 9 (54)
32) 64 sc
33) (4 sc, dec) * 9 (45)
34) (3 sc, dec) * 9 (36)
35) (2 sc, dec) * 9 (27)
Stuff as you knit.

Registration
We make a tightening for the eyes, nose and teeth. Sew on the nose and teeth.
We glue the eyes. We embroider the whites of the eyes with a white thread, we embroider eyelashes and eyebrows with a black thread.
Hands (2 parts)
1) 6 sc into magic ring
2) 6 inc (12)
3) (1 sc, inc) * 6 (18)
4-6) 18 sc
7) (1 sc, dec) * 6 (12)
8) 12 sc
9) (1 sc, inc) * 6 (18)
10) (5 sc, inc) * 3 (21)
11-17) 21 sc
18) (5 sc, dec) * 3 (18)
19-23) 18 sc
24) (1 sc, dec) * 6 (12)
25) 6 dec (6)
Stuff as you knit.
Pull off the hole. Cut the thread and hide.
Tail
1) 6 sc into magic ring
2) 6 inc (12)
3) (1 sc, inc) * 6 (18)
4) (2 sc, inc) * 6 (24)
5) (3 sc, inc) * 6 (30)
6) (4 sc, inc) * 6 (36)
7) inc, 17 sc, inc, 17 sc (38)
8) inc, 18 sc, inc, 18 sc (40)
9) 2 inc, 18 sc, 2 inc, 18 sc (44)
10) 1 sc, 2 inc, 20 sc, 2 inc, 19 sc (48)
11) 2 sc, 2 inc, 11 sc, inc, 10 sc, 2 inc, 10 sc, inc, 9 sc (54)
12) 17 sc, 2 inc, 24 sc, 2 inc, 9 sc (58)
13-16) 58 sc
17) 2 sc, 2 dec, 25 sc, 2 dec, 23 sc (54)
18) 54 sc
19) 2 sc, dec, 25 sc, dec, 23 sc (52)
20) 2 sc, dec, 24 sc, dec, 22 sc (50)
21) 2 sc, dec, 23 sc, dec, 21 sc (48)
22) 2 sc, dec, 22 sc, dec, 20 sc (46)
23) 2 sc, dec, 21 sc, dec, 19 sc (44)
24) 2 sc, dec, 20 sc, dec, 18 sc (42)
25) 2 sc, dec, 19 sc, dec, 17 sc (40)
26) 2 sc, dec, 18 sc, dec, 16 sc (38)
27) 2 sc, dec, 17 sc, dec, 15 sc (36)
28) 2 sc, dec, 16 sc, dec, 14 sc (34)
29) 2 sc, dec, 15 sc, dec, 13 sc (32)
30) 2 sc, dec, 14 sc, dec, 12 sc (30)
31) 2 sc, dec, 13 sc, dec, 11 sc (28)
32) 2 sc, dec, 12 sc, dec, 10 sc (26)
If desired, fill quite a bit, with a thin layer.
Fold and knit 13 sc.
Fasten the thread, leave a long end for sewing.
Spout
1) 6 sc into magic ring
2) 6 inc (12)
3-7) 12 sc
We stuff.
8) 6 dec (6)
Pull off the hole. Leave the thread for sewing.

Teeth
1) 5 ch. We knit on both sides of the chain, forming an oval:
2) from the 2nd loop from the hook, do inc, 2 sc, 3 sc in one loop, 3 sc (10)
3-6) 10 sc
We do not stuff.
Fold and knit 5 sc.
Fasten the thread, leave a long end for sewing.
In the middle, embroider the strip in brown.
Ears (2 parts)
1) 6 sc into magic ring
2) 6 inc (12)
3) (1 sc, inc) * 6 (18)
4-6) 18 sc
Detail fold and knit 9 sc.
Then fold over and knit 4 sc.
Before you leave, make sure to check out more free amigurumi crochet patterns and discover new ideas for your next project.
You can also browse our full amigurumi pattern archive for hundreds of beginner-friendly designs.