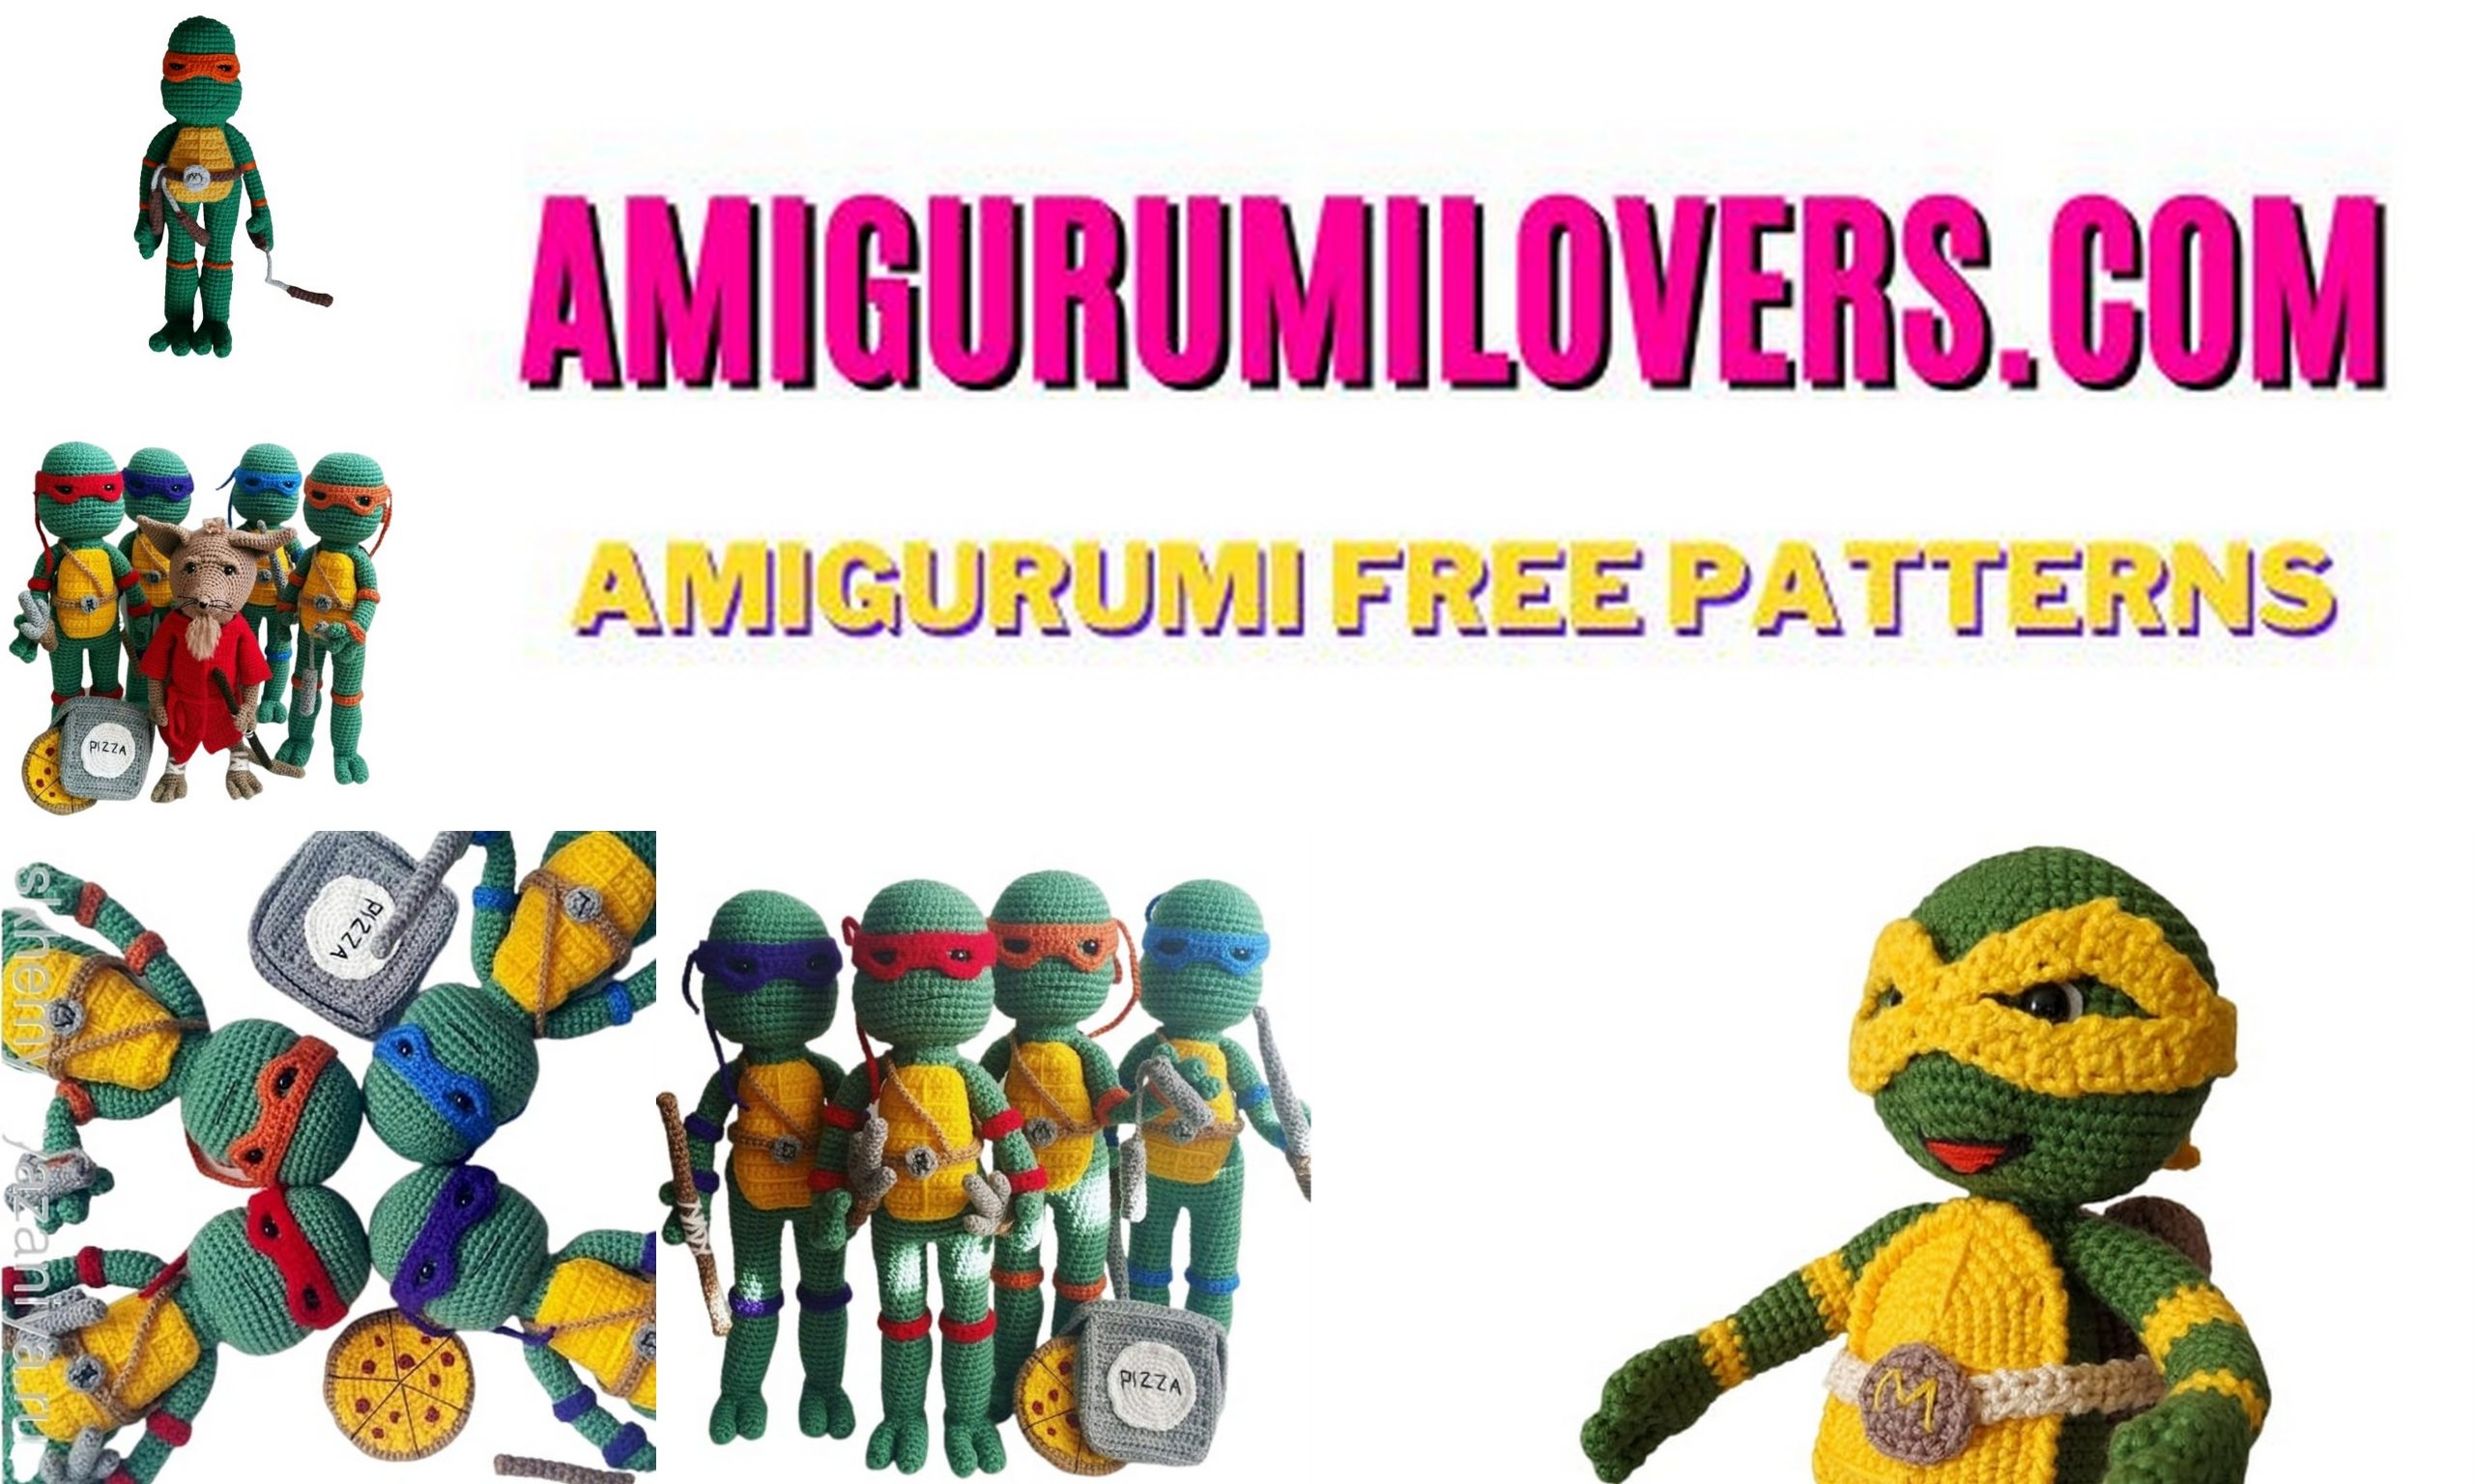
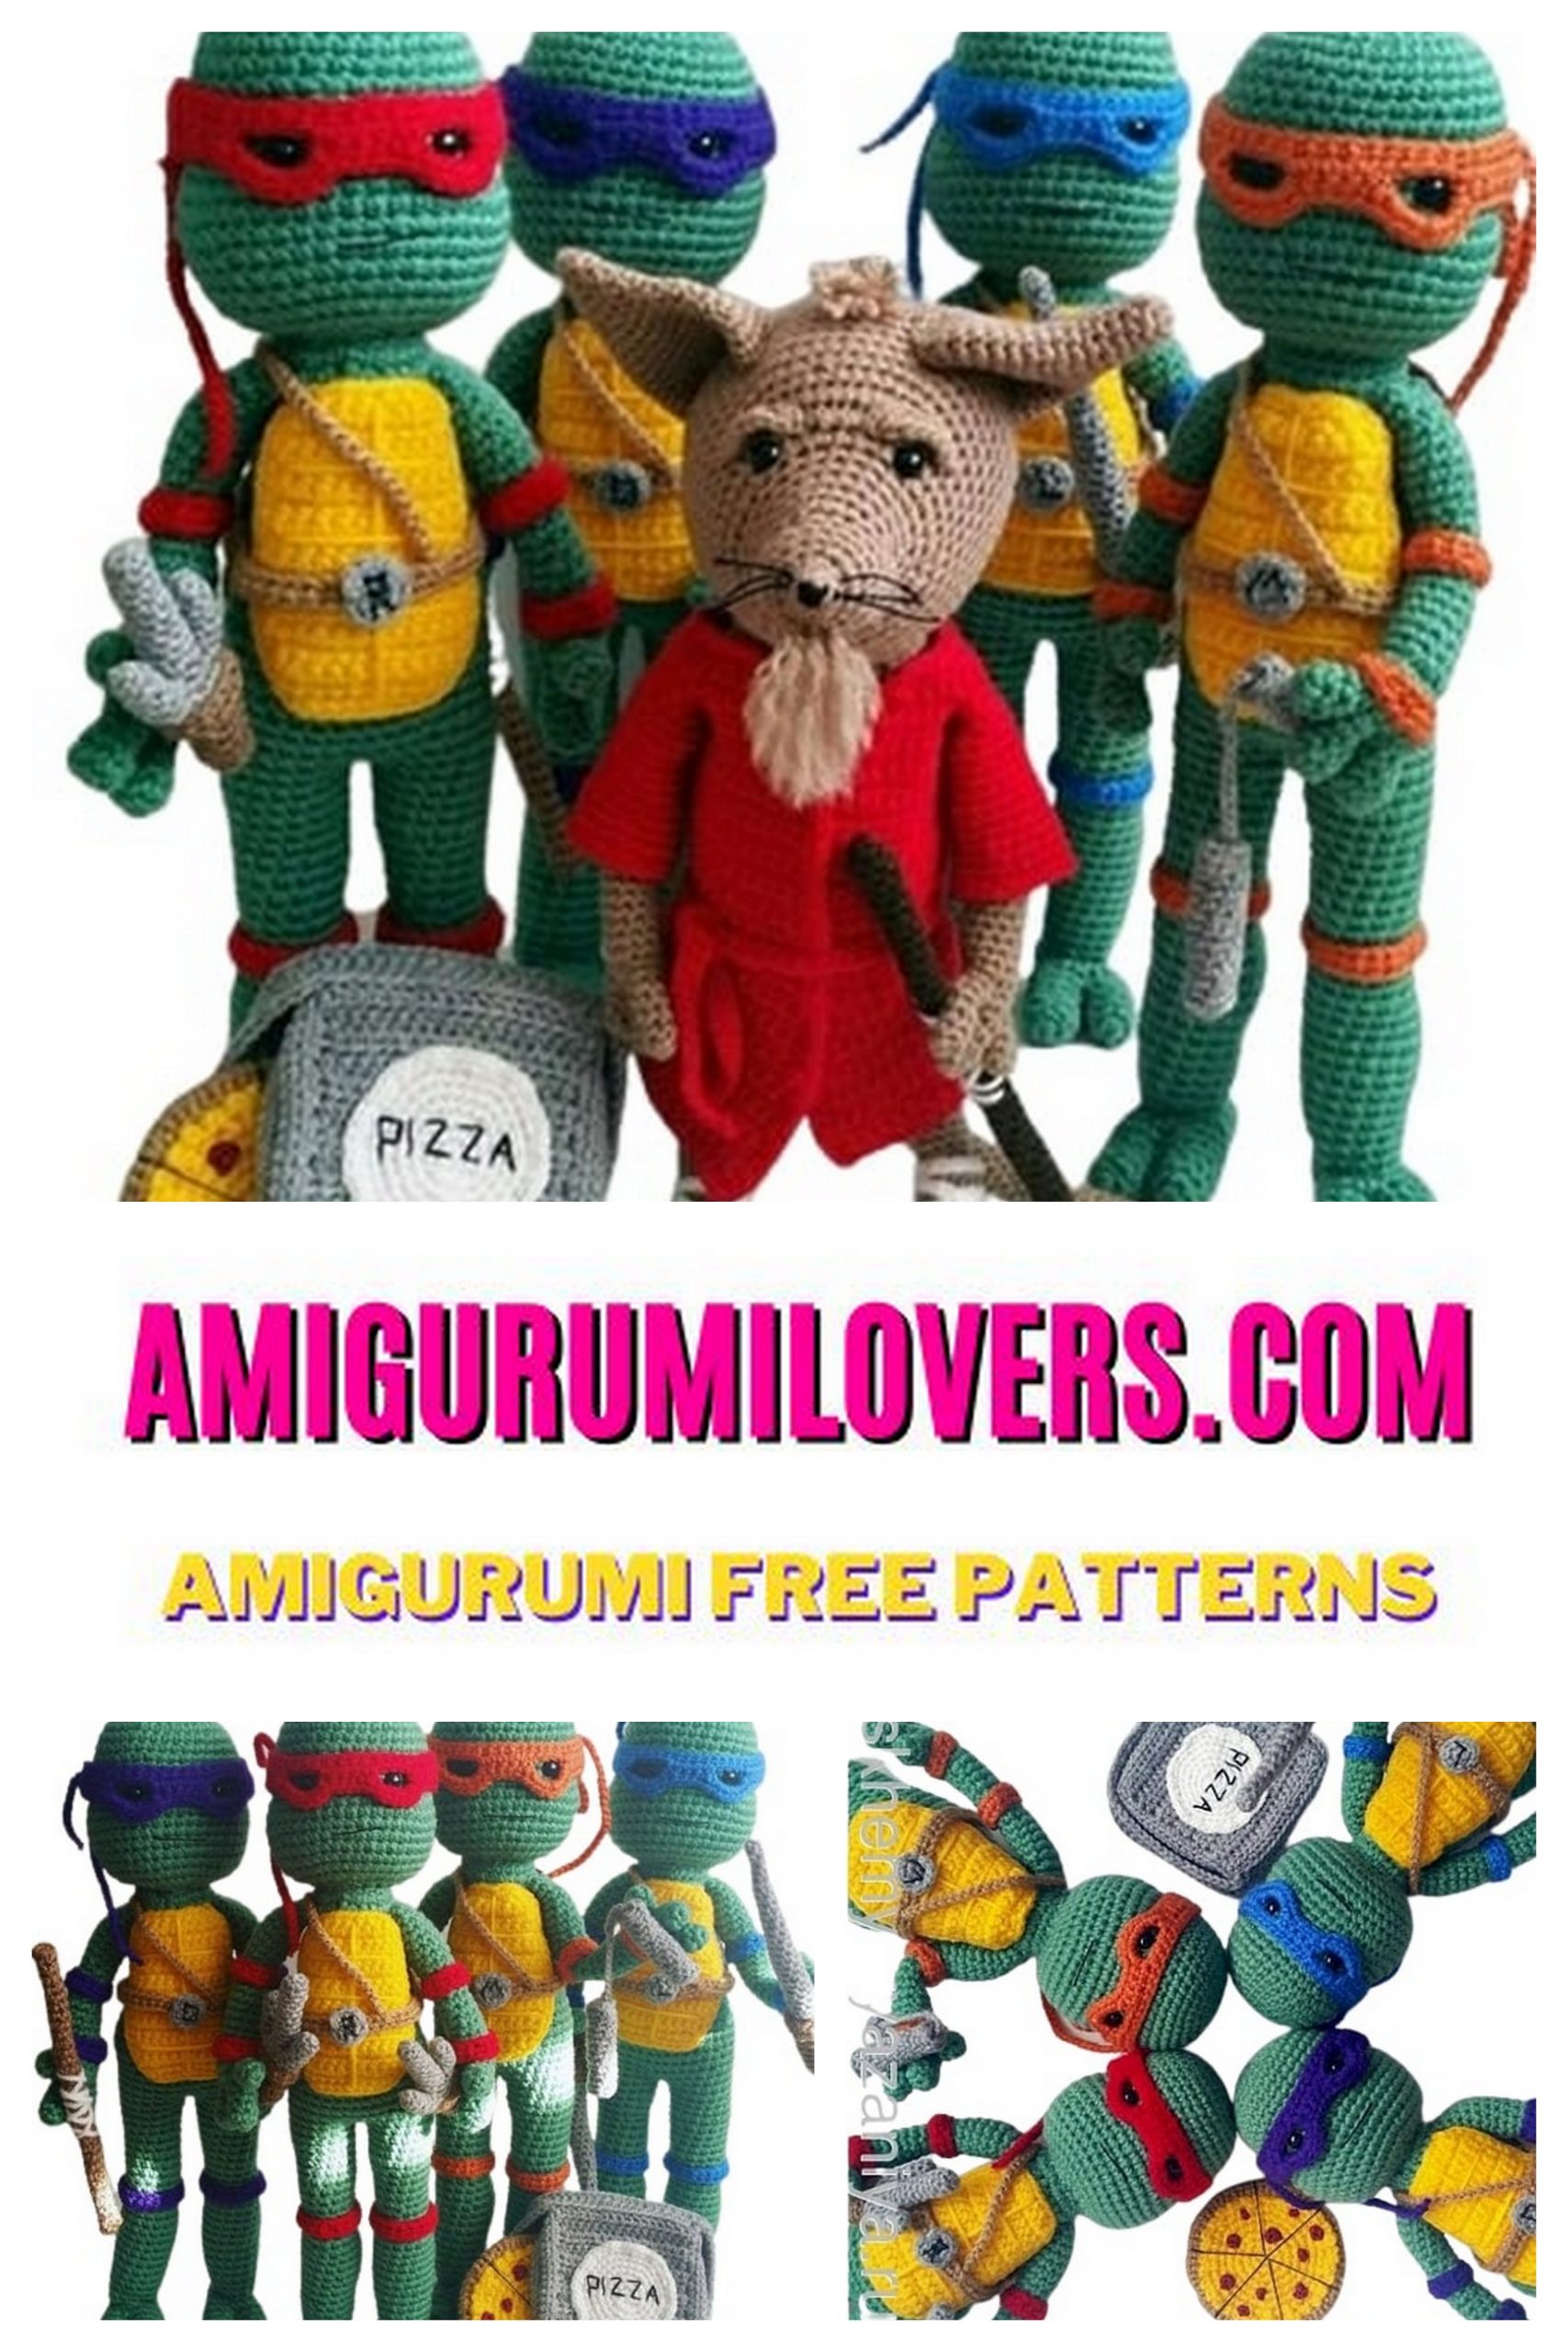
Free Amigurumi Ninja Turtles Pattern
You may also enjoy exploring our free amigurumi patterns and other popular amigurumi animal patterns available on our website.
Are you ready to embark on a fun and creative crochet adventure? If you’ve been searching for the perfect project to flex your crafting skills, look no further. In this post, we’re thrilled to share a free amigurumi pattern that will bring your favorite heroes in a half shell to life—Ninja Turtles! Whether you’re a novice or an experienced crocheter, this beginner-friendly guide will walk you through each step, ensuring a satisfying and enjoyable crafting experience.
Amigurumi is a Japanese art form that involves crocheting small, stuffed animals or figures. These charming creations have become immensely popular amongst crafters around the world, and for good reason. Not only does making amigurumi allow you to express your creativity, but it also offers a wonderful way to create unique and heartfelt gifts for friends and family. Imagine surprising a child—or even an adult—who adores the Teenage Mutant Ninja Turtles with a handmade Michelangelo, Leonardo, Donatello, or Raphael. The joy on their face will be priceless!
In this comprehensive tutorial, you will receive a detailed, step-by-step pattern that is easy to follow, even if you’re new to crochet. We’ll cover everything from selecting the right yarn and tools to completing the intricate details that make each turtle unique. With clear instructions and helpful tips, you’ll find that crafting your own amigurumi Ninja Turtles is not only achievable, but it will also ignite a newfound passion for crochet.
We understand that starting a new project can sometimes feel overwhelming, especially when faced with complicated patterns. That’s why we’ve designed this free amigurumi pattern with beginners in mind. Our aim is to make the process as smooth and enjoyable as possible. You’ll learn essential crochet techniques along the way, such as stitching, joining pieces, and adding embellishments, all while creating adorable characters that you can cherish or gift.
So grab your crochet hook, some colorful yarn, and let’s dive into this exciting project together. Whether you’re aiming to enhance your crochet skills or simply looking for a delightful way to spend an afternoon, this free amigurumi Ninja Turtles pattern is the perfect choice. We can’t wait to see what you create, and we are here to support you at every stitch. Let’s unleash our creativity and make some amazing Ninja Turtles that will surely become treasured keepsakes!
Cowabunga, crochet enthusiasts! If you’re a fan of the Teenage Mutant Ninja Turtles and love all things cute and crafty, you’re in for a treat. Our free crochet pattern for amigurumi Ninja Turtles is here to help you bring your favorite crime-fighting reptilian heroes to life in a whole new way.
Amigurumi allows you to transform iconic characters into soft and huggable plush toys, and what better way to do that than with Leonardo, Michelangelo, Donatello, and Raphael? With our easy-to-follow pattern, you can create your own squad of ninja turtles, each with its unique personality and charm.
Whether you’re a crochet pro or just starting out, our step-by-step guide will walk you through the process. From selecting the right yarn colors to mastering the essential stitches, you’ll soon have your own turtle heroes ready to defend the sewers and bring joy to fans of all ages.
So, gather your crafting materials and prepare to embark on a creative adventure in the world of Ninja Turtles amigurumi. These cuddly renditions make for fantastic gifts, nostalgic decorations, or companions for fans young and old. Stay tuned for more free amigurumi patterns and other exciting crochet projects, and get ready to crochet some turtle power into your life!
Materials:
★ Green yarn is the main color (author uses Red Heart Comfort yarn 100% acrylic, 450 g, 790 m)
★ Yarn of blue, purple, red, orange, yellow, gray, brown, light brown and white – for dressings, shell, weapons and pizza (author uses Red Heart Super Saver yarn 100% acrylic, 200 g, 300 m)
★ 2.5 mm hook from the author, or suitable for your yarn
★ 1.25 mm hook for pepperoni by the author, or suitable for your yarn
★ Ready eyes or 8mm half beads, or the size you need
★ Filler
★ Needle for stitching
PATTERN
Head (in green):
1 row: 6 sc into magic ring (6)
2 row: inc x 6 (12)
3 row: inc x 12 (24)
4 row: sc in EACH loop (24)
5 row: (1 sc, inc) x 12 (36)
6-11 rows: sc in EVERY loop (36)
12 row: 3 sc, (8 sc, dec) x 3, 3 sc (33)
13 row: In this row, the eyes are installed. You can do this in the knitting process, but it’s possible at the end. To whom it is more convenient. 11 sc, install eye, 7 sc, install eye, 15 sc (33)
14 row: 5 sc, inc x 3, 11 sc, inc x 3, 11 sc (39)
15 row: 7 sc, inc x 3, 13 sc, inc x 3, 13 sc (45)
16-17 rows: sc in EACH loop (45)
18 row: 8 sc, dec, 2 sc, dec, 15 sc, dec, 2 sc, dec, 10 sc (41)
19-22 rows: sc in EACH loop (41)
23 row: 1 sc, dec x 20 (21)
24 row: 1 sc, dec x 10 (11) – fill with filler
25 row: 1 sc, dec x 5 (6)
26 row: dec x 3 (3)
Finish knitting. Pull off the hole. Thread cut, leaving a long end for sewing on.
Torso (in green):
Stuff in the course of knitting.
1 row: We start from the neck. Dial 24 CH and lock into the ring (24)
2-5 rows: sc in EACH loop (24)
6 row: (3 sc, inc) x 6 (30)
7-9 rows: sc in EACH loop (30)
10 row: 5 sc, inc x 5, 9 sc, inc x 5, 6 sc (40)
11-13 rows: sc in each loop (40)
14 row: 9 sc, dec, 2 sc, dec, 12 sc, dec, 2 sc, dec, 7 sc (36)
15-18 Rd: sc to EACH loop (36)
19 row: We begin to knit the first leg. 1 sc, skip 18 loops, 17 sc (18)
20-23 rows: sc in EACH loop (18)
24 row: (4 sc, dec) x 3 (15)
25-32 rows: sc in EACH loop (15)
33 row: 13 sc, inc x 2 (17)
34 row: inc x 2, 15 sc (19)
35-39 rows: sc in EACH loop (19)
40 row: (1 sc, dec) x 2, 11 sc, dec (16)
41 row: dec, 14 sc (15)
42-44 rows: sc in EVERY loop (15)
Finish knitting. Cut the thread, leaving a long end for sewing on the foot.
Foot (x2, green):
1 finger:
1 row: 6 sc into magic ring (6)
2 row: (inc, 2 sc) x 2 (8)
3-5 rows: sc per EACH loop (8)
6 row: inc, 7 sc (9)
Finish knitting. Cut the thread.
2 finger:
1 row: 6 sc into magic ring (6)
2 row: (inc, 2 sc) x 2 (8)
3-5 rows: sc per EACH loop (8)
6 row: inc, 7 sc (9)
7 row: Connect both fingers, tie sc (18)
8 row: sc in EACH loop (18)
9 row: 1 sc, (1 sc, dec) x 5, 2 sc (13)
10-13 rows: sc in EACH loop (13)
14 row: 1 sc, dec x 6 (7) – fill with filler
15 row: dec x 3 (3)
Finish knitting. Sew to the foot. Knit the second foot as well.
Second leg (in green):
Turn the toy over with its back to itself and fasten the thread to the left of the first leg.
1 row: sc in EACH loop (18)
2-3 rows: sc in EACH loop (18)
4 row: (4 sc, dec) x 3 (15)
5-14 rows: sc in EACH loop (15)
15 row: 5 sc, inc x 4, 6 sc (19)
16-20 rows: sc in EVERY loop (19)
21 row: 6 sc, dec x 3, 7 sc (16)
22 row: 6 sc, dec, 8 sc (15)
23-26 rows: sc in EACH loop (15)
Finish knitting. Cut the thread, leaving a long end for sewing. To sew a foot.
Hands (x2, green):
1 finger:
1 row: 6 sc into magic ring (6)
2 row: inc, 5 sc (7)
3 row: sc in EACH loop (7)
4 row: dec, 5 sc (6)
5 row: sc in EACH loop (6)
Finish knitting. Cut the thread.
2 finger:
1 row: 6 sc into magic ring (6)
2 row: inc, 5 sc (7)
3 row: sc in EACH loop (7)
4 row: dec, 5 sc (6)
5 row: sc in EACH loop (6)
6 row: connect both fingers, tie sc (12)
7-9 rows: sc in EACH loop (12)
10 row: (2 sc, dec) x 3 (9)
11-19 rows: sc to EVERY loop (9)
20 row: 1 sc, (3 sc, inc) x 2 (11)
21-24 rows: sc in EVERY loop (11)
25 row: 1 sc, (3 sc, dec) x 2 (9)
26-27 rows: sc in EACH loop (9)
Finish knitting. Cut the thread, leaving a long end for sewing.
Knit the second hand as well.
Thumb (x2, green):
1 row: 6 sc into magic ring
2-4 rows: sc in EACH loop (6)
Finish knitting. Cut the thread, leaving a long end for sewing. Sew to hand.
Second finger knit as well.
Sew hands to the body
Front part of the shell (yellow):
Knit in rotary rows.
1 row: dial 10 air loops (10)
2 row: 9 sc from the second loop from the hook (9)
3 row: CH, turn, inc, 7 sc, inc (11)
4 row: CH, turn, 11 sc (11)
5 row: CH, turn, inc, 9 sc, inc (13)
6-10 rows: CH, turn, 13 sc (13)
11 row: CH, turn, dec, 9 sc, dec (11)
12-16 rows: CH, turn, 11 sc (11)
17 row:: CH, turn, dec, 7 sc, dec (9)
18 row:: CH, turn, dec, 5 sc, dec (7)
19 row: do not turn! Fully oblige item sc.
Finish knitting. Cut the thread, leaving a long end for sewing.
Embroider the cubes. Sew to the torso.
The back of the shell (brown):
1-18 rows: knit like 18 rows of the front
19 row: do not turn, tie the part until 50 sc (50)
20 row: inc, 49 sc (51)
21 rows: sc in EVERY loop (51)
Finish knitting. Cut the thread, leaving a long end for sewing.
Sew to the body, stuffing with filler.
Headband (blue, purple, red and orange colors):
Knit in rotary rows.
1 row: Dial 30 CH (30)
2 row: 29 sc from the second loop from the hook (29)
3 row: CH, turn, 9 sc, 7 CH, skip 3 loops, 5 sc, 7 CH, skip 3 loops, 9 sc (37)
4 row: CH, turn, 37 sc (37)
Make a tie. Finish knitting. Cut the thread.
Elbow Pads (x2, blue, purple, red and orange colors):
Knit in rotary rows.
1 row: Dial 14 CH (14)
2 row: 13 sc from the second loop from the hook (13)
Finish knitting. Cut the thread, leaving a long end for sewing.
Put on a toy and sew in a ring.
Wristbands (x2, blue, purple, red and orange colors):
Knit in rotary rows.
1 row: Dial 17 CH (17)
2 row: 16 sc from the second loop from the hook (16)
Finish knitting. Cut the thread, leaving a long end for sewing.
Put on a toy and sew in a ring.
Kneepads (x2, blue, purple, red and orange colors):
Knit in rotary rows.
1 row: Dial 23 CH (23)
2 row: 22 sc from the second loop from the hook (22)
Finish knitting. Cut the thread, leaving a long end for sewing.
Put on a toy and sew in a ring.


Belt (light brown):
Knit in rotary rows.
1 row: Dial 52 CH (52)
2 row: 51 sc from the second loop from the hook (51)
Finish knitting. Cut the thread, leaving a long end for sewing. Put on a belt on a toy and sew into a ring.
Shoulder Strap (light brown):
1 row: Dial 52 CH (52)
Finish knitting. Cut the thread, leaving a long end for sewing.
Sew to the belt.
Buckle (in gray):
1 row: 6 sc into magic ring (6)
2 row: inc x 2 (12)
Finish knitting. Cut the thread, leaving a long end for sewing.
Embroider the first letter of the name.
L – Leonardo Blue Armband
D – Donatello Purple Headband
R – Raphael Red Dressing
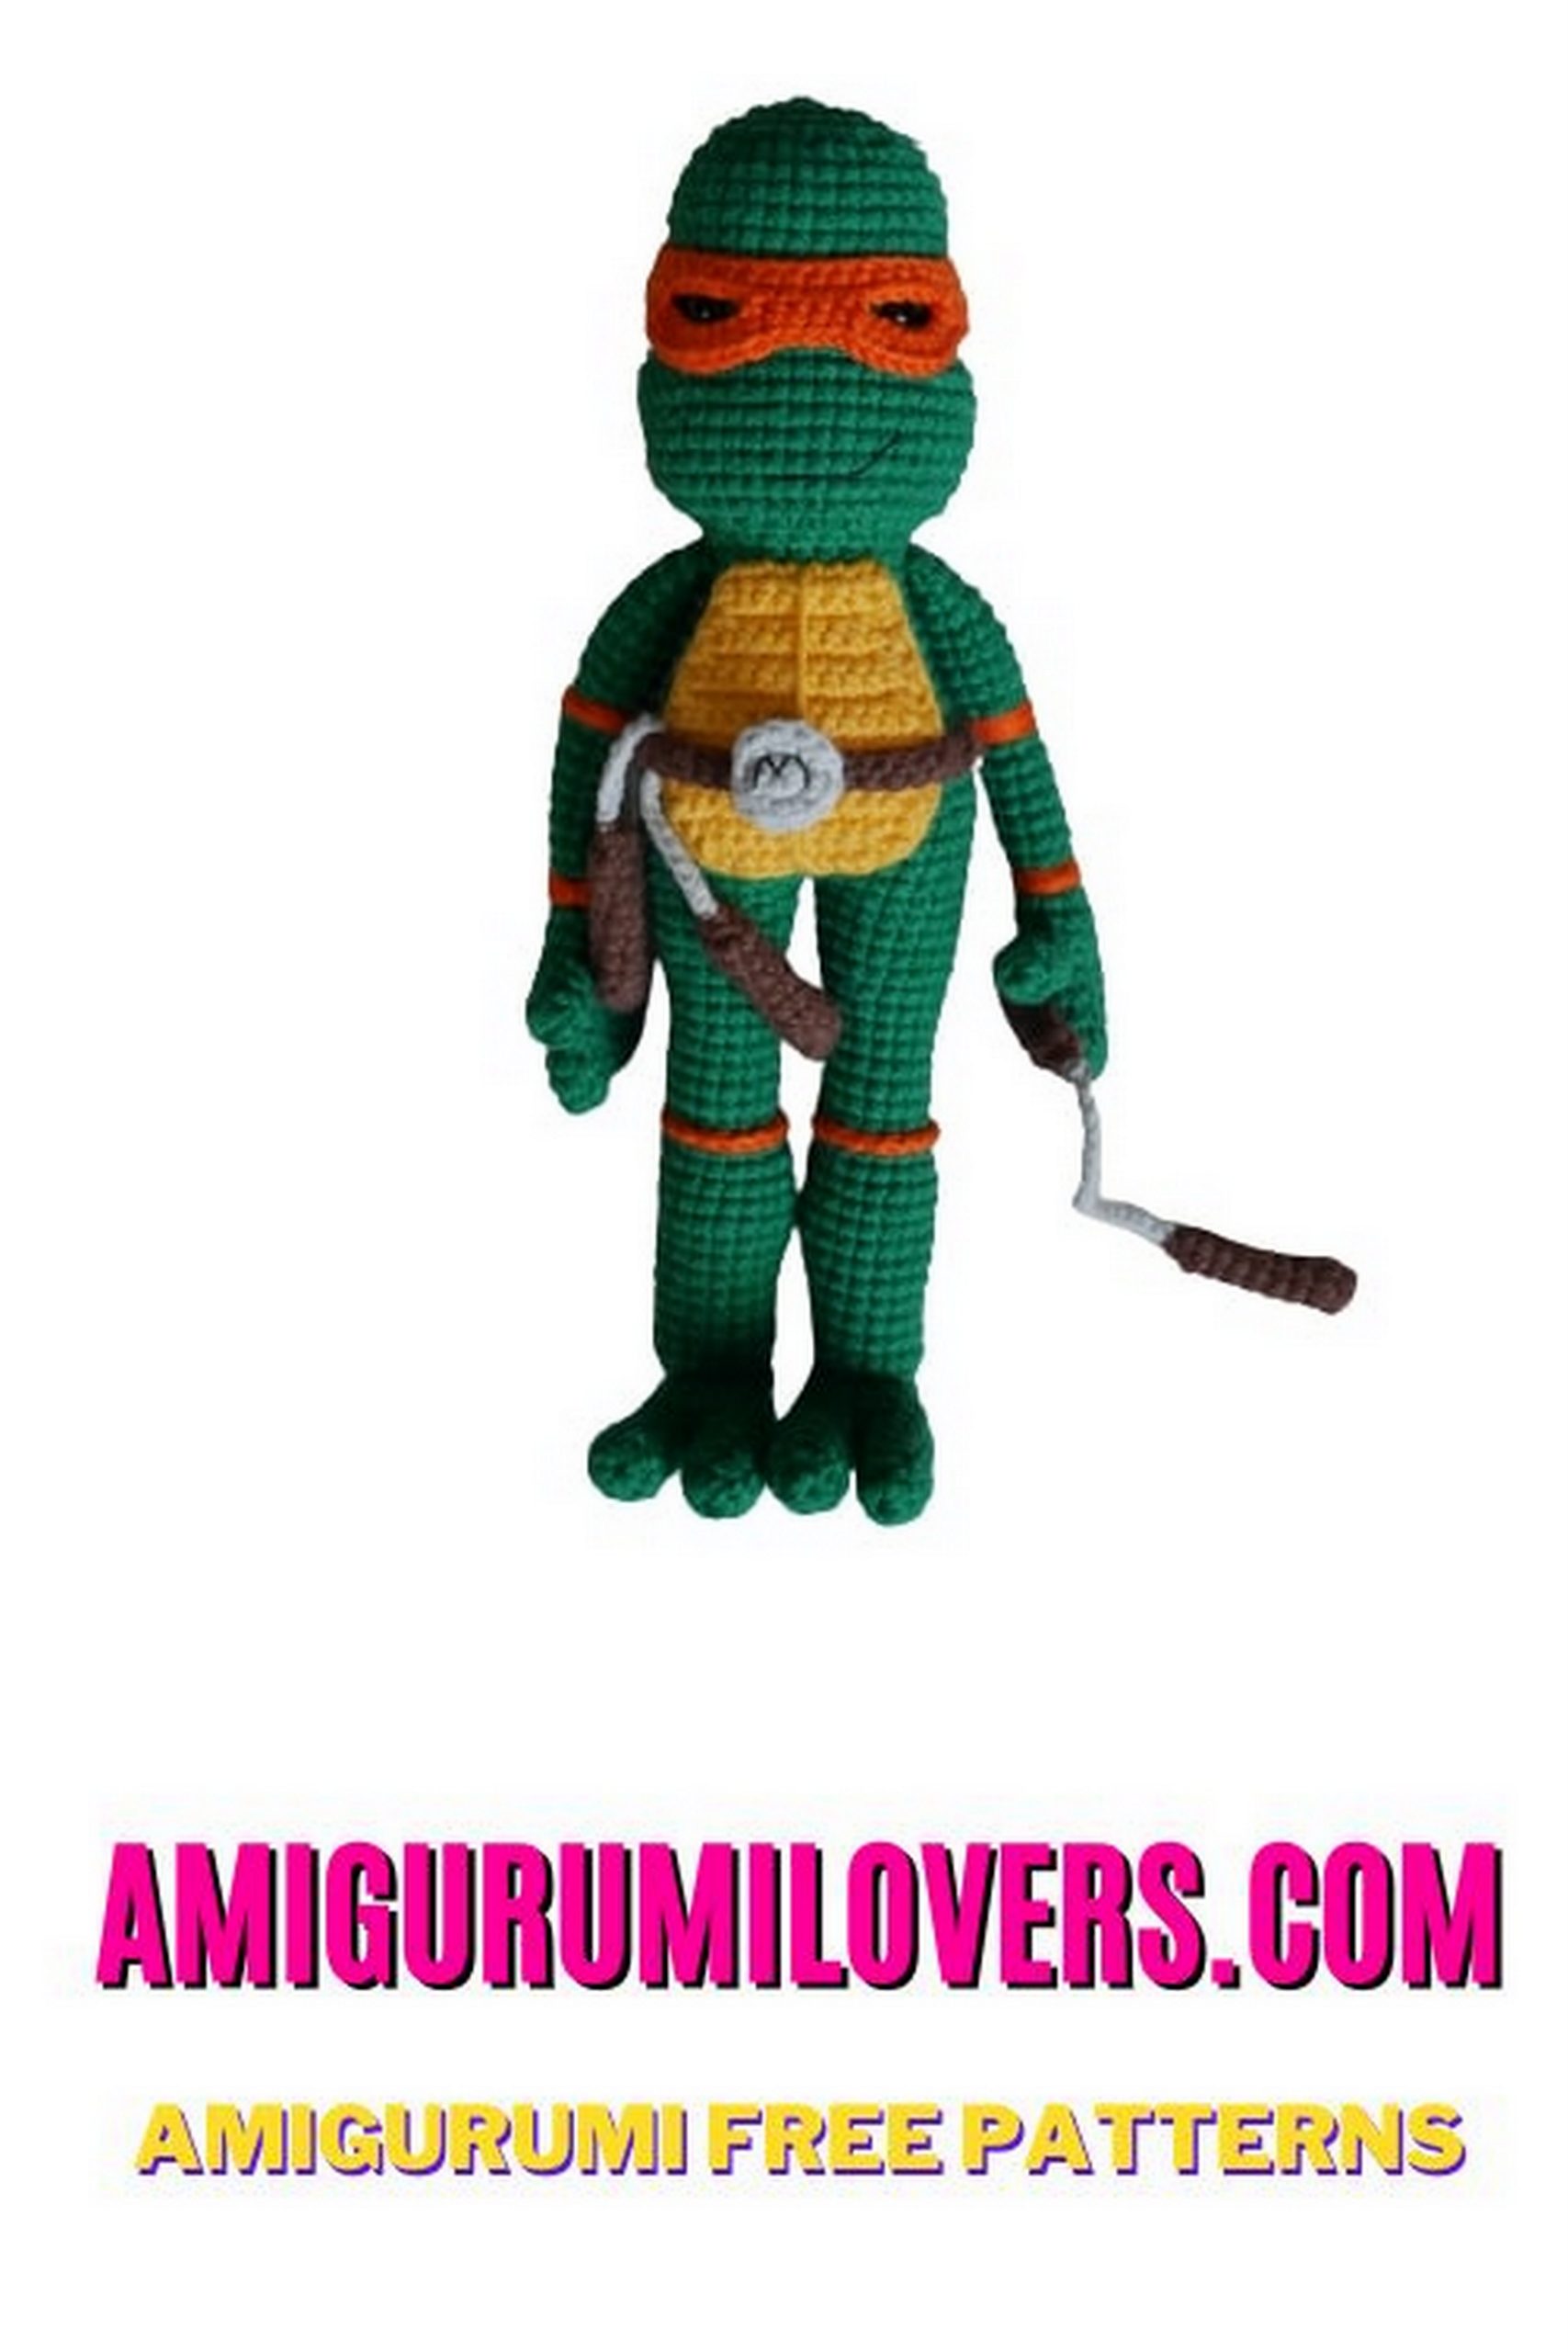
M – Michelangelo, orange bandage.
Sew a buckle to your belt. Put a belt on a toy and sew it into a ring.
Six-bo (aka stick, brown):
1 row: 5 sc into magic ring (5)
2-34 rows: sc in EACH loop (5)
Finish knitting. Cut the thread.
Wrap with white thread, as in the photo.
Six-bo – Donatello’s weapon.
Nunchucks (x2, gray):
1 row: 6 sc into magic ring (6)
2 row: (inc, 1 sc) x 3 (9)
3 row: 9 sc behind the back wall of the loop (9)
4 row: 3 sc, dec, 4 sc (8)
4-14 rows: sc in EACH loop (8)
Finish knitting. Cut the thread.
The bottom of the nunchaku (x2, gray)
1 row: 6 sc into magic ring (6)
Finish knitting. Cut the thread, leaving a long end for sewing.
Sew to the base of the nunchaku.
Chain for nunchaku (in gray):
1 row: Dial 17 CH (17)
Finish knitting. Cut the thread, leaving a long end for sewing.
Sew to the base of the nunchaku.
Nunchucks are Michelangelo’s weapons. He has 2 of them, so the details the base and lower part you need to make 4 pieces, and the chains – 2. But you can make one nunchak.
Katanas (swords, x2):
Start gray
1 row: 5 sc into magic ring (5)
2-6 rows: sc in EACH loop (5)
7 row: inc, 4 sc (6)
8-13 rows: sc in EACH loop (6)
14 row: inc, 5 sc (7)
15 row: sc in EACH loop (7)
16 row: 3 sc, inc, 3 sc (8)
17-27 rows: sc in EVERY loop (8)
28 row: (3 sc, inc) x 2 (10)
29 row: sc in EACH loop (10)
Change to brown
30 row: sc in EACH loop (10)
31 row: (inc, 4 sc) x 2 (12)
32-34 rows: sc in EACH loop (12)
35 row: dec, 10 sc (11)
36 row: dec, 9 sc (10)
Finish knitting. Cut the thread.
Lower katana (x2, brown):
1 row: 6 sc into magic ring (6)
2 row: (inc, 1 sc) x 2 (8)
Finish knitting. Cut the thread, leaving a long end for sewing.
Sew to the base of the katana.
Finishing katana (x2, brown):
* I don’t know what else to call it.
Knit in rotary rows
1 row: Dial 13 CH (13)
2 row: 12 sc from the second loop from the hook (12)
3 row: CH, turn, sc in EACH loop (12)
Finish knitting. Cut the thread, leaving a long end for sewing.
Sew to the base of the katana, locking it into a ring.
Katanas are the weapons of Leonardo.
Sai (large blade in the middle, in gray):
1 row: 6 sc into magic ring (6)
2 row: inc, 5 sc (7)
3-12 rows: sc in each loop (7)
Finish knitting. Cut the thread.
Sai (small blades, x2, gray):
1 blade:
1 row: 6 sc into magic ring (6)
2-6 rows: sc in EACH loop (6)
Finish knitting. Cut the thread.
2 blade:
1 row: 6 sc into magic ring (6)
2-6 rows: sc in EACH loop (6)
7 row: Connect the three blades (small-large-small), tie sc (15)
8 row: sc in EACH loop (15)
Change to brown
9 row: (3 sc, dec) x 3 (12)
10 row: sc in EACH loop (12)
11 row: (1 sc, dec) x 4 (8)
12-14 rows: sc in EVERY loop (8)
Finish knitting. Cut the thread.
Sai bottom (brown):
1 row: 6 sc into magic ring (6)
Finish knitting. Cut the thread, leaving a long end for sewing.
Sew to the base of the bark.
Sai finish (brown):
Knit in rotary rows
1 row: Dial 13 CH (14)
2 row: 13 sc from the second loop from the hook (13)
Finish knitting. Cut the thread, leaving a long end for sewing.
Sew to the base of the bark, closing in a ring.
The second sai knit similarly.
Sai – Raphael’s weapon.
Pizza dough (light brown):
1 row: 6 sc into magic ring (6)
2 row: inc x 6 (12)
3 row: (1 sc, inc) x 6 (18)
4 row: (inc, 1 sc) x 9 (27)
5 row: sc in EACH loop (27)
6 row: (2 sc, inc) x 9 (36)
7 row: (1 sc, inc) x 18 (54)
8 row: sc in EACH loop (54)
9 row: 54 sc behind the back loop (54)
10 row: (4 sc, inc) x 10, 3 sc, inc (65)
11 row: sc in EACH loop (65)
Finish knitting. Cut the thread.
Cheese (yellow):
1 row: 6 sc into magic ring (6)
2 row: inc x 6 (12)
3 row: (1 sc, inc) x 6 (18)
4 row: (1sc, inc, 1 sc) x 6 (24)
5 row: (3 sc, inc) x 6 (30)
6 row: (4 sc, inc) x 6 (36)
Finish knitting. Cut the thread, leaving a long end for sewing.


Pepperoni (small pieces, crocheted 1.25 mm, 6 pcs.):
1 row: 6 sc into magic ring (6)
Finish knitting. Cut the thread, leaving a long end for sewing.
Pepperoni (large pieces, crocheted 1.25 mm, 6 pcs.):
1 row: 6 sc into magic ring (6)
2 row: inc x 6 (12)
Finish knitting. Cut the thread, leaving a long end for sewing.
Sew pepperoni to cheese. Sew cheese to pizza. “Cut the pizza into pieces.”
Pizza box (in gray):
Start knitting in rotary rows
1 row: Dial 23 CH (23)
2 row: 22 hdc from the second loop from the hook (22)
3-15 rows: CH, turn, 22 hdc (22)
16 row: DO NOT TURN, tie the sc part until 77 sc (77)
17 row: knit for the back wall of the loop, 10 hdc, hdc2vm, 12 hdc, hdc2vm, 12 hdc, hdc2bm, 10 hdc, hdc2bm, 15 hdc, hdc2bm, 6 hdc, hdc2bm, 3 hdc (74)
18 row: hdc in EACH loop (74)
19 row: start knitting the cover,1 hdc, CH, turn,17 hdc behind the front wall hinges (18) Continue in the turning rows
20-31 rows: CH, turn, 17 hdc (17)
Finish knitting. Cut the thread.
Side cover (gray):
1 row: Fasten the thread in one of the loops of the cover and knit 55 sc (55)
2 row: 55 sc behind the front wall of the hinge (55)
3-4 rows: sc per EACH loop (55)
Finish knitting. Cut the thread.
Circle on the lid (white):
1 row: 6 sc into magic ring (6)
2 row: inc x 6 (12)
3 row: (inc, 1 sc) x 6 (18)
4 row: (2 sc, inc) x 6 (24)
5 row: (3 sc, inc) x 6 (30)
6 row: (2 sc, inc, 2 sc) x 6 (36)
7 row: 3 sc, (2 sc, inc) x 10, 3 sc (46)
Finish knitting. Cut the thread, leaving a long end for sewing. Embroider the word “PIZZA”. Sew to the box lid. Put the pizza in the box.
Note: the author assembles the toy after all the details are connected. To me personally
It is convenient to collect along the knitting. You can do as you wish.
Before you leave, make sure to check out more free amigurumi crochet patterns and discover new ideas for your next project.
You can also browse our full amigurumi pattern archive for hundreds of beginner-friendly designs.