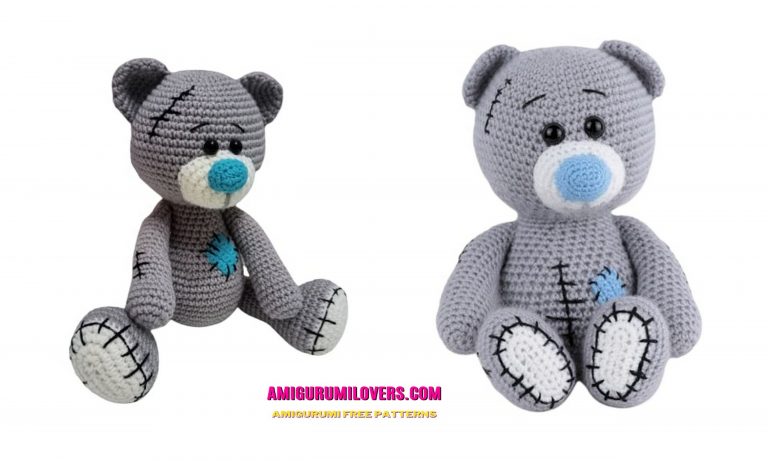
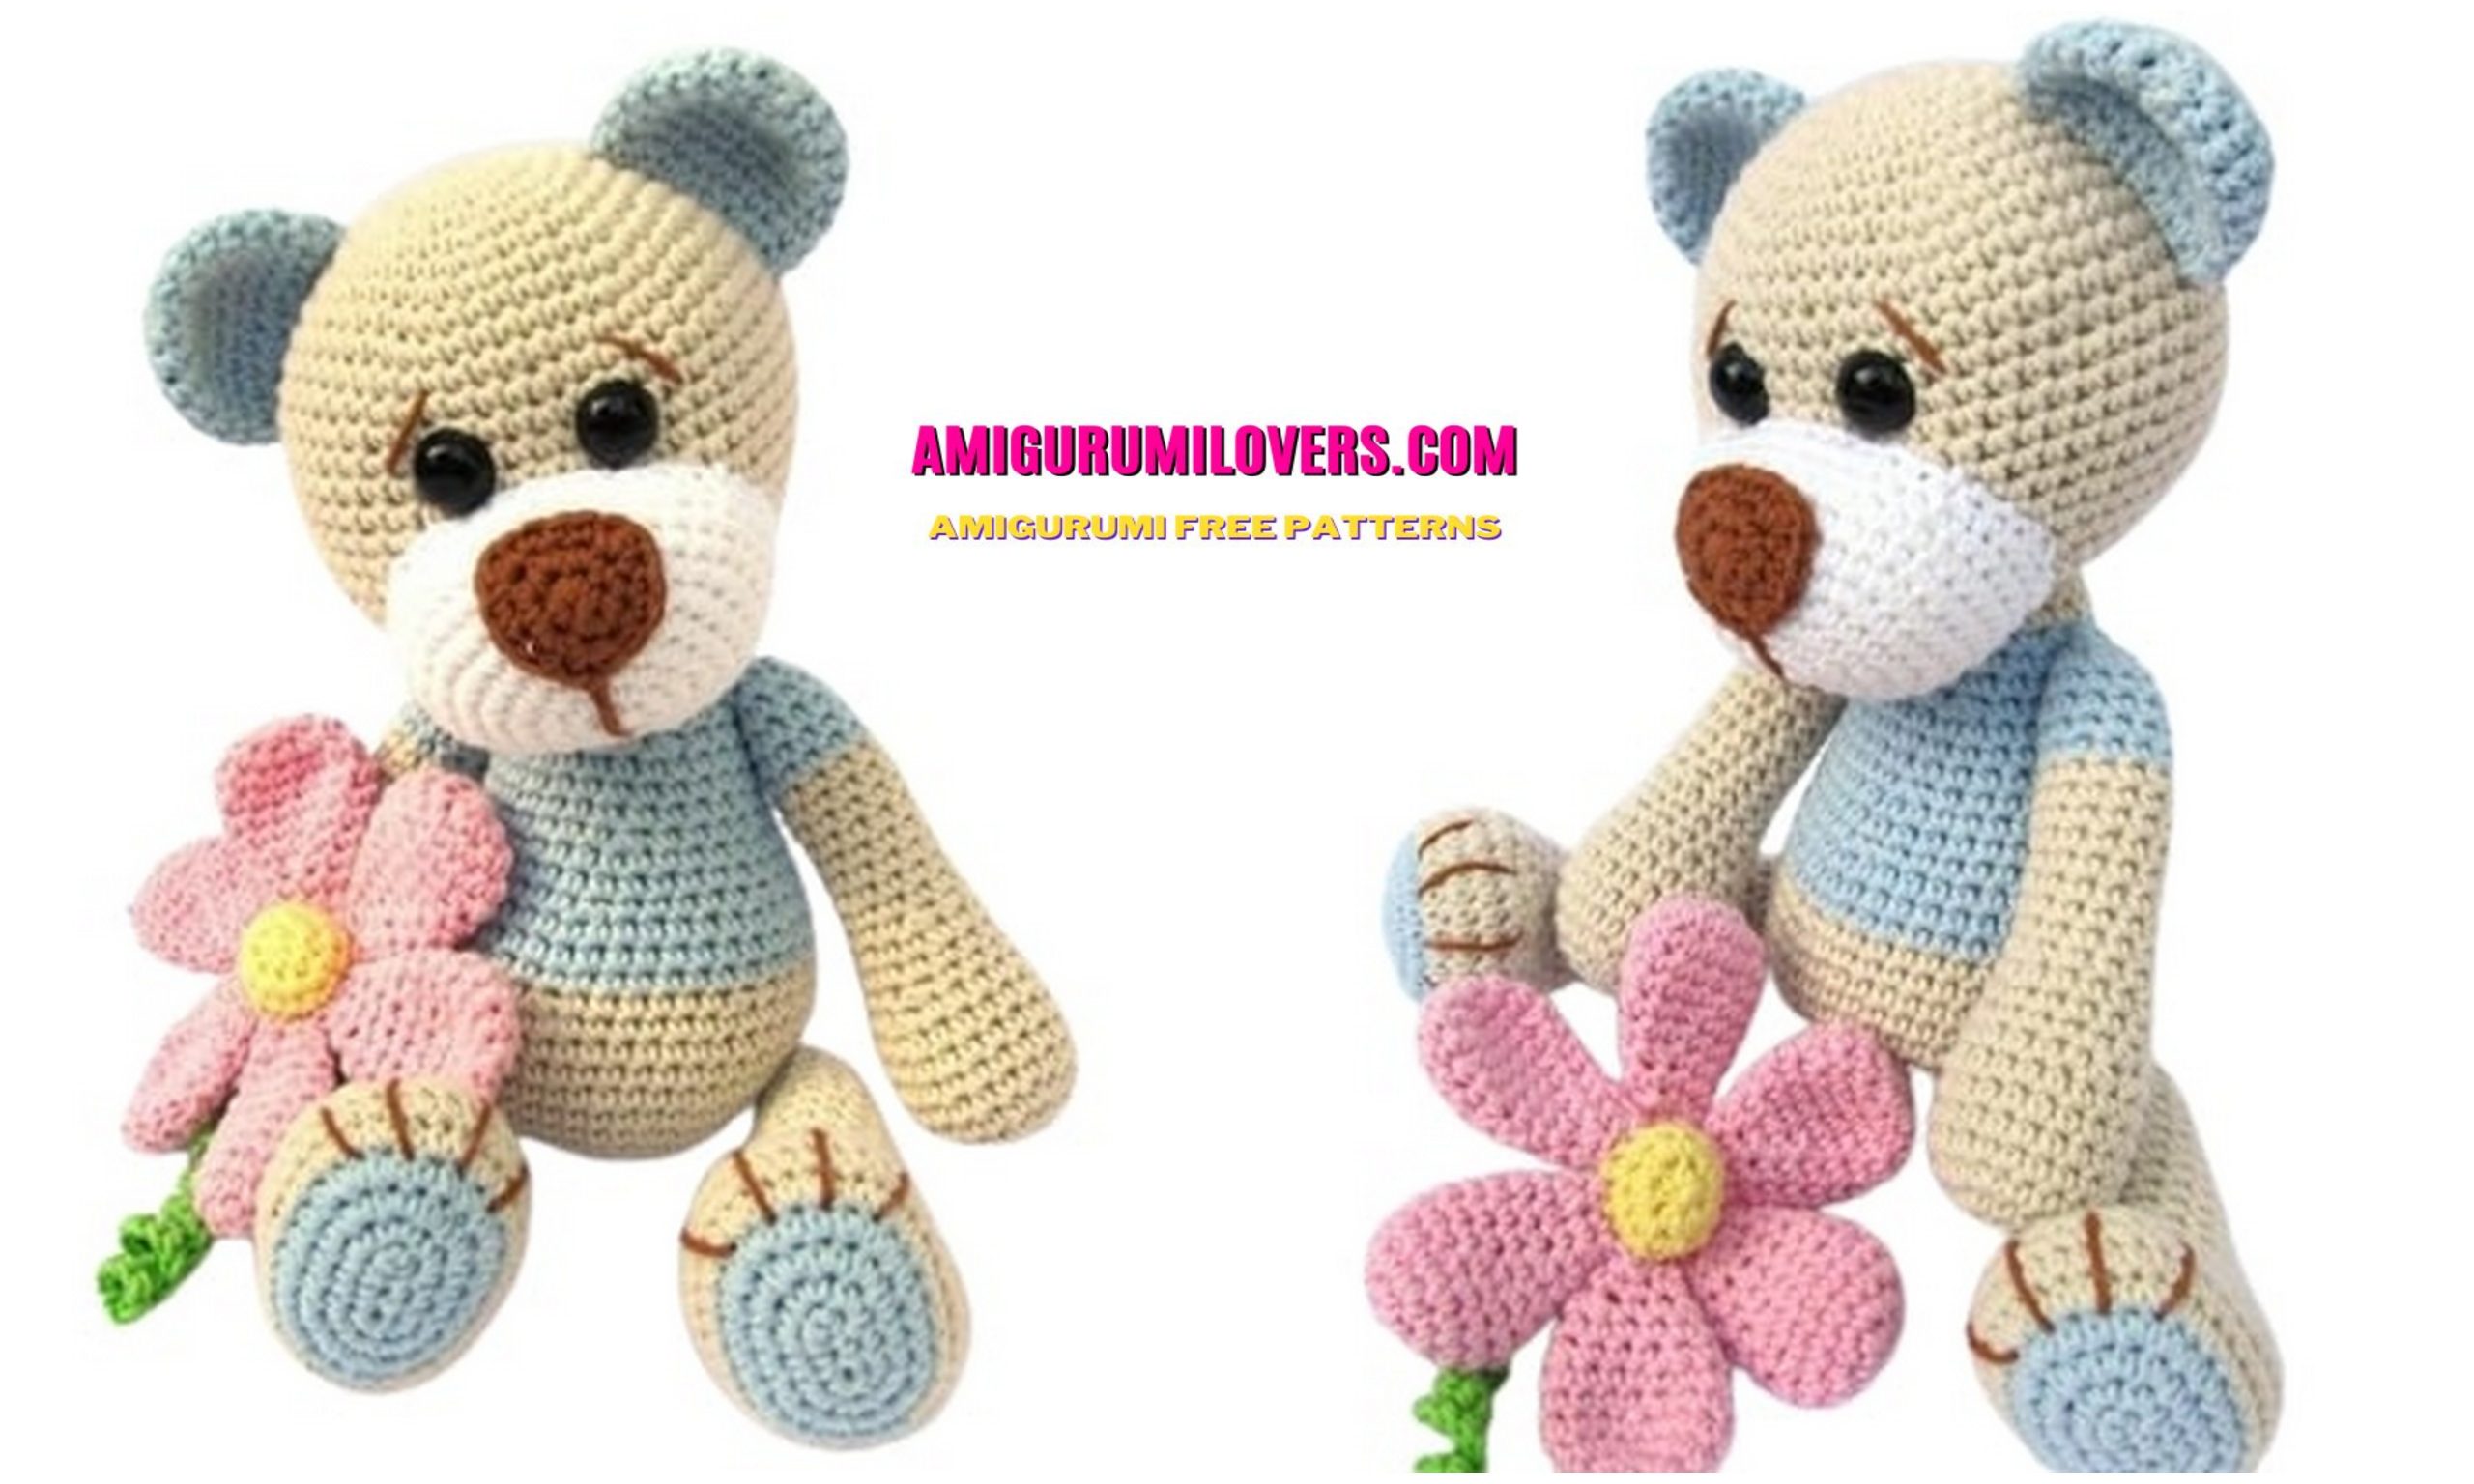
Amigurumi Teddy Bear Free Pattern
You may also enjoy exploring our free amigurumi patterns and other popular amigurumi animal patterns available on our website.
Welcome to our crochet haven, where creativity and craftsmanship collide! If you’re new to the world of crocheting or seeking a delightful project that will spark joy and creativity, you’ve landed in the right place. Today, we’re thrilled to share with you our free amigurumi crochet pattern to create an adorable teddy bear that’s perfect for beginners and experts alike. Amigurumi, the Japanese art of knitting or crocheting small stuffed animals and creatures, has gained immense popularity thanks to its charm and cuteness. This teddy bear pattern is not only simple but also an excellent way to practice your crocheting skills while producing a treasured finished product.
Making your own amigurumi teddy bear can be a rewarding experience, and it allows you to add a personal touch with colors and embellishments of your choice. Whether you’re creating it for a child, a friend, or simply as a decorative item for your home, this teddy bear is sure to bring smiles and warmth. This step-by-step guide will walk you through the process, ensuring that even if you’ve just picked up a crochet hook for the first time, you’ll find it manageable and fun. You might just discover a new favorite hobby!
Before you dive into the pattern, gather your materials: soft yarn in your preferred teddy bear color, a crochet hook, stuffing, and perhaps some safety eyes to bring your creation to life. The beauty of making an amigurumi teddy bear lies in the adaptability of the pattern. Feel free to customize your bear by changing the colors or adding accessories such as a tiny scarf or a bow. The possibilities are endless, and every bear you create can be unique! This lovely project will help you develop your skills in constructing rounds, increasing, decreasing, and more, all while creating something utterly adorable.
The best part about this free pattern is that it caters to the crochet community’s love for sharing and learning from one another. We believe that every stitch you make contributes to a greater world of creativity and connection. So, don’t hesitate to share your finished creations with friends and fellow crocheters to inspire them too. We also encourage you to ask questions or seek clarification as you follow the pattern; the crochet community is incredibly supportive and filled with resources to help you along the way. So grab your yarn, and let’s get started on this enchanting journey to create your own amigurumi teddy bear that’s bound to capture hearts and inspire your crochet endeavors!
We continue to share the most beautiful amongst thousands of designs for you, free of charge. In this article, we shared a very cute bear pattern. Hope you like it.
Abbreviations:
sc – single crochet
st – stitch
ch – chain stitch
Dec – sc next 2 stitches together
inc – sc in indicated stitch 2 times
rnd(s) – sl stround(s)
hdc – half double crochet
sl-st -slip stitch
Materials and tools:
• Yarn 150m / 50g (polyacrylic) and 120m / 50g (cotton):
• 50 gr blue
• 50 gr beige
• 20 gr white
• 10 gr pink
• 5 gr green
• Slightly yellow and brown
• 2 plastic eyes with a safety lock 14 mm or 2 black beads.
• Filler
• Hook number 3.5 or suitable for your yarn
• Needle
The beginning of every detail
There are two options for starting each detail (the author uses the second, so you can avoid extra hole):
1. Type 2 CH at the beginning and knit in the second from the hook
2. Make a magic ring amigurumi
Change of rows
Knit in a spiral without shifting the beginning of the row. The first column of the row is above the last column the previous one. Mark the beginning with contrasting string.
Head (beige)
1.6 sc into magic ring
2. (inc) x6 (12)
3. (1 sc, inc) x6 (18)
4. (2 sc, inc) x6 (24)
5. (3 sc, inc) x6 (30)
6. (4 sc, inc) x6 (36)
7. (5 sc, inc) x6 (42)
8. (6 sc, inc) x6 (48)
9. (7 sc, inc) x6 (54)
10-21. 54 sc (54)
22. (7 sc, dec) x6 (48)
23. (6 sc, dec) x6 (42)
24. (5 sc, dec) x6 (36)
25. (4 sc, dec) x6 (30)
Time to put in the eyes. Better do it on
13th row at a distance of 6 sc. Stuff your head.
26. (3 sc, dec) x6 (24)
27. (2 sc, dec) x6 (18)
28. (1 sc, dec) x6 (12)
29.dec x6 (6)
30.dec x3 (3)
Muzzle (white) Ears (2 parts, light blue)
1.6 sc into magic ring
2. (inc) x6 (12)
3. (1 sc, inc) x6 (18)
4. (2 sc, inc) x6 (24)
5. (3 sc, inc) x6 (30)
6. (4 sc, inc) x6 (36)
7. (5 sc, inc) x6 (42)
8-10. 42 sc (42)
11. (19 sc, dec) x2 (40)
1.6 sc into magic ring
2. (inc) x6 (12)
3. (1 sc, inc) x6 (18)
4. (2 sc, inc) x6 (24)
5-8. 24 sc (24)
9. (2 sc, dec) x6 (18)
Nose (brown)
1.6 sc into magic ring
2. (inc) x6 (12)
3. (sc, hdc, sc, 3 sc in 1 loop) x3 (18)
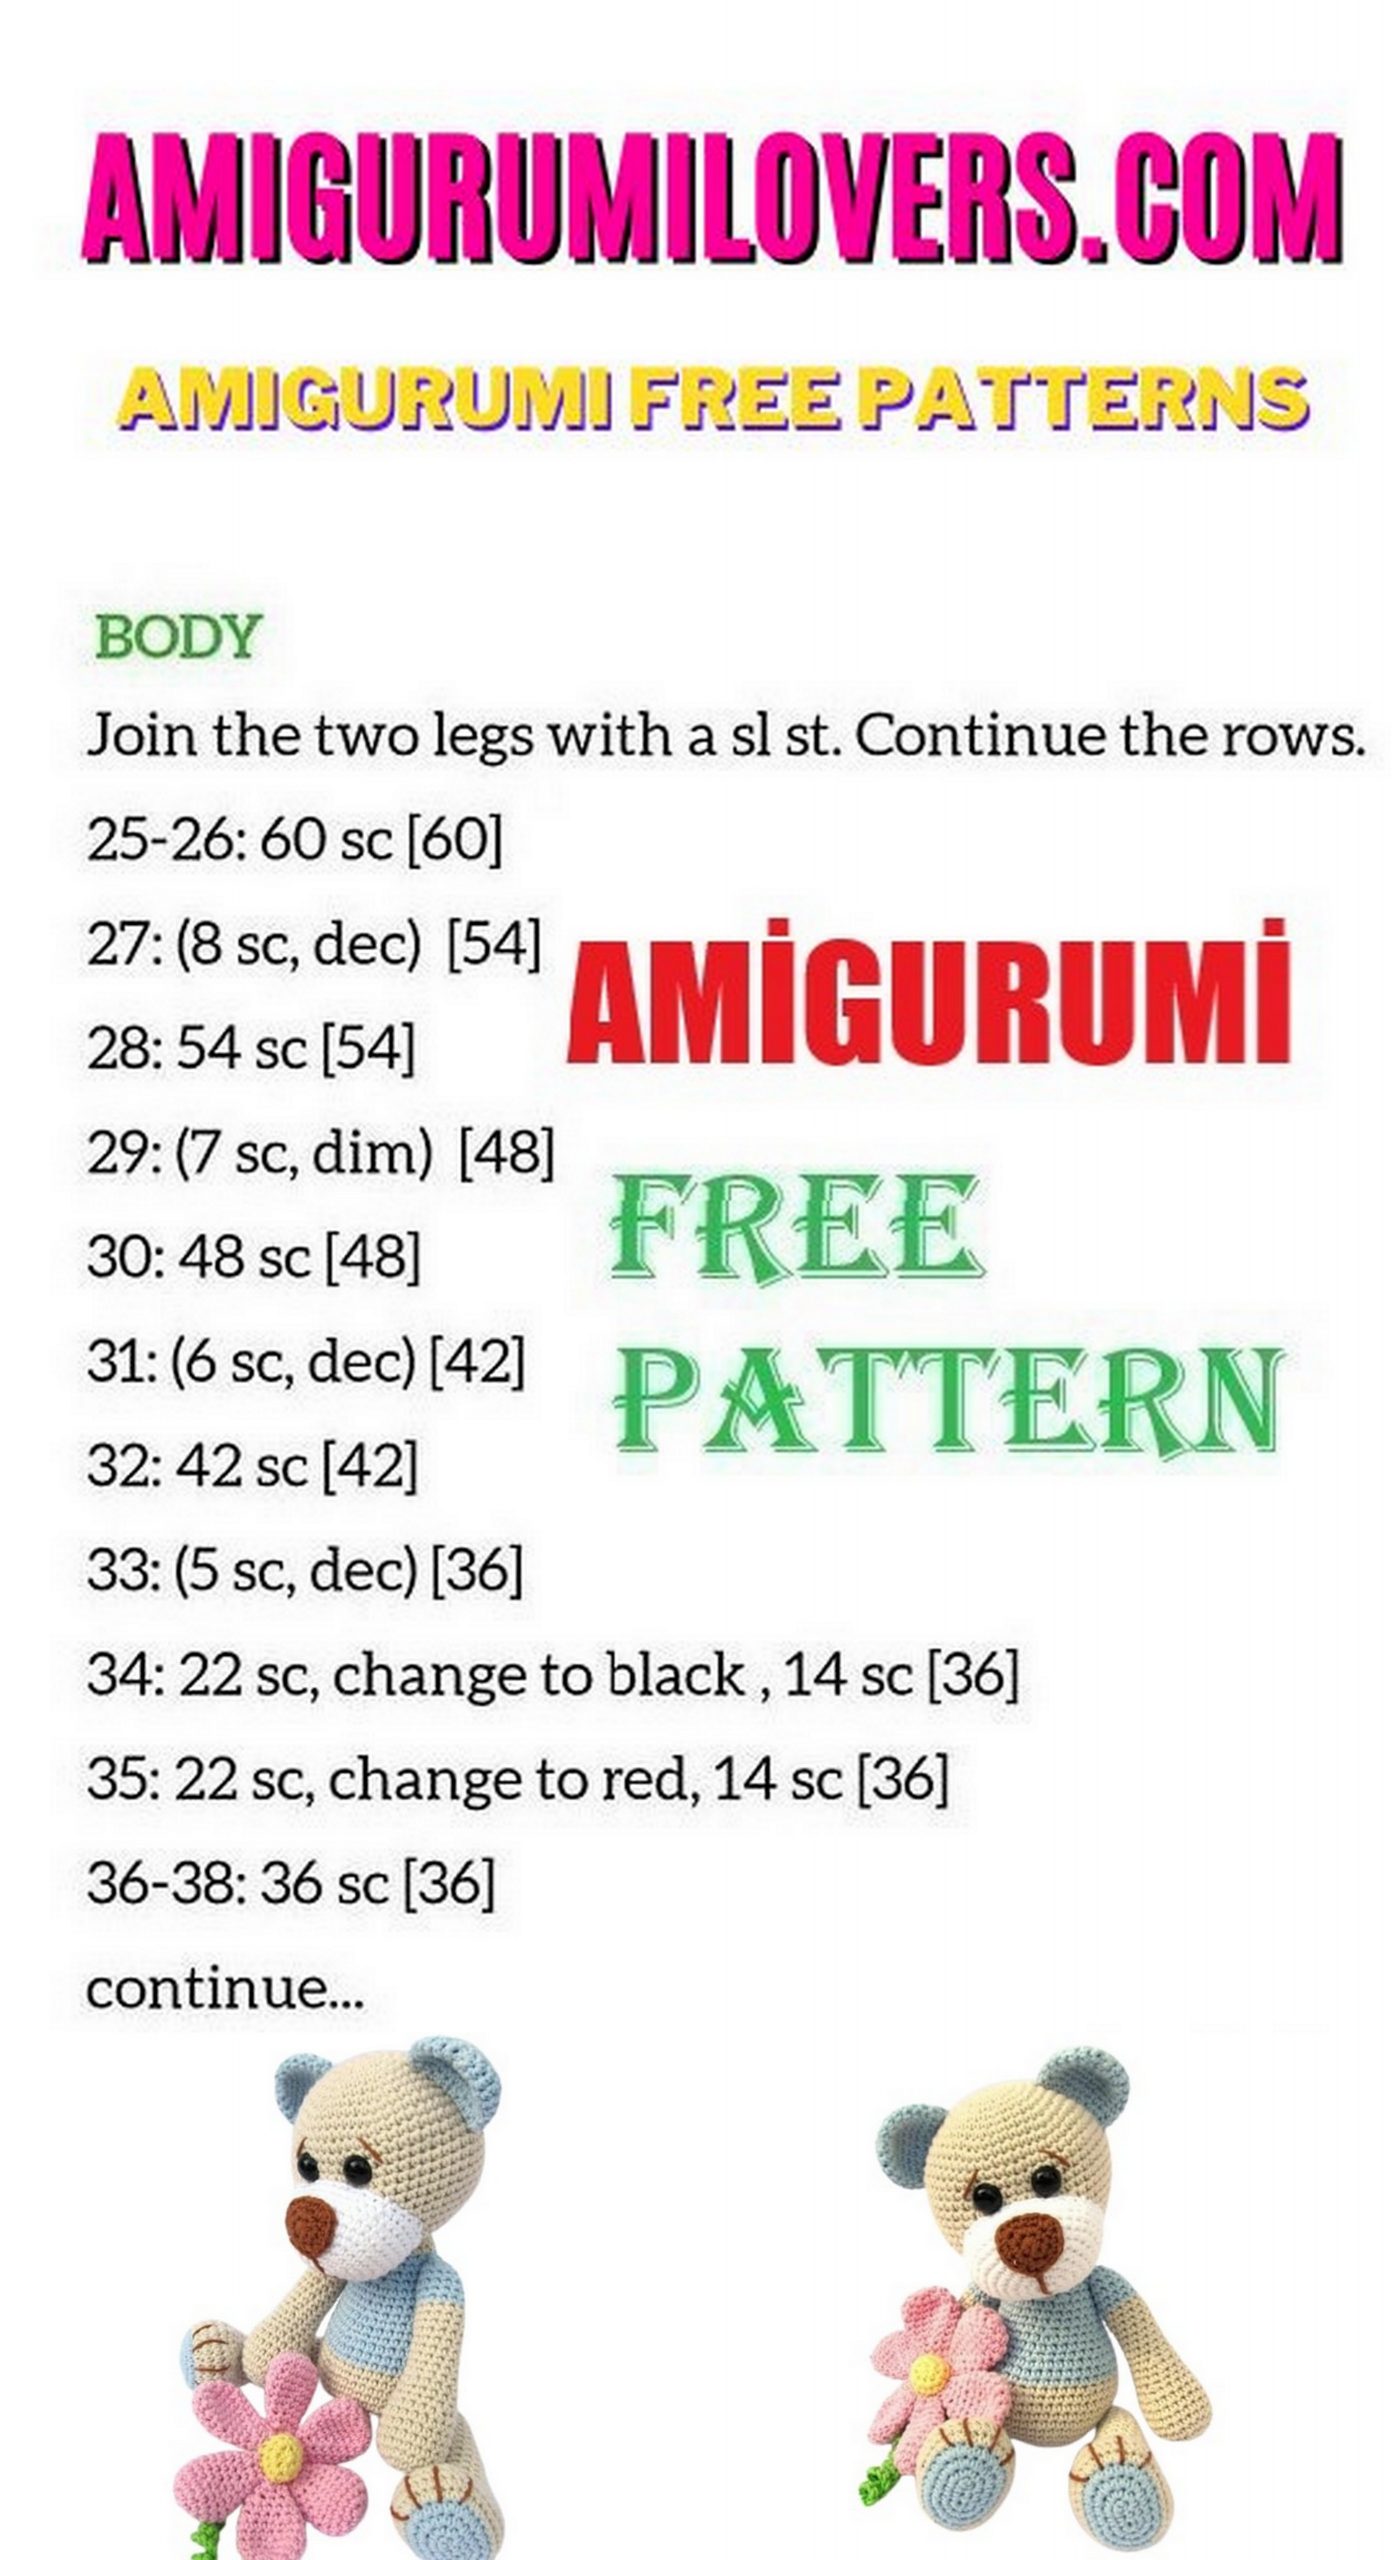
Body (starting with beige)
1.6 sc into magic ring
2. (inc) x6 (12)
3. (1 sc, inc) x6 (18)
4. (2 sc, inc) x6 (24)
5. (3 sc, inc) x6 (30)
6. (4 sc, inc) x6 (36)
7. (5 sc, inc) x6 (42)
8. (6 sc, inc) x6 (48)
9-13. 48 sc (48)
14. (6 sc, dec) x6 (42)
Change color to light blue
15-17. 42 sc (42)
18. (5 sc, dec) x6 (36)
19-20. 36 sc (36)
21. (4 sc, dec) x6 (30)
22-24. 30 sc (30)
25. (3 sc, dec) x6 (24)
Change color to beige
26-27. 24 sc (24)
28. (4 sc, dec) x4 (20)
Stuff the body


Hands (2 children, starting with beige)
1.6 sc into magic ring
2. (inc) x6 (12)
3. (1 sc, inc) x6 (18)
4. (5 sc, inc) х3 (21)
5-8. 21 sc (21)
9. (5 sc, dec) x3 (18)
10. (4 sc, dec) х3 (15)
11-12. 15 sc (15)
13. (3 sc, dec) x3 (12)
14-21. 12 sc (12)
Color change to light blue.
22-26. 12 sc (12)
Stuff your hands
27.dec x6 (6)
28.dec x3 (3)
Legs (2 children, starting with light blue)
1. Cast on 4 sts, starting with 2nd from hook, do 2 sc in a row, 3 sc into last loop. On the other side of the chain – 1 sc, 2 sc in the last loop (8)
2.Inc, sc, 3 inc, sc, 2 inc (14)
3.Inc, 3 sc, 4 inc, 3 sc, 3 inc (22)
4.Inc, 5 sc, 2 inc, 2 sc, 2 inc, 5
sc, 2 inc, 2 sc, inc (30)
Change color to beige
5.sc, inc, 7 sc, inc, sc, inc, 2 sc, inc, sc, inc, 7 sc, inc, sc, inc, 2 sc, inc (38)
6.38 sc (38)
7.dec, 28 sc, dec, 6 sc (36)
8.36 sc (36)
9.10 sc, 6 dec, 14 sc (30)
10.8 sc, 6 dec, 6 sc, 2 dec (22)
11.22 sc (22)
12.5 sc, 6 dec, 5 sc (16)
13-21. 16 sc (16)
Stuff your leg
22. (6 sc, dec) x2 (14)
23-24. 14 sc (14)
25. (5 sc, dec) x2 (12)
26.12 sc (12)
Stuff your leg again
27.dec x6 (6)
28.dec х3 (3)
Tail (beige)
1.6 sc into magic ring
2. (inc) x6 (12)
3. (1 sc, inc) x6 (18)
4. (8 sc, inc) x2 (20)
5-6. 20 sc (20)
7. (8 sc, dec) x2 (18)
8. (1 sc, dec) x6 (12)
Flower
1.6 sc into magic ring
2. (inc) x6 (12)
3. (1 sc, inc) x6 (18)
4.18 sc (18)
5. (4 sc, dec) х3 (15)
6.15 sc (15)
7. (3 sc, dec) x3 (12)
8.12 sc (12)
9. (2 sc, dec) x3 (9)
10.9 sc (9)
11. (sc, dec) х3 (6)
Petals 6 pcs (pink)
Stem (starting with yellow)
1.6 sc into magic ring
2. (inc) x6 (12)
3. (3 sc, inc) х3 (15)
4.15 sc (15)
Change color to green
5. (3 sc, dec) x3 (12)
6. (2 sc, dec) x3 (9)
7.9 sc (9)
8. (1 sc, dec) x3 (6)
9.decrease from 3 sc, dial 42 bp, inc at 2nd from hook, 33 inc, 7 sc, decrease from 3 sc.

Assembly
1. Sew on the muzzle under the eyes
2. Then sew the head to the body and nose
3. Sew the ears to the head
4. Then arms and legs to the body
5. Sew on the tail at the back
6. Embroider fingers and eyebrows in brown
7. Sew the flower petals on the sides of the stem.
Your Teddy with a flower is ready!
Before you leave, make sure to check out more free amigurumi crochet patterns and discover new ideas for your next project.
You can also browse our full amigurumi pattern archive for hundreds of beginner-friendly designs.