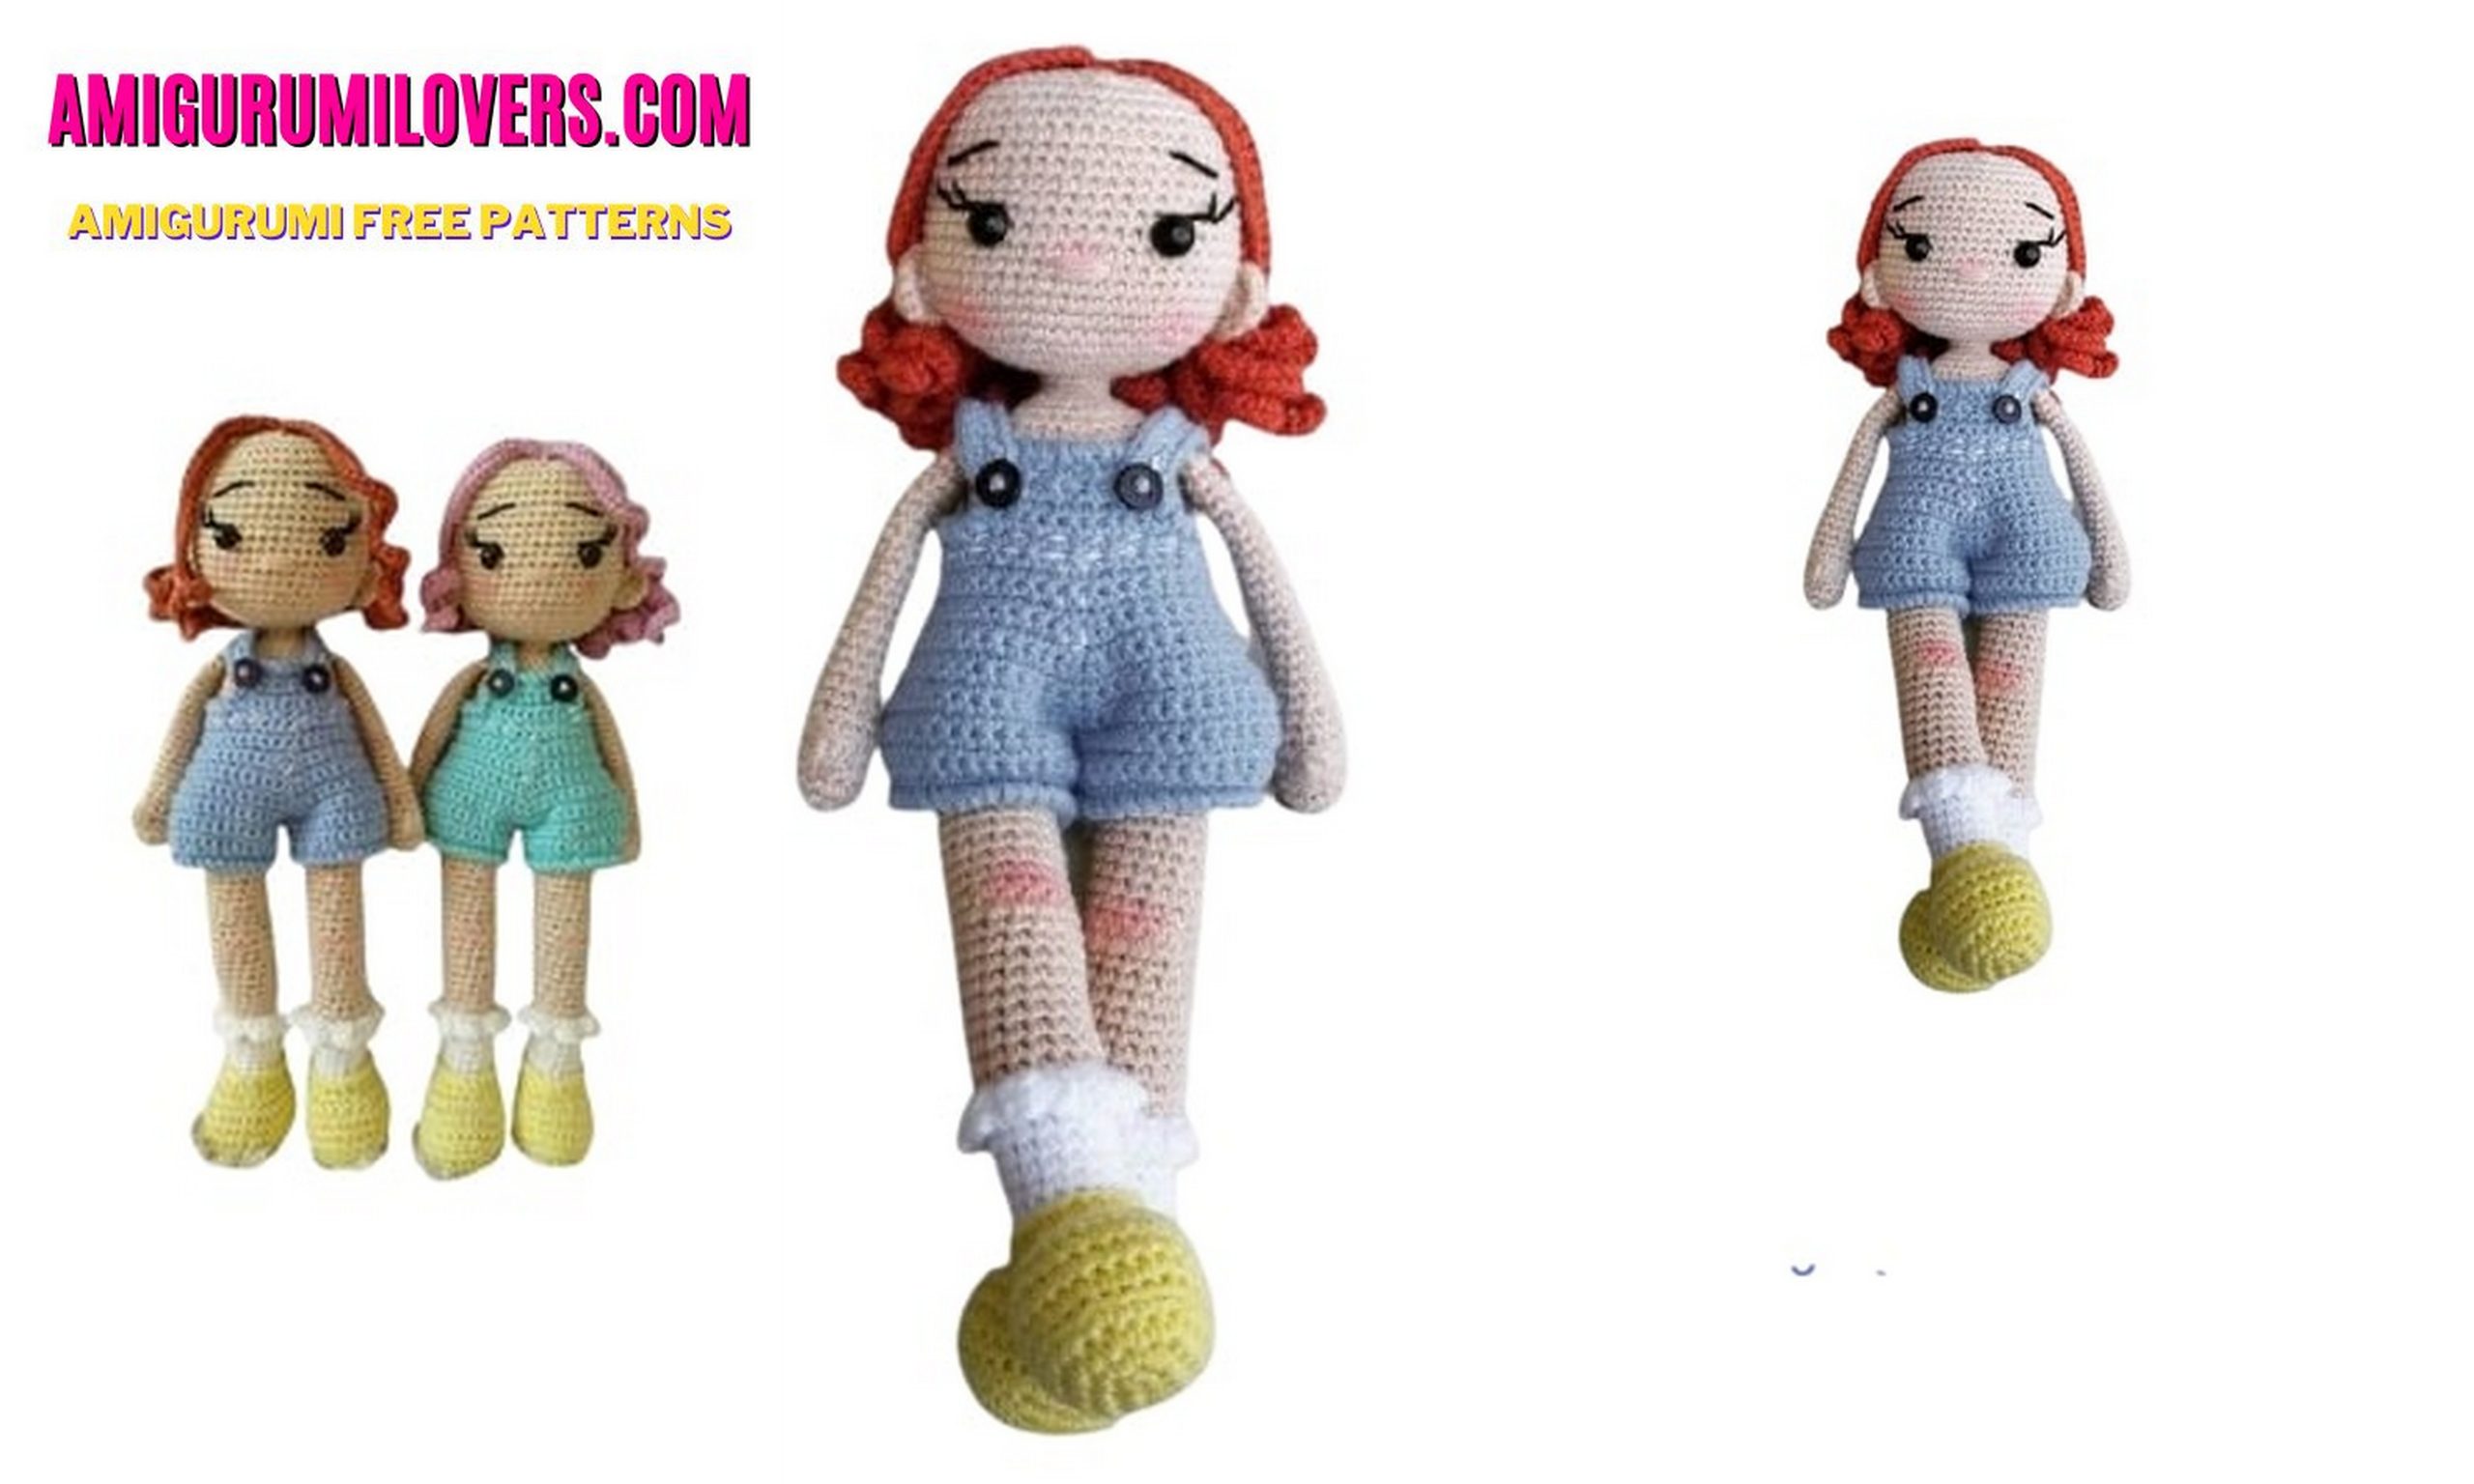
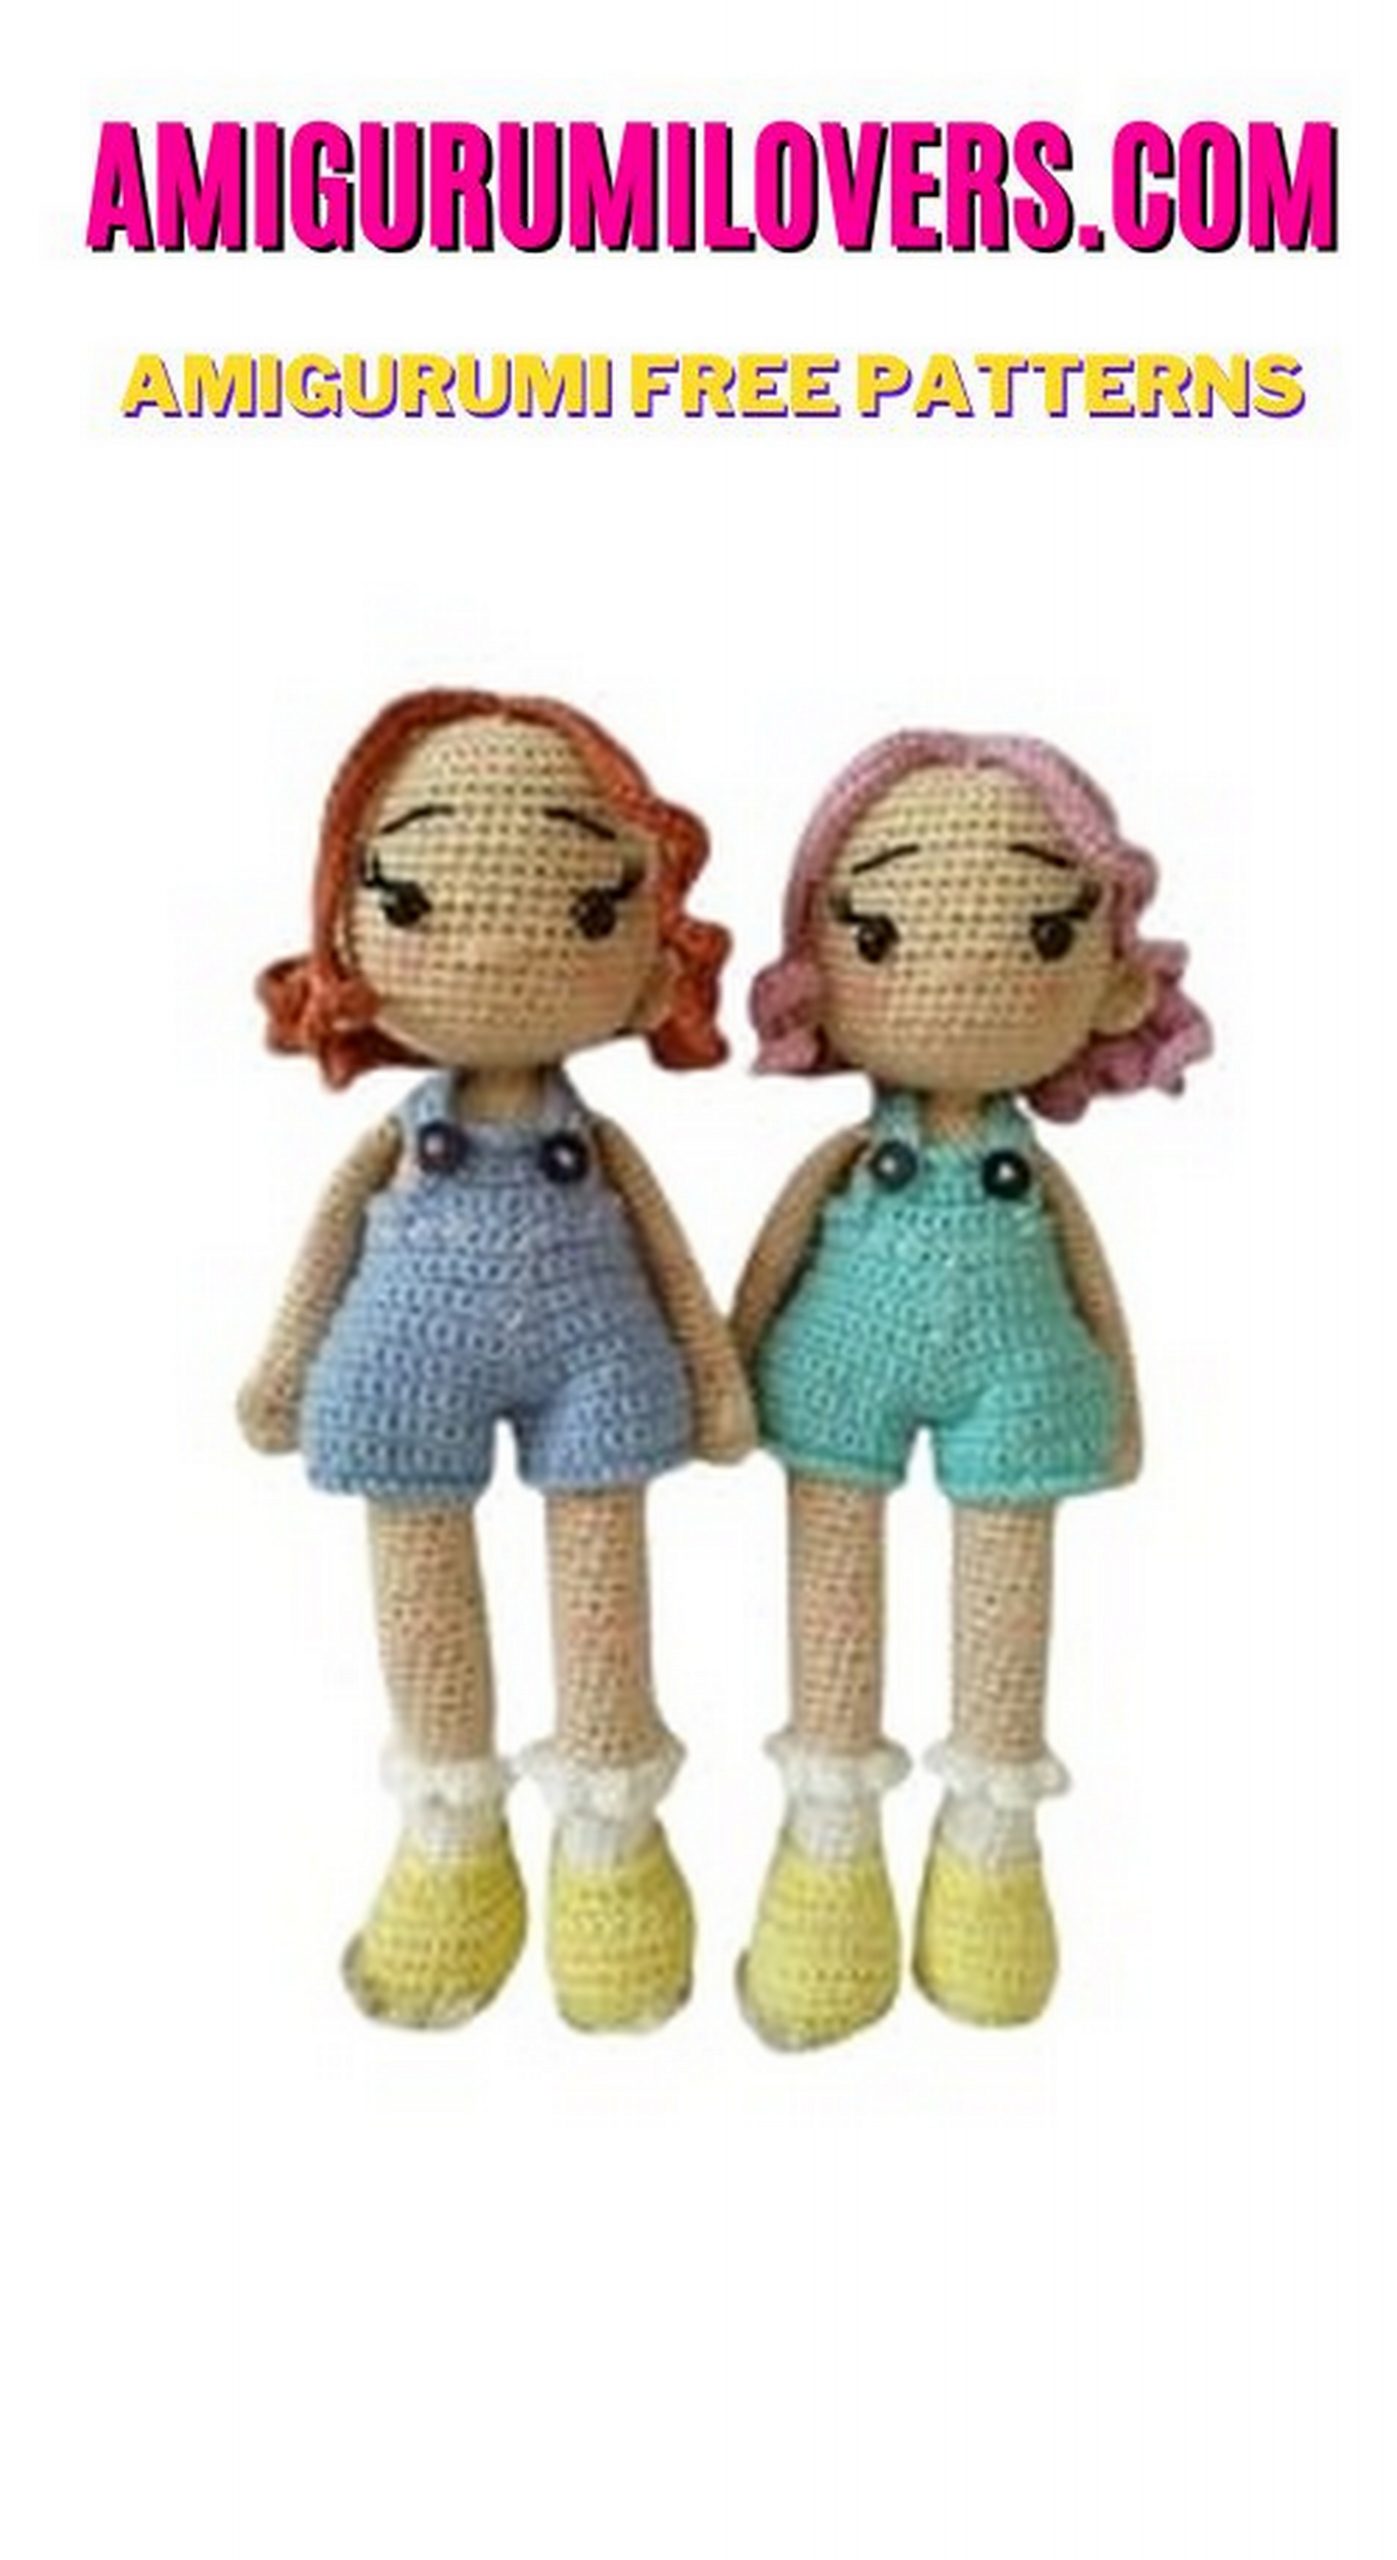
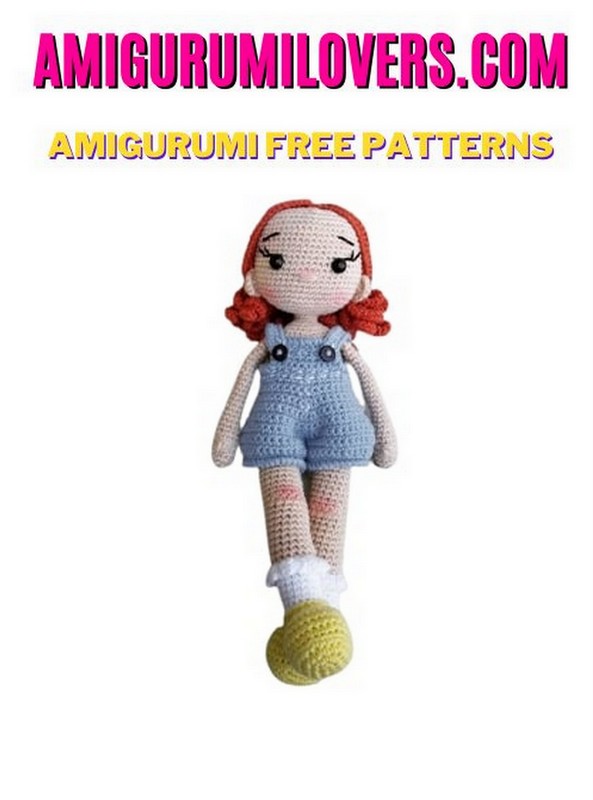
Maria Doll Amigurumi Free Pattern
You may also enjoy exploring our free amigurumi patterns and other popular amigurumi animal patterns available on our website.
If you’ve ever wanted to dive into the enchanting world of crochet, there’s no better way to start than with a delightful amigurumi project. Today, I’m thrilled to share the “Maria Doll Amigurumi Free Pattern,” perfect for both novice crafters and seasoned aficionados. Amigurumi, the Japanese art of knitting or crocheting small stuffed animals and dolls, offers a fantastic opportunity to create adorable, huggable treasures that can brighten anyone’s day. With its simple shapes and engaging techniques, this pattern serves as an excellent introduction to the joys of crochet while allowing you to unleash your creativity.
The “Maria Doll” design is not only charming but also incredibly versatile. Once you master the basic steps, you can modify her outfit, hair, and accessories to reflect your unique flair. This flexibility makes it an ideal project for anyone looking to personalize their creations or make thoughtful gifts for loved ones. The pattern is crafted with beginner crocheters in mind, featuring clear, concise instructions that guide you through each stitch and step. You’ll be amazed at how quickly you can bring Maria to life, giving you a sense of accomplishment that comes with creating something beautiful from scratch.
In this blog post, I’ll break down everything you need to know to successfully crochet your very own Maria Doll. From the materials required to helpful tips for stitching techniques, I’ll ensure you have all the tools in your crochet toolkit for a smooth crafting experience. Plus, I’ll share pointers on how to troubleshoot common issues that beginners might face. Whether you’ve just picked up a crochet hook or have dabbled in other projects, this pattern is approachable and fun, promising a delightful addition to your crochet repertoire.
Gather your yarn, hook, and a sprinkle of enthusiasm as we embark on this crochet journey together. The “Maria Doll Amigurumi Free Pattern” is not just about making a doll; it’s about sparking joy, building confidence, and inspiring creativity. So, grab a cozy spot, set aside some time, and let’s create something magical together. I can’t wait to see the wonderful interpretations of Maria you’ll create, each reflecting your individuality and artistic style. Are you ready to start stitching your own sweet crochet companion? Let’s get to it!
We share wonderful amigurumi free patterns with you. In this article, maria amigurumi doll free pattern is waiting for you.
ABBREVIATIONS
Ch: chain
Sc: single crochet
İnc: 2sc in the next st(increase)
w: 3sc in the next st(increase)
dec: sc next 2sts together (decrease)
Dc: Double crochet
Hdc: (half double crochet)
Sl-st : slip stitch
Sc3tog( single crochet 3 together) (…)* repetition
PATTERN
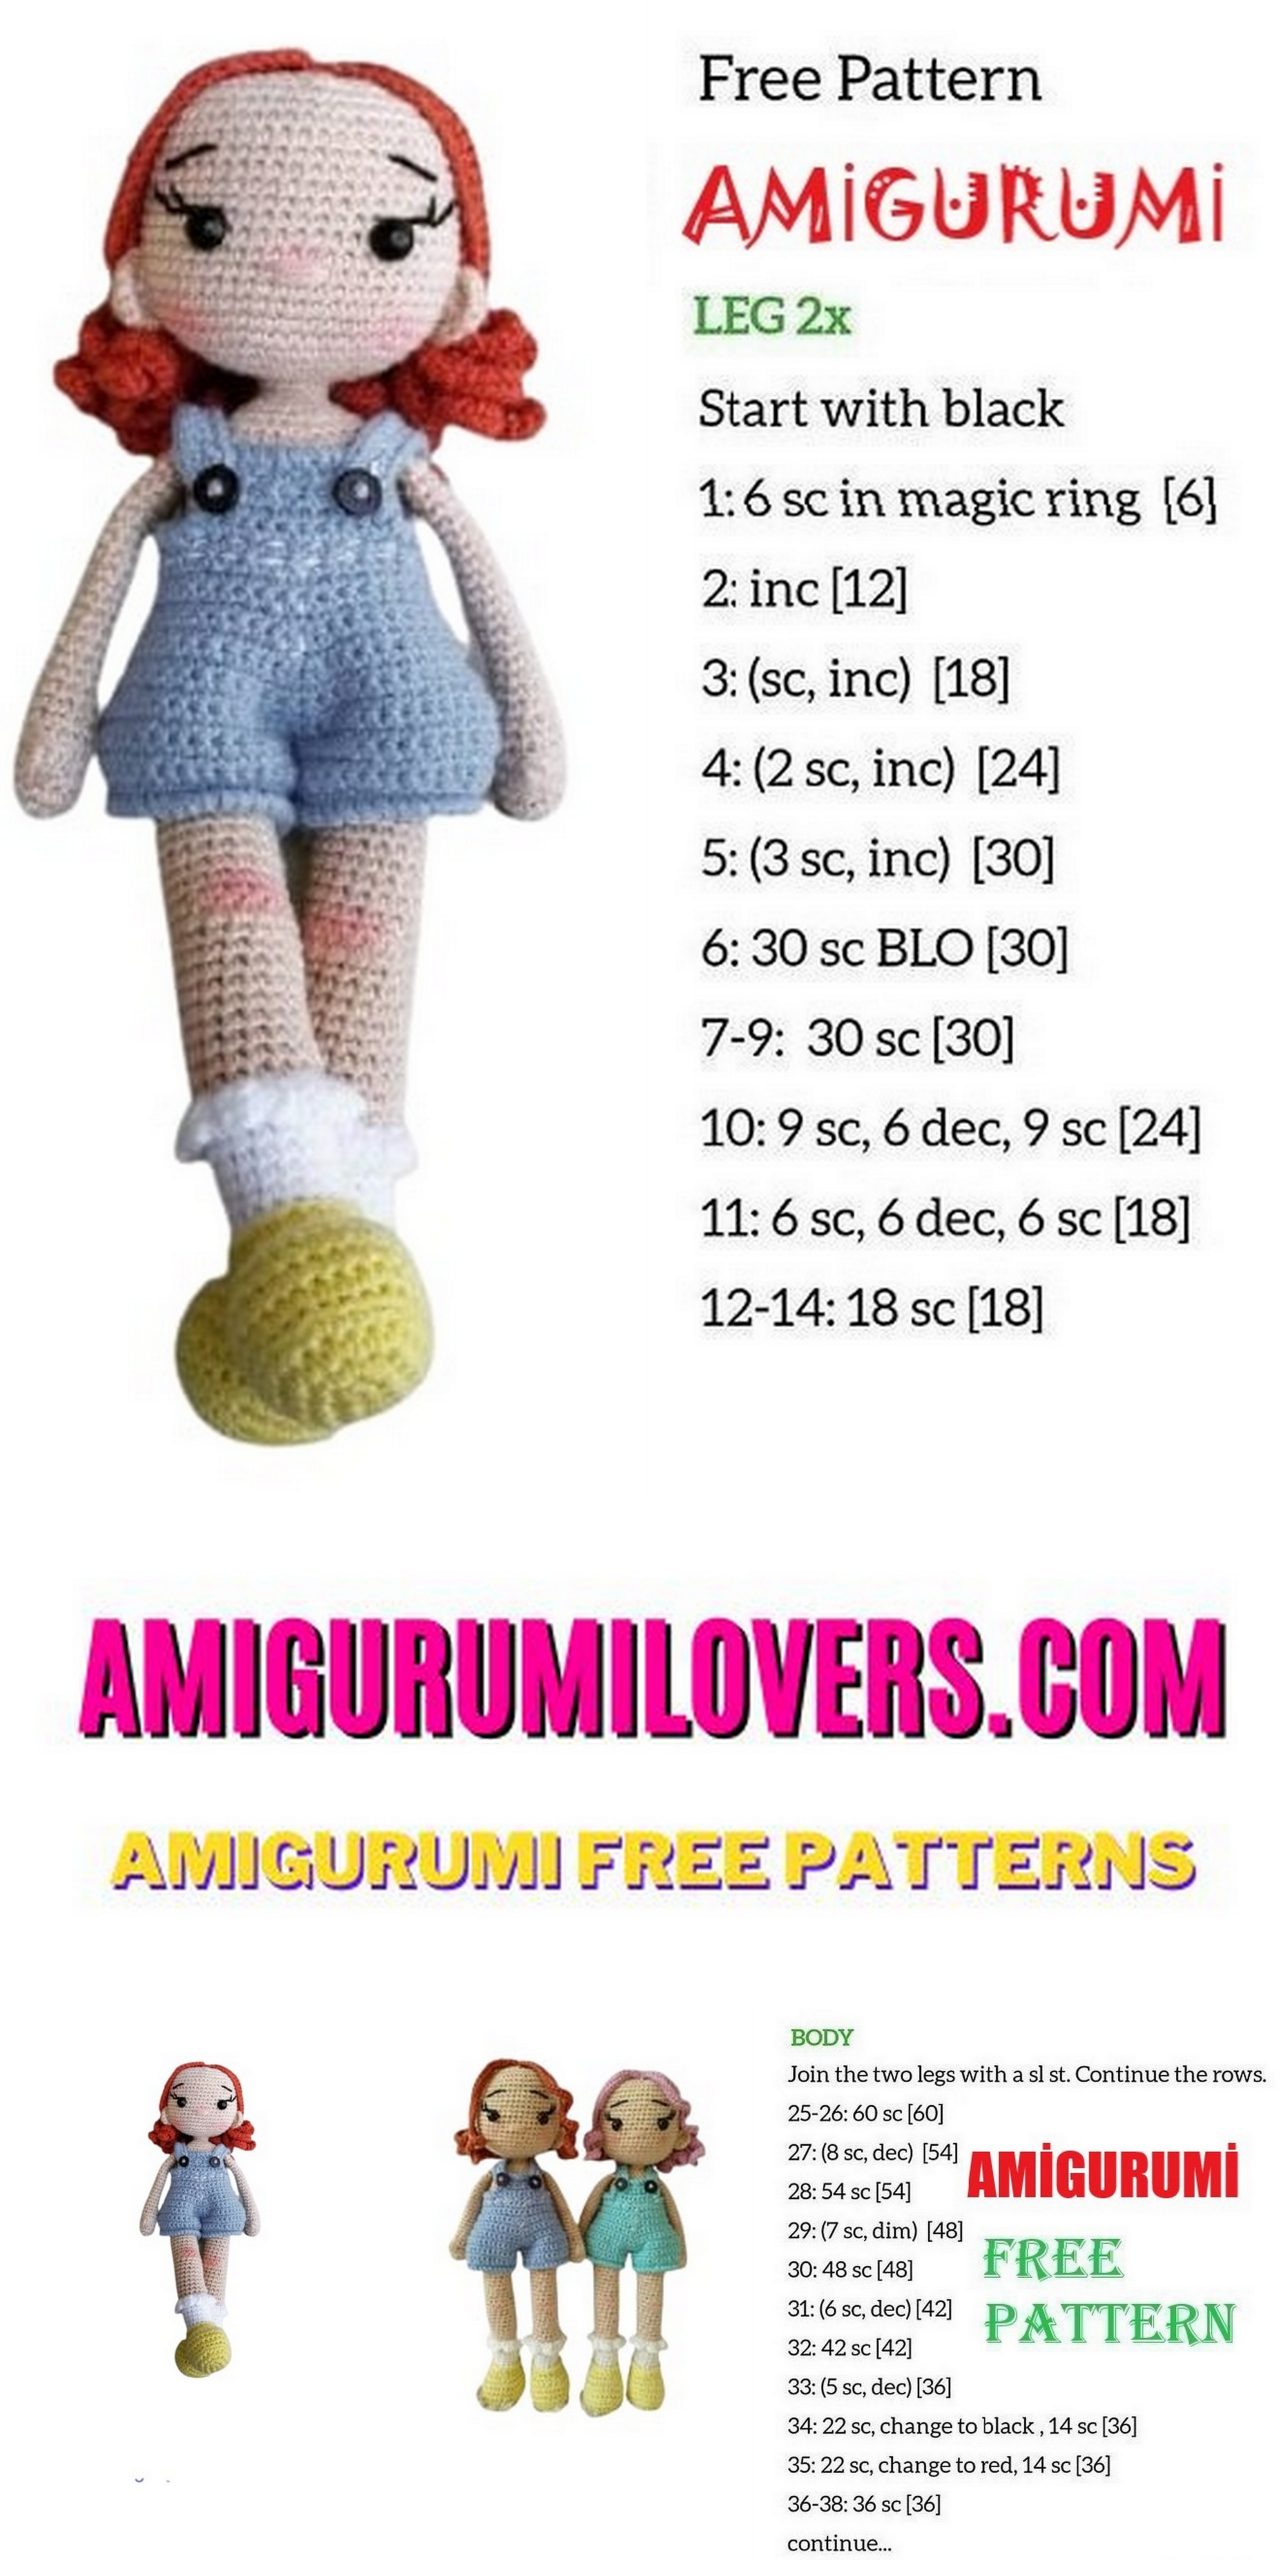
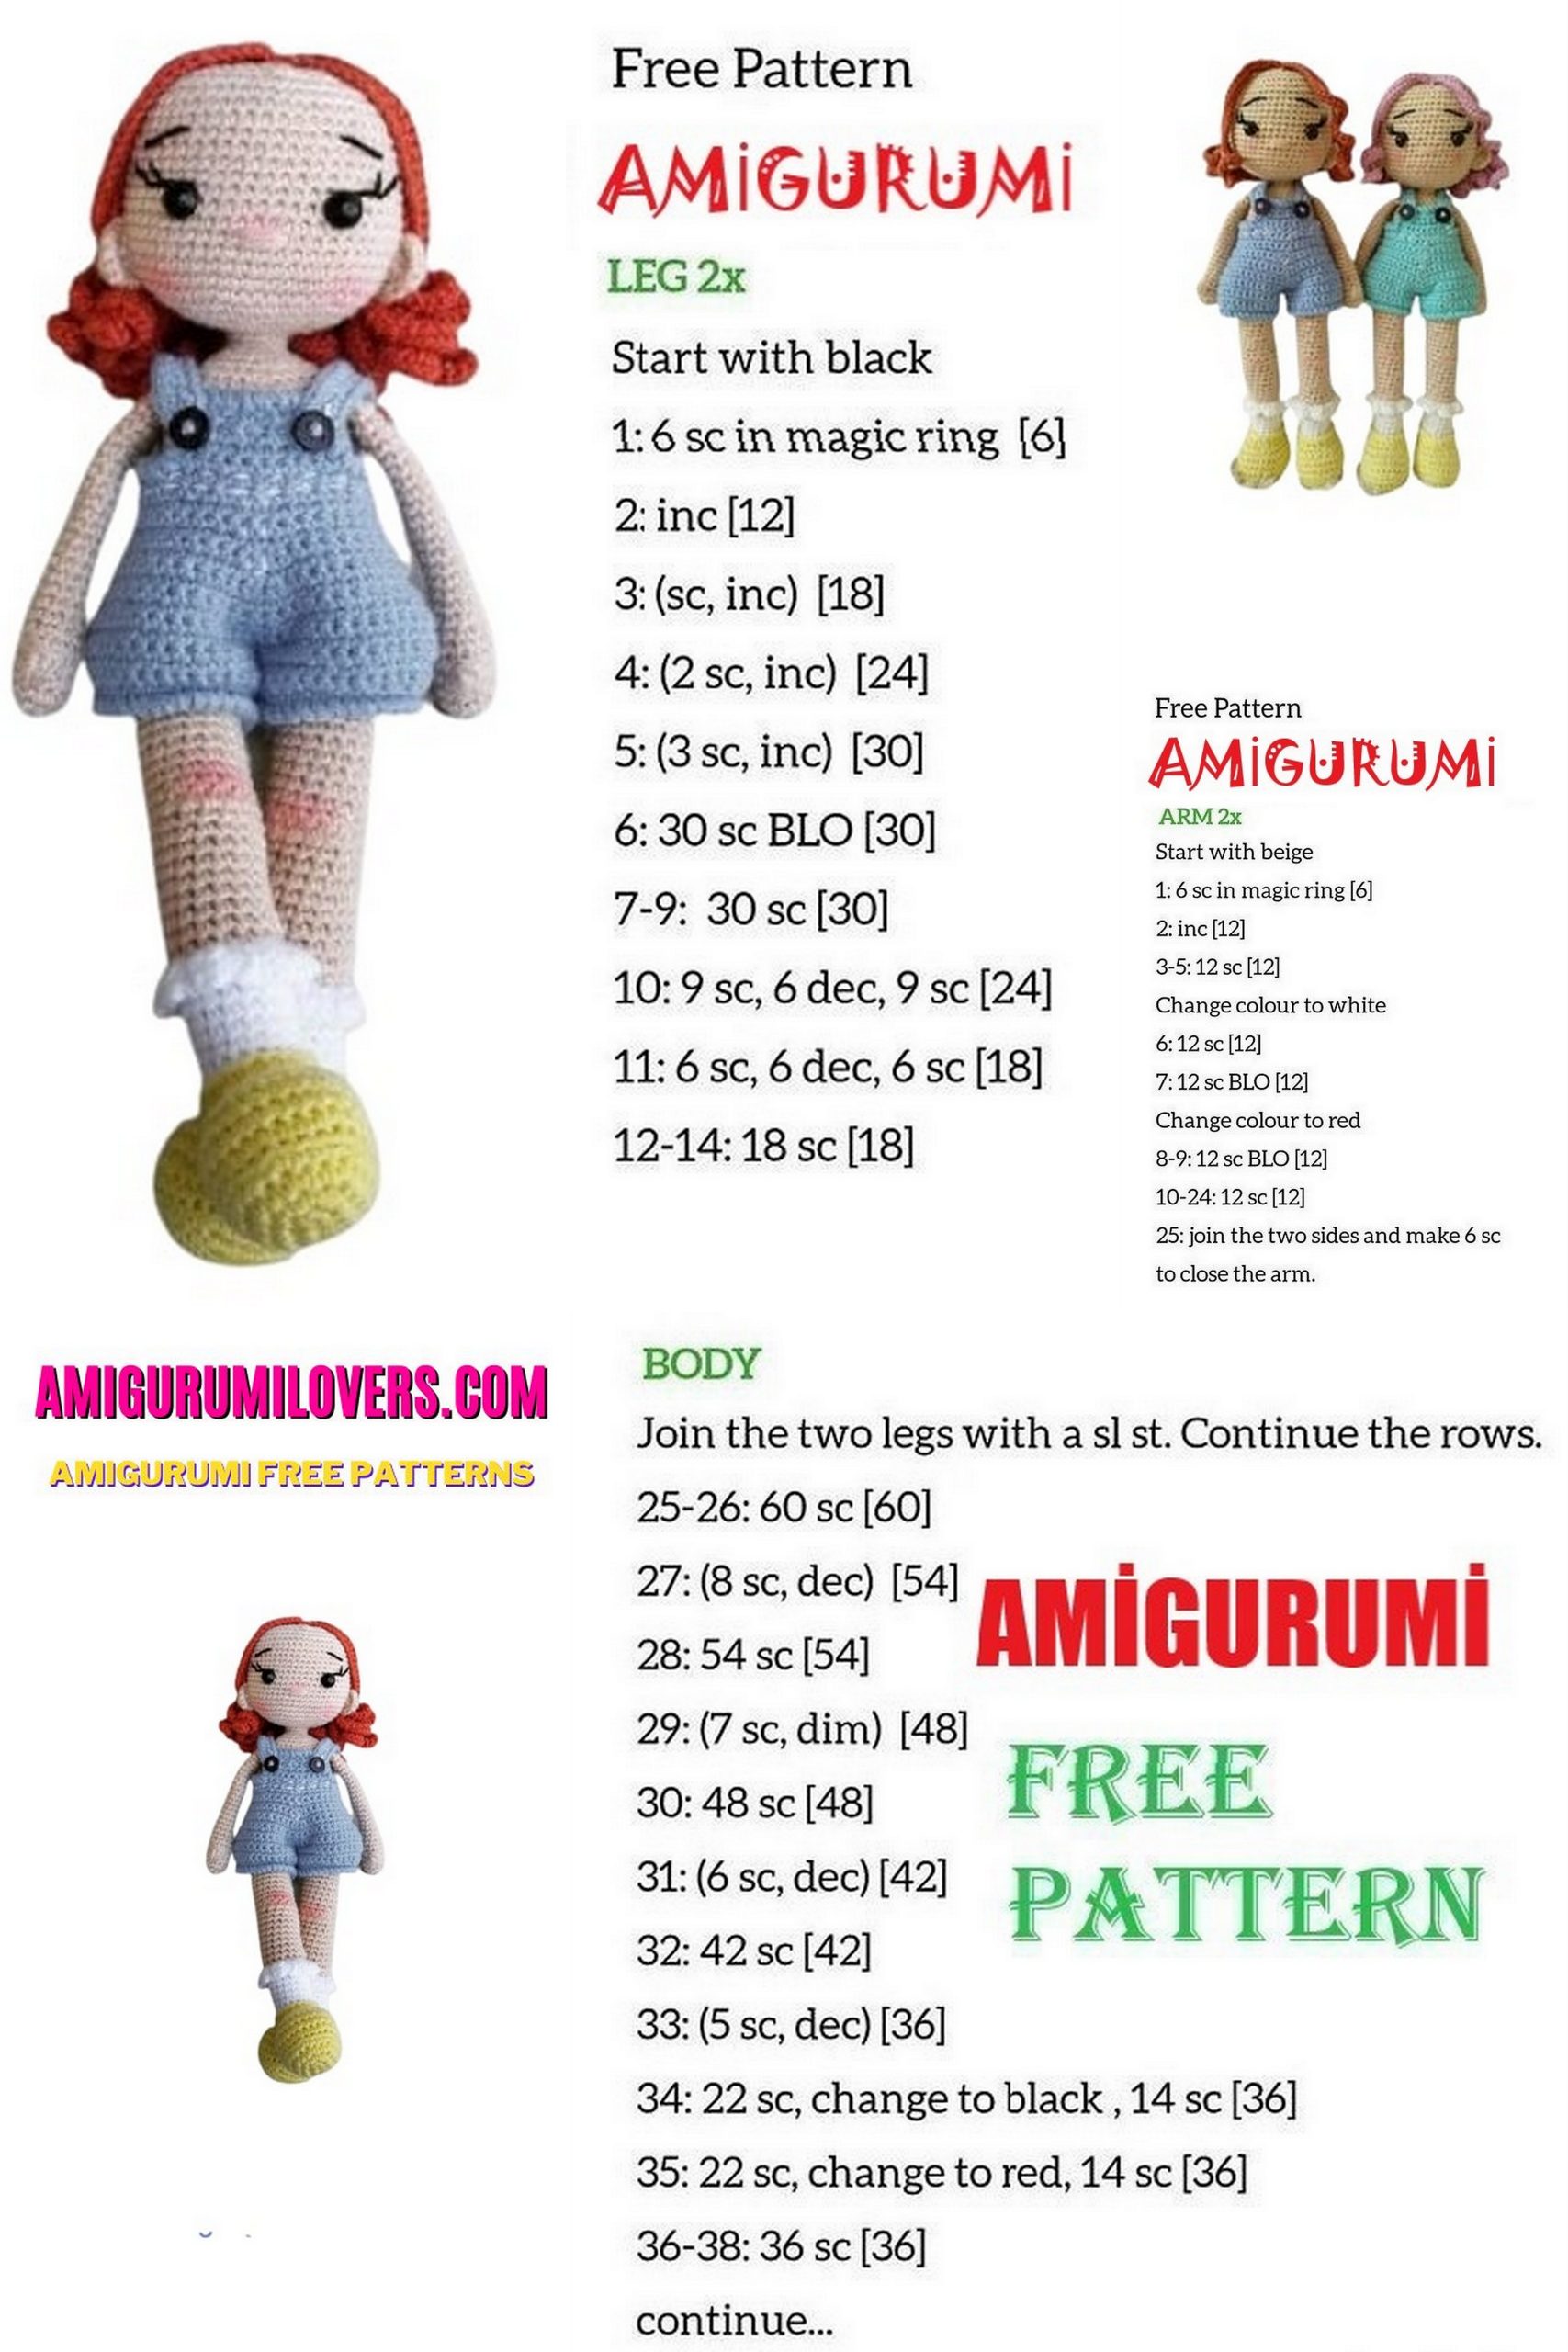
LEGS
We start with yellow
1.7ch 5sc1w4sc1inc.14sc
2.1inc5sc3 + 4sc2inc.20sc
3.1sc1inc4sc (1sc1inc) * 3,4sc, (1sc1inc) * 2.26sc
4.2sc1inc4sc (2sc1inc) * 3,4sc (2sc1inc) * 2.32sc
5.blo.32sc
6-8.32sc
9.8sc7dec 10sc.25sc
10.7sc5dec8sc.20sc
11.blo 6sc38sc with one row sc 20sc change color white with 11.flo yellow. 17sc
12.17sc
13-18.17sc
19.flo (2ch 2dc 2ch 1sc into next sc in) * to end of row. 19.blo 17sc with change color skin color
20-27.17sc
28.8sc5inc4sc22sc. There will be an increase for the 5 inch knee here.
29.8sc5dec4sc. 17sc
Let’s cut the 30-41.17sc
Skin color rope, let’s double it with white 8sc Let’s knit the other leg in the same way and combine it with 4 chains Let’s cut the rope, let’s start from the right leg.
ARMS
1.Magic ring.6sc
2.6inc. 12sc
3-4.12sc
5.1sc, 1p, 10sc. 12sc
6.12sc
7.1sc1dec4sc1dec3sc. 10sc
8-26.10sc
27.Double up 5sc
BODY
Continue with white
1.flo 8sc, 4sc (above Ch), flo8sc blo8sc, 4sc (above ch), blo8sc40sc
2-6.40sc
7.1sc1dec17sc1dec18sc.38sc
8-10.38sc
11.9sc1dec17sc1dec8sc.36sc
12.36sc change color skin color
13.blo36sc
14.16sc
15.10sc1dec16sc1dec6sc.34sc
16-17.34sc
18.10sc1dec15sc1dec5sc.32sc
19.32sc
20.9sc1dec14sc1dec5sc.30sc
21. (3sc1dec) * 6.24sc
22. (2sc1dec) * 6.18sc
23. (1sc1dec) * 6.12sc
24-26.12sc
Let’s not cut the rope, we will continue to head
HEAD
27.12inc.24sc
28. (1sc1inc) * 12.36sc
29. (5sc1inc) * 6.42sc
30. (6sc1inc) * 6.48sc
31. (7sc1inc) * 6.54sc
32-47.54sc
We will continue on the head, let’s not cut the rope.
Let’s sew the ears where appropriate at this stage.
Eyes
It will be attached to the 38th row with a 9sc interval.
The nose will be embroidered on the 36th row.
Continue head …
48. (7sc1dec) * 6.48sc
49. (6sc1dec) * 6.42sc
50. (5sc1dec) * 6.36sc
51. (1sc1dec) * 12.24sc
52.12dec. 12sc
53.6dec.6sc
Note: Let’s not forget to insert a wire in it so that the neck does not fall.
EARS
1.Magic ring.6sc 1ch check back
2. (1sc1inc) * 3 9sc
TOUPEE
Let’s pull 20 chains and attach the marker detector. and let’s keep pulling chains.
1.40ch 38 hdc sl-st of the 18th chain we shot at the top
2-7.40ch 38 hdc We will sink into the chain we pulled at the beginning as 1 SL-ST, skip a chain.
8.36 Ch 34 hDC.
9.34 Ch 36hdc. two will be made into the last chain
10.34ch 32 hdc. Let’s turn and continue braiding the hair on the flo.
11.34ch 32 hdc
12.34ch 32hdc
13.36ch 34 hdc
14.40ch 38 hdc
15-20.40 Ch 38 hdc.
Let’s leave the thread long and start sewing by fixing the hair with a needle.
OVERALLS
We knit 2 legs
Combine with 1.30ch SL-ST.
2.1 chain check turn 30sc 1 sl-st
3.1ch check turn 30sc 1 sl-st
Take 4.1ch, turn 30 sc. 1 sl-st. Let’s do 30 reverse sc to the 30 chain flos we pulled at the beginning.
Let’s knit the second leg in the same way and continue by pulling 1 chain and turning.
1.30sc 1sc 30sc 1sc.62sc always pull 1 chain and make 1 SL-ST, we will go to the beginning of the row
2-3.62sc
4.1 Ch check return 2dec10sc2dec10sc4dec9sc2dec10sc2dec.50.1sl-st 1 ch check return
Return 5-6.50sc 1sl-st 1 Ch. 7. (1dec10sc) * 31dec10sc1dec.45sc 1sl-st 1 Ch check return
8.45sc 1 SL-ST
9.1dec9sc1dec8sc2dec9sc1dec7sc1dec.39sc 1sl-st 1 Ch check return
10.39sc
11-13.1ch check turn 39sc 1st sl-st
Note: 1 sc over or less at the end of the row is ok. Let’s cut the rope, center the front part and knit 10sc 4 rows. Let’s wrap it around with inverted sc
For buckles (two will be made)
1.24ch skip 1ch 22sc into the last chain (1 inc5ch1inc.) 22sc …
Let’s sew the button on the overalls. Let’s embroider the edges with white thread.
And our baby is ready
Before you leave, make sure to check out more free amigurumi crochet patterns and discover new ideas for your next project.
You can also browse our full amigurumi pattern archive for hundreds of beginner-friendly designs.