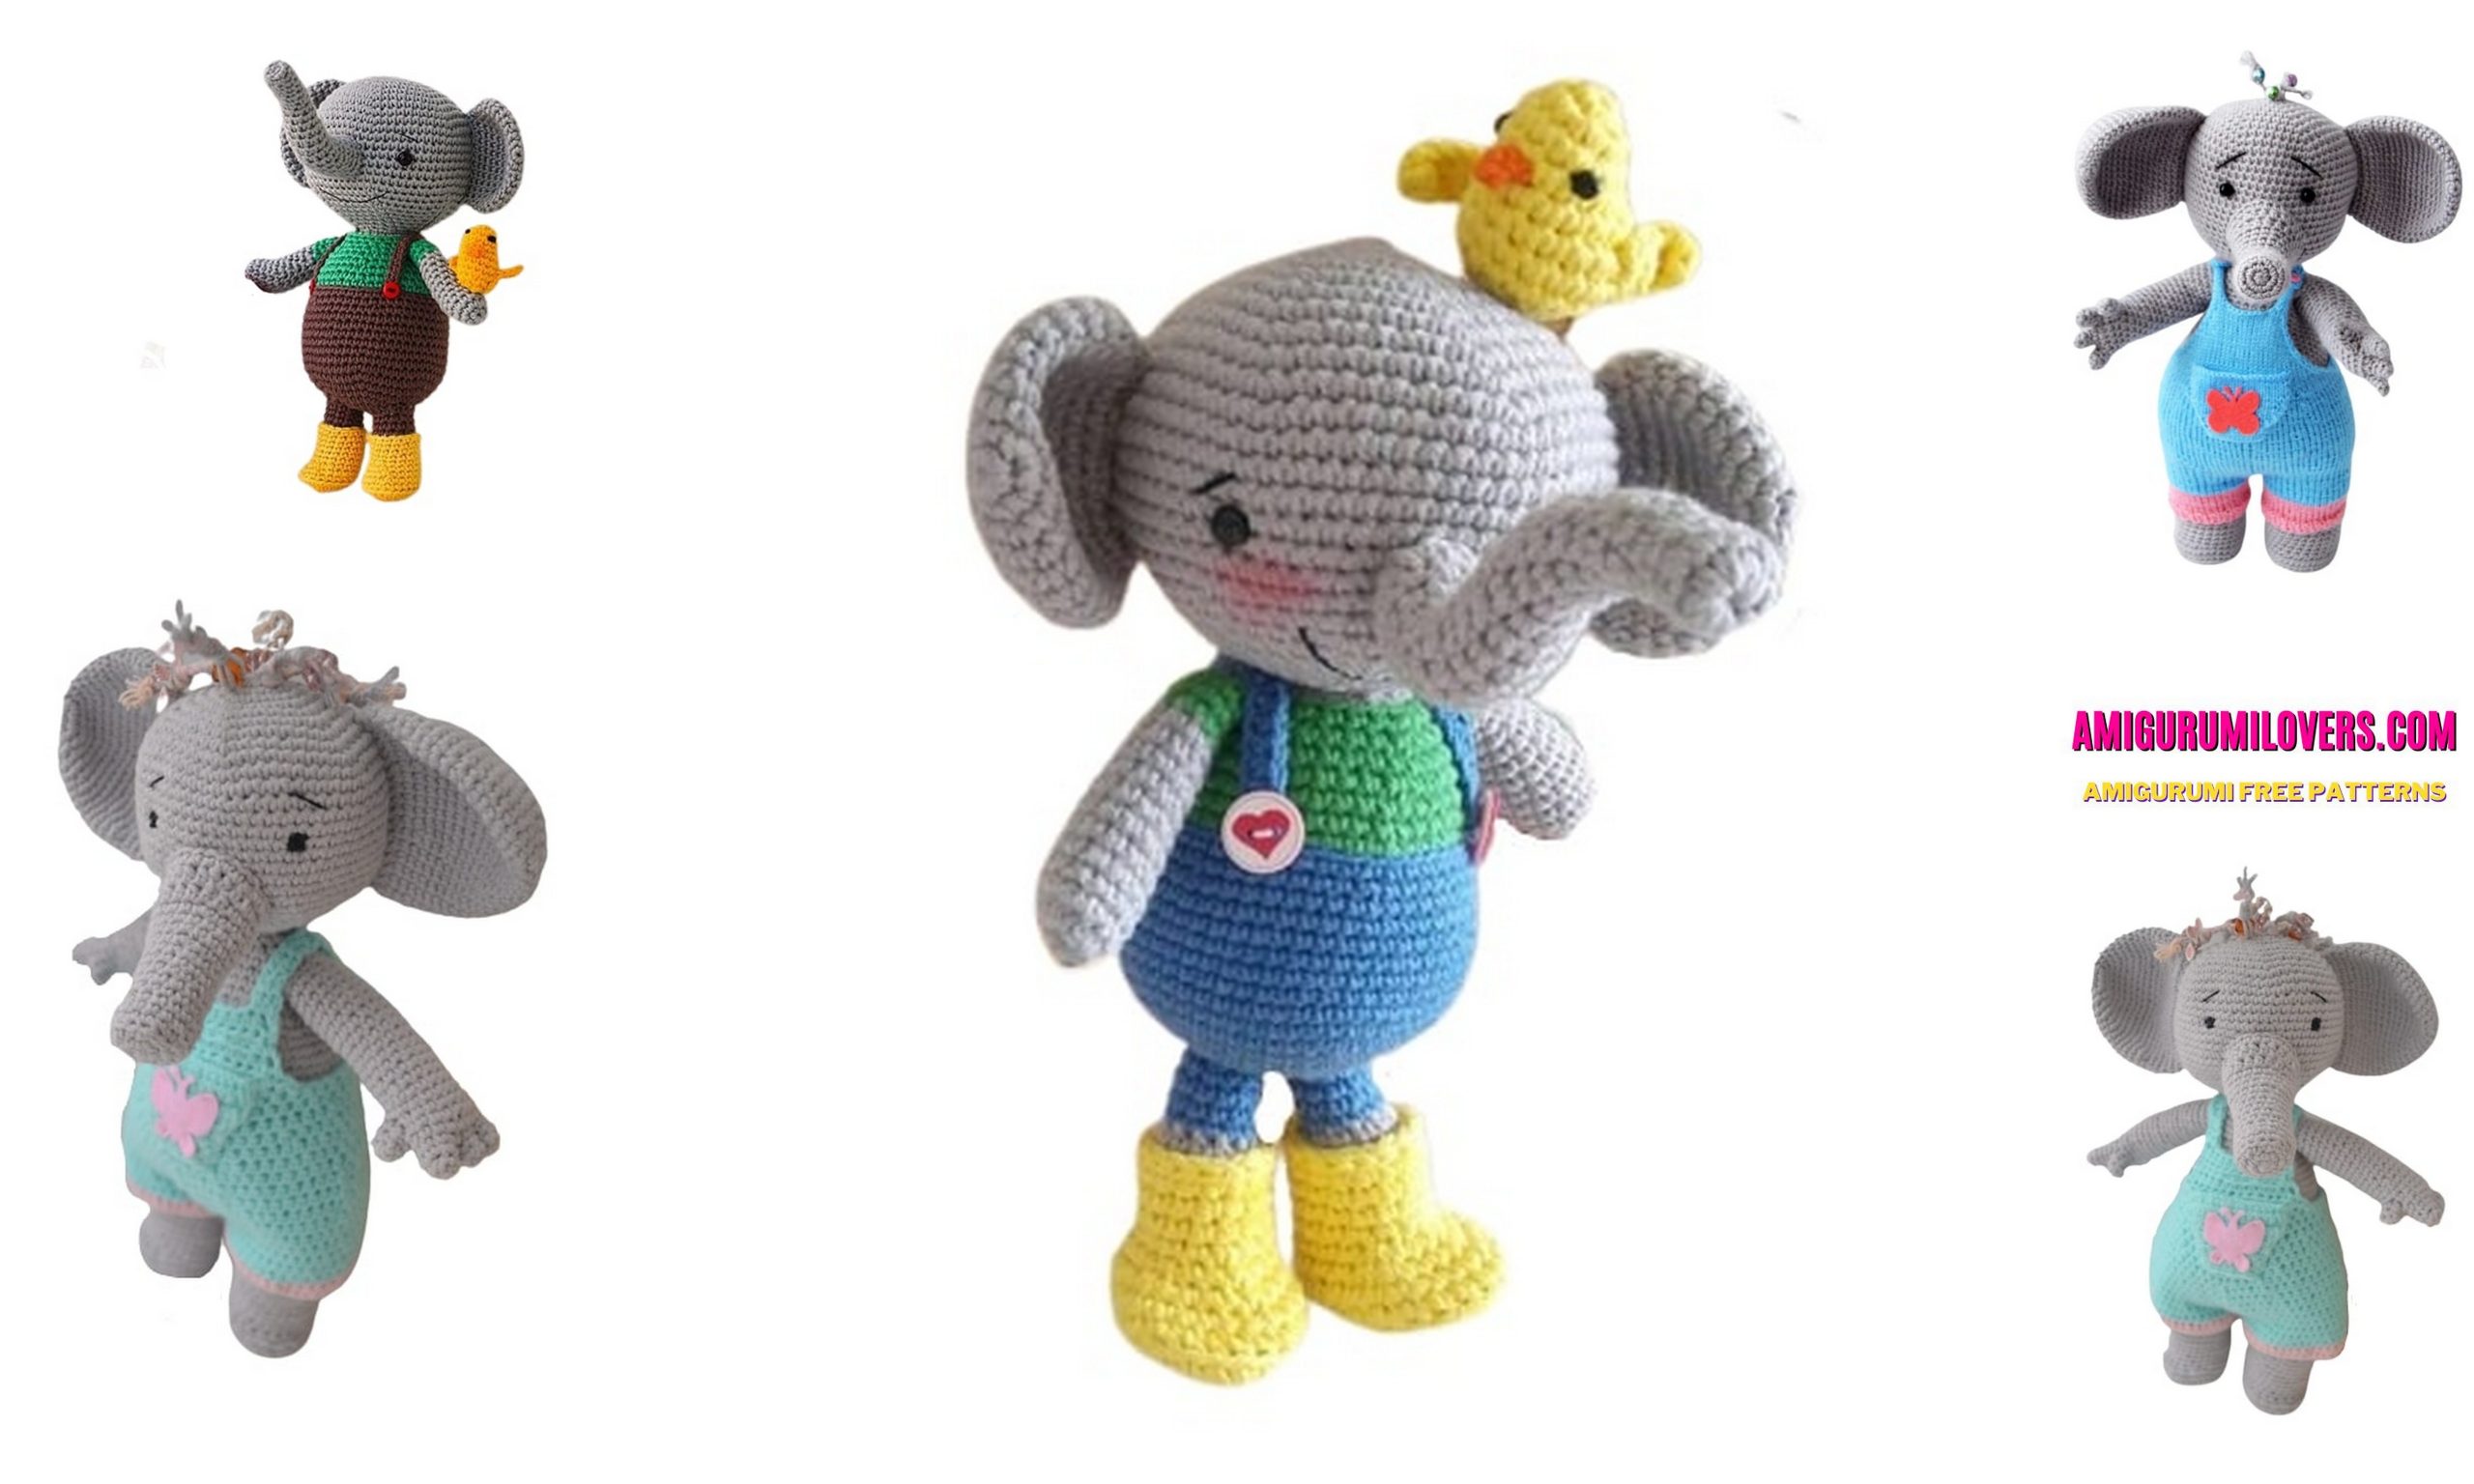
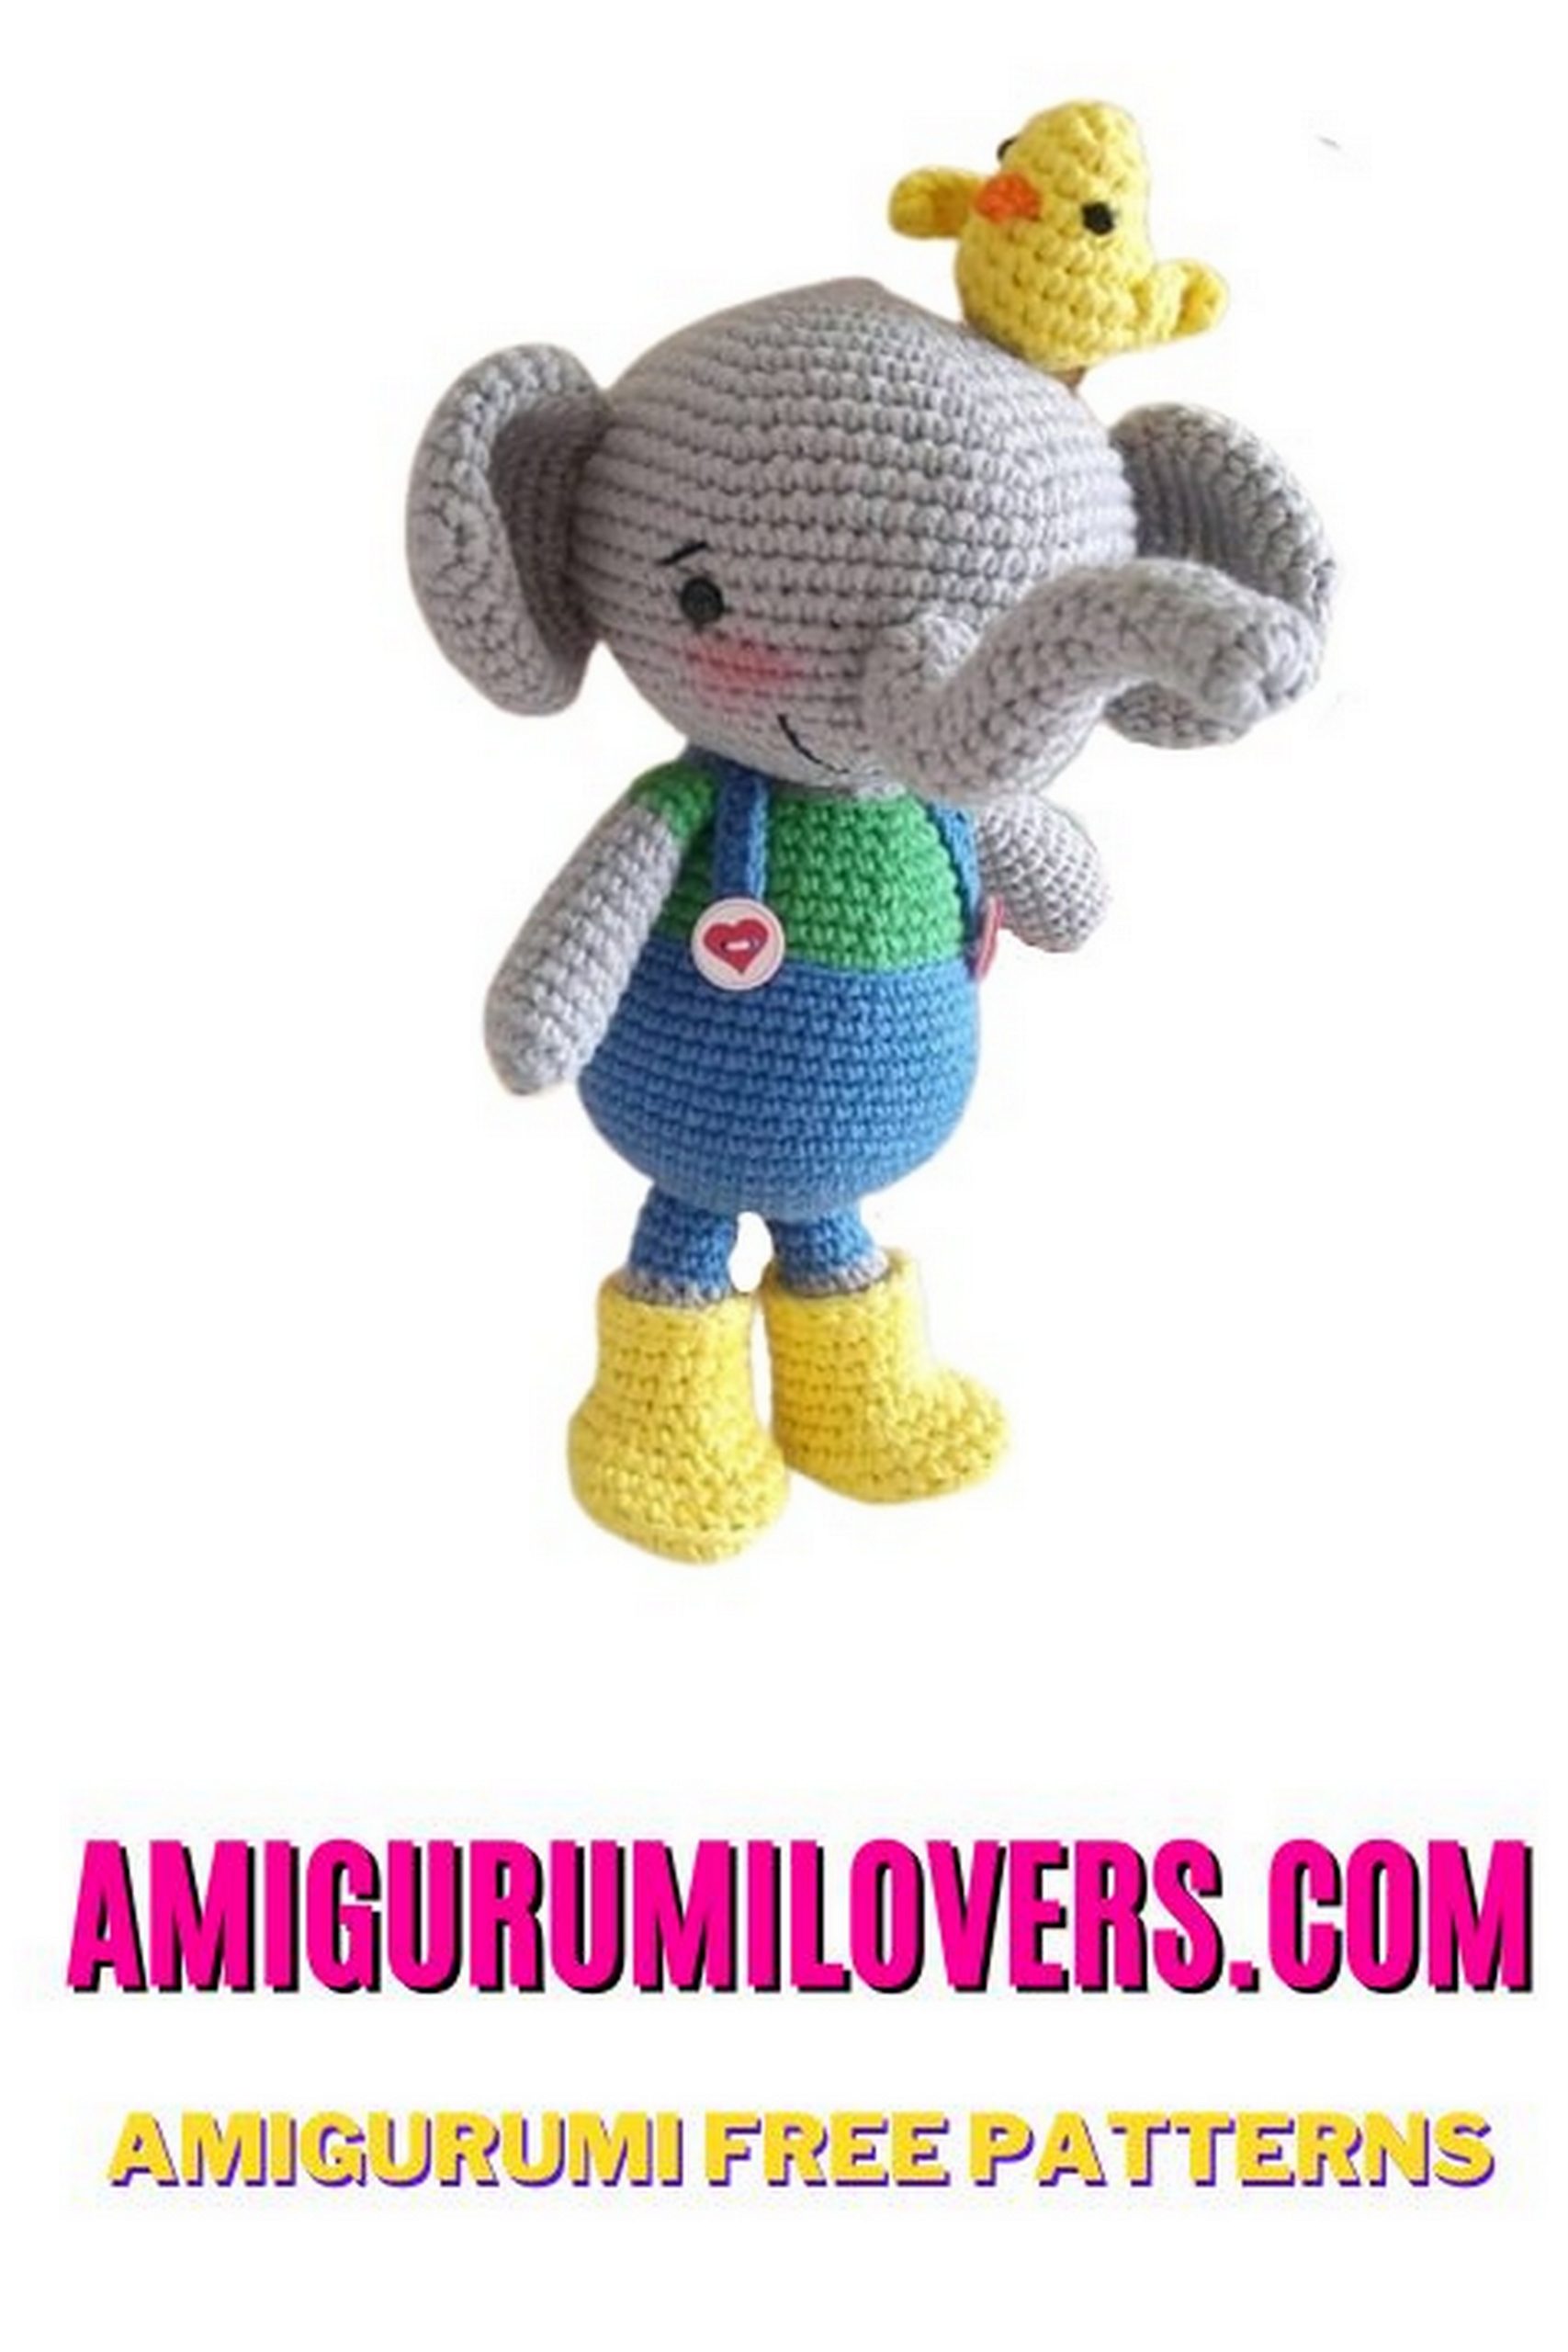
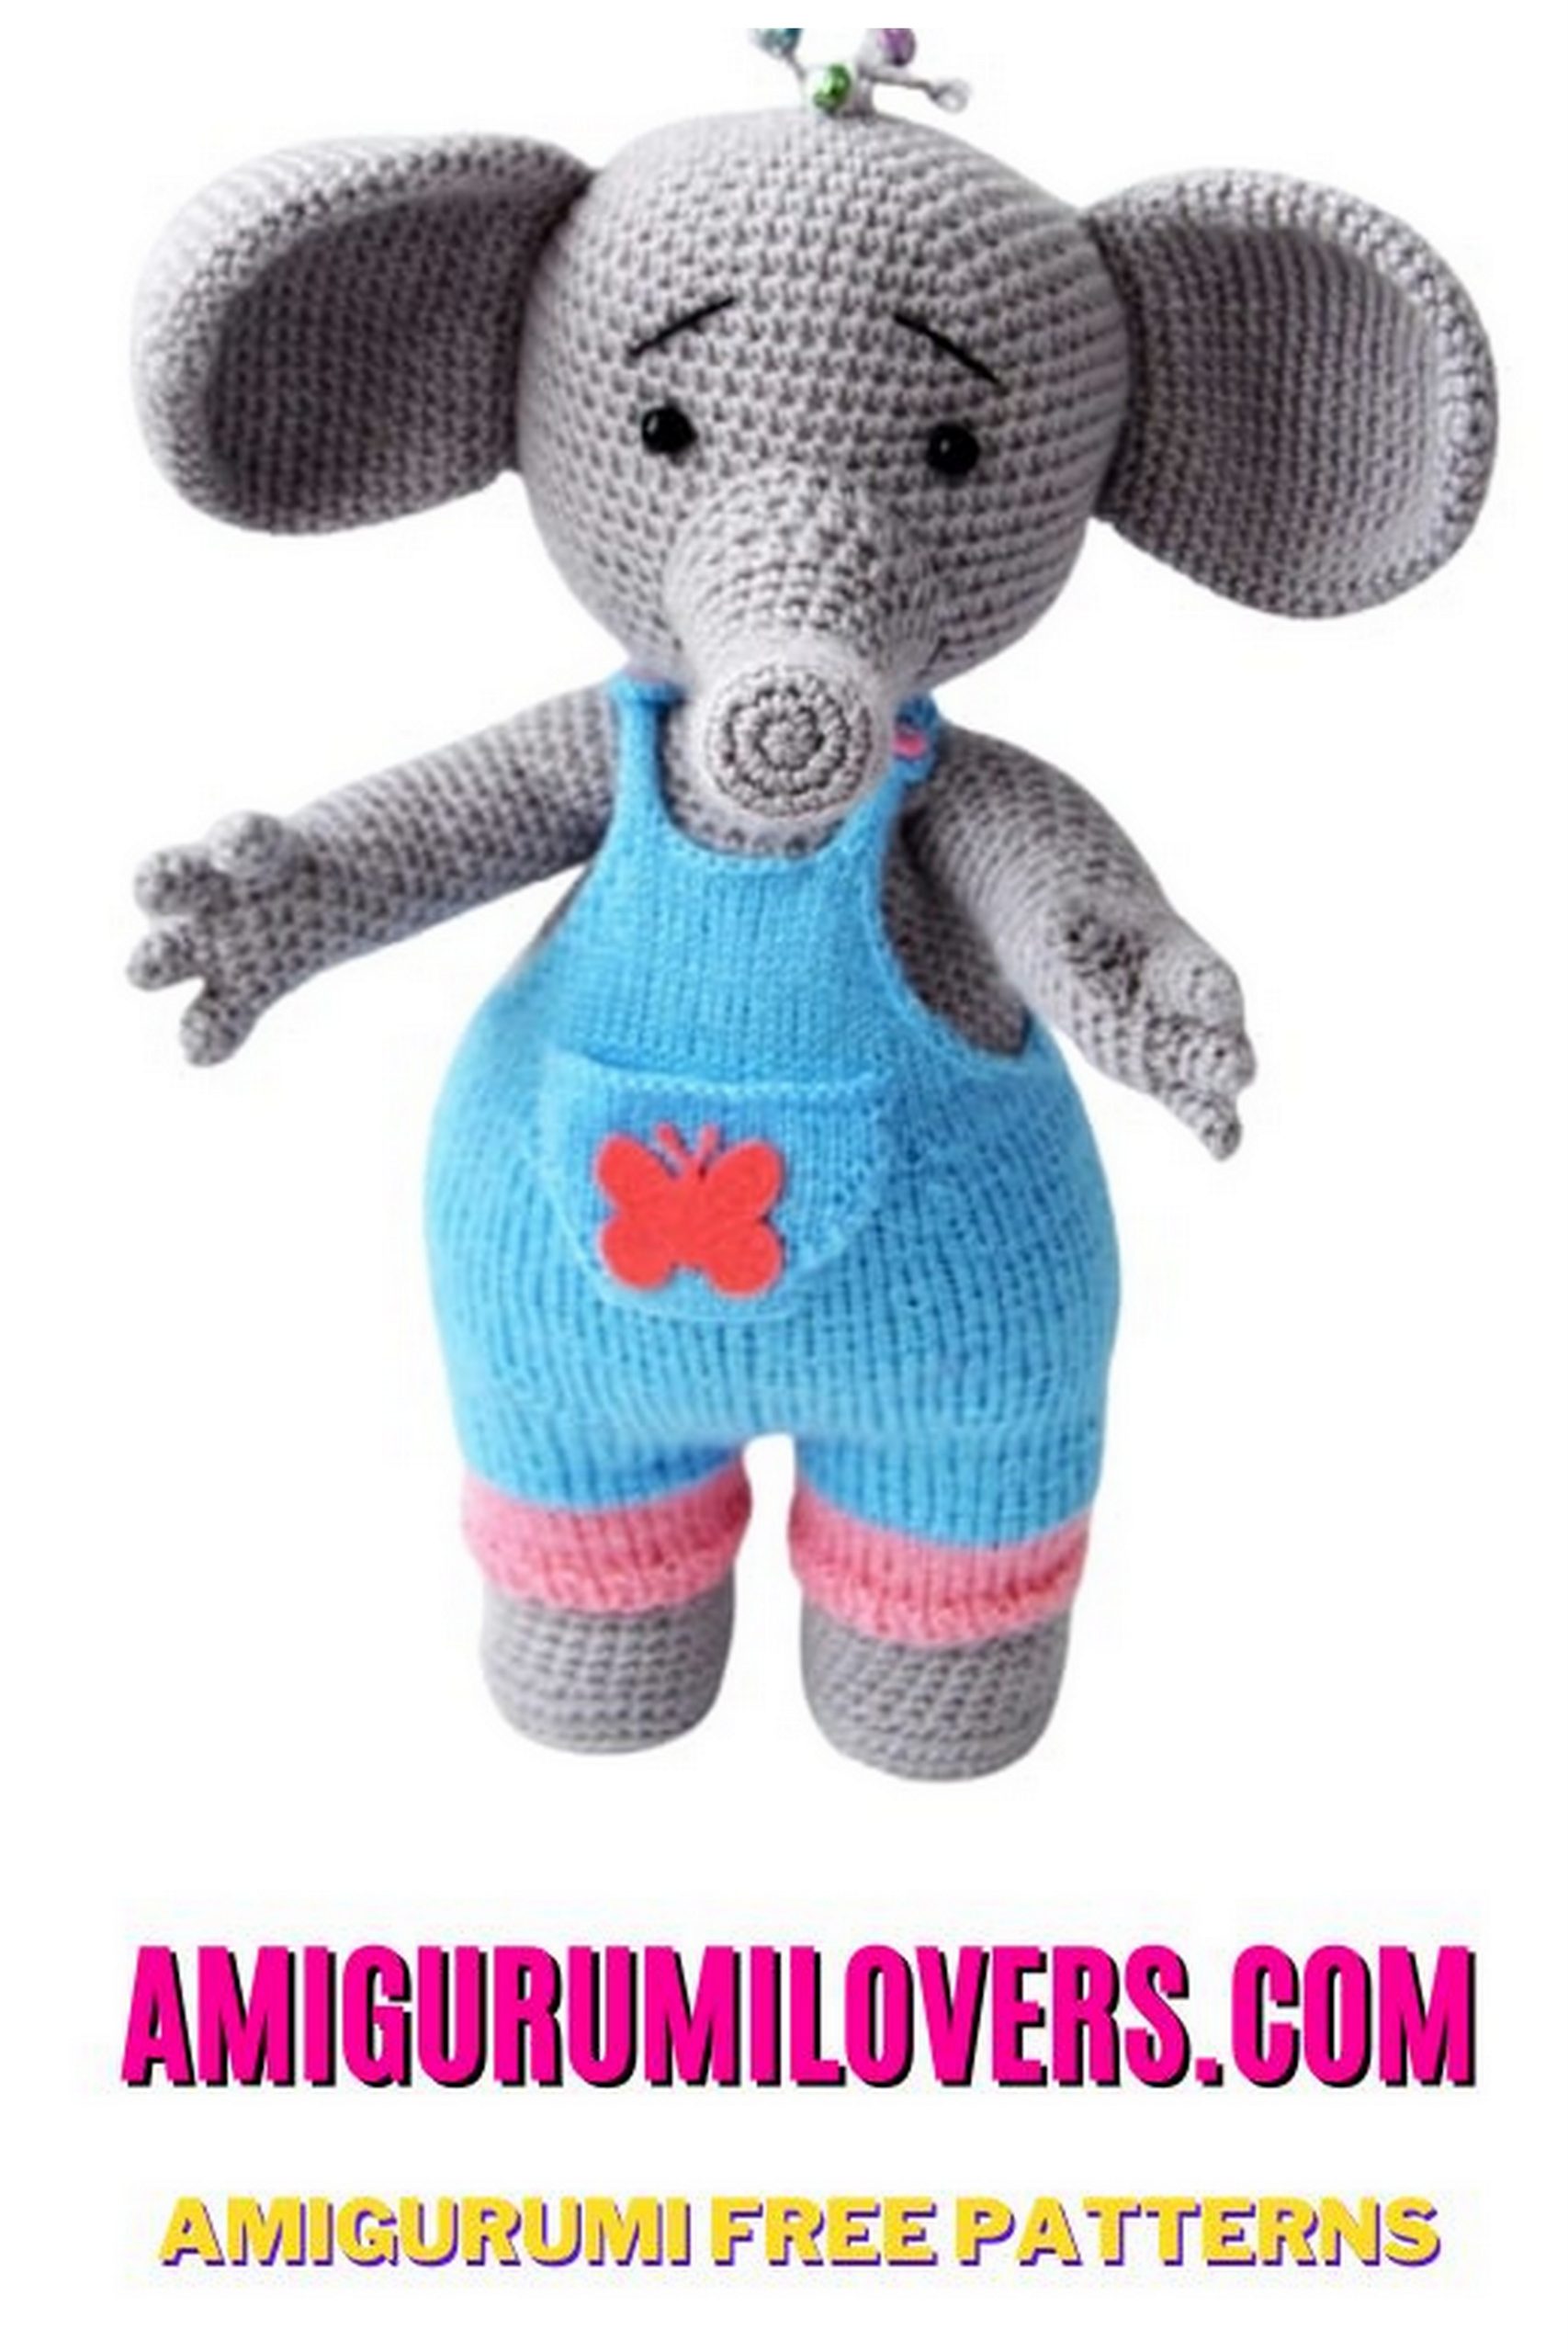
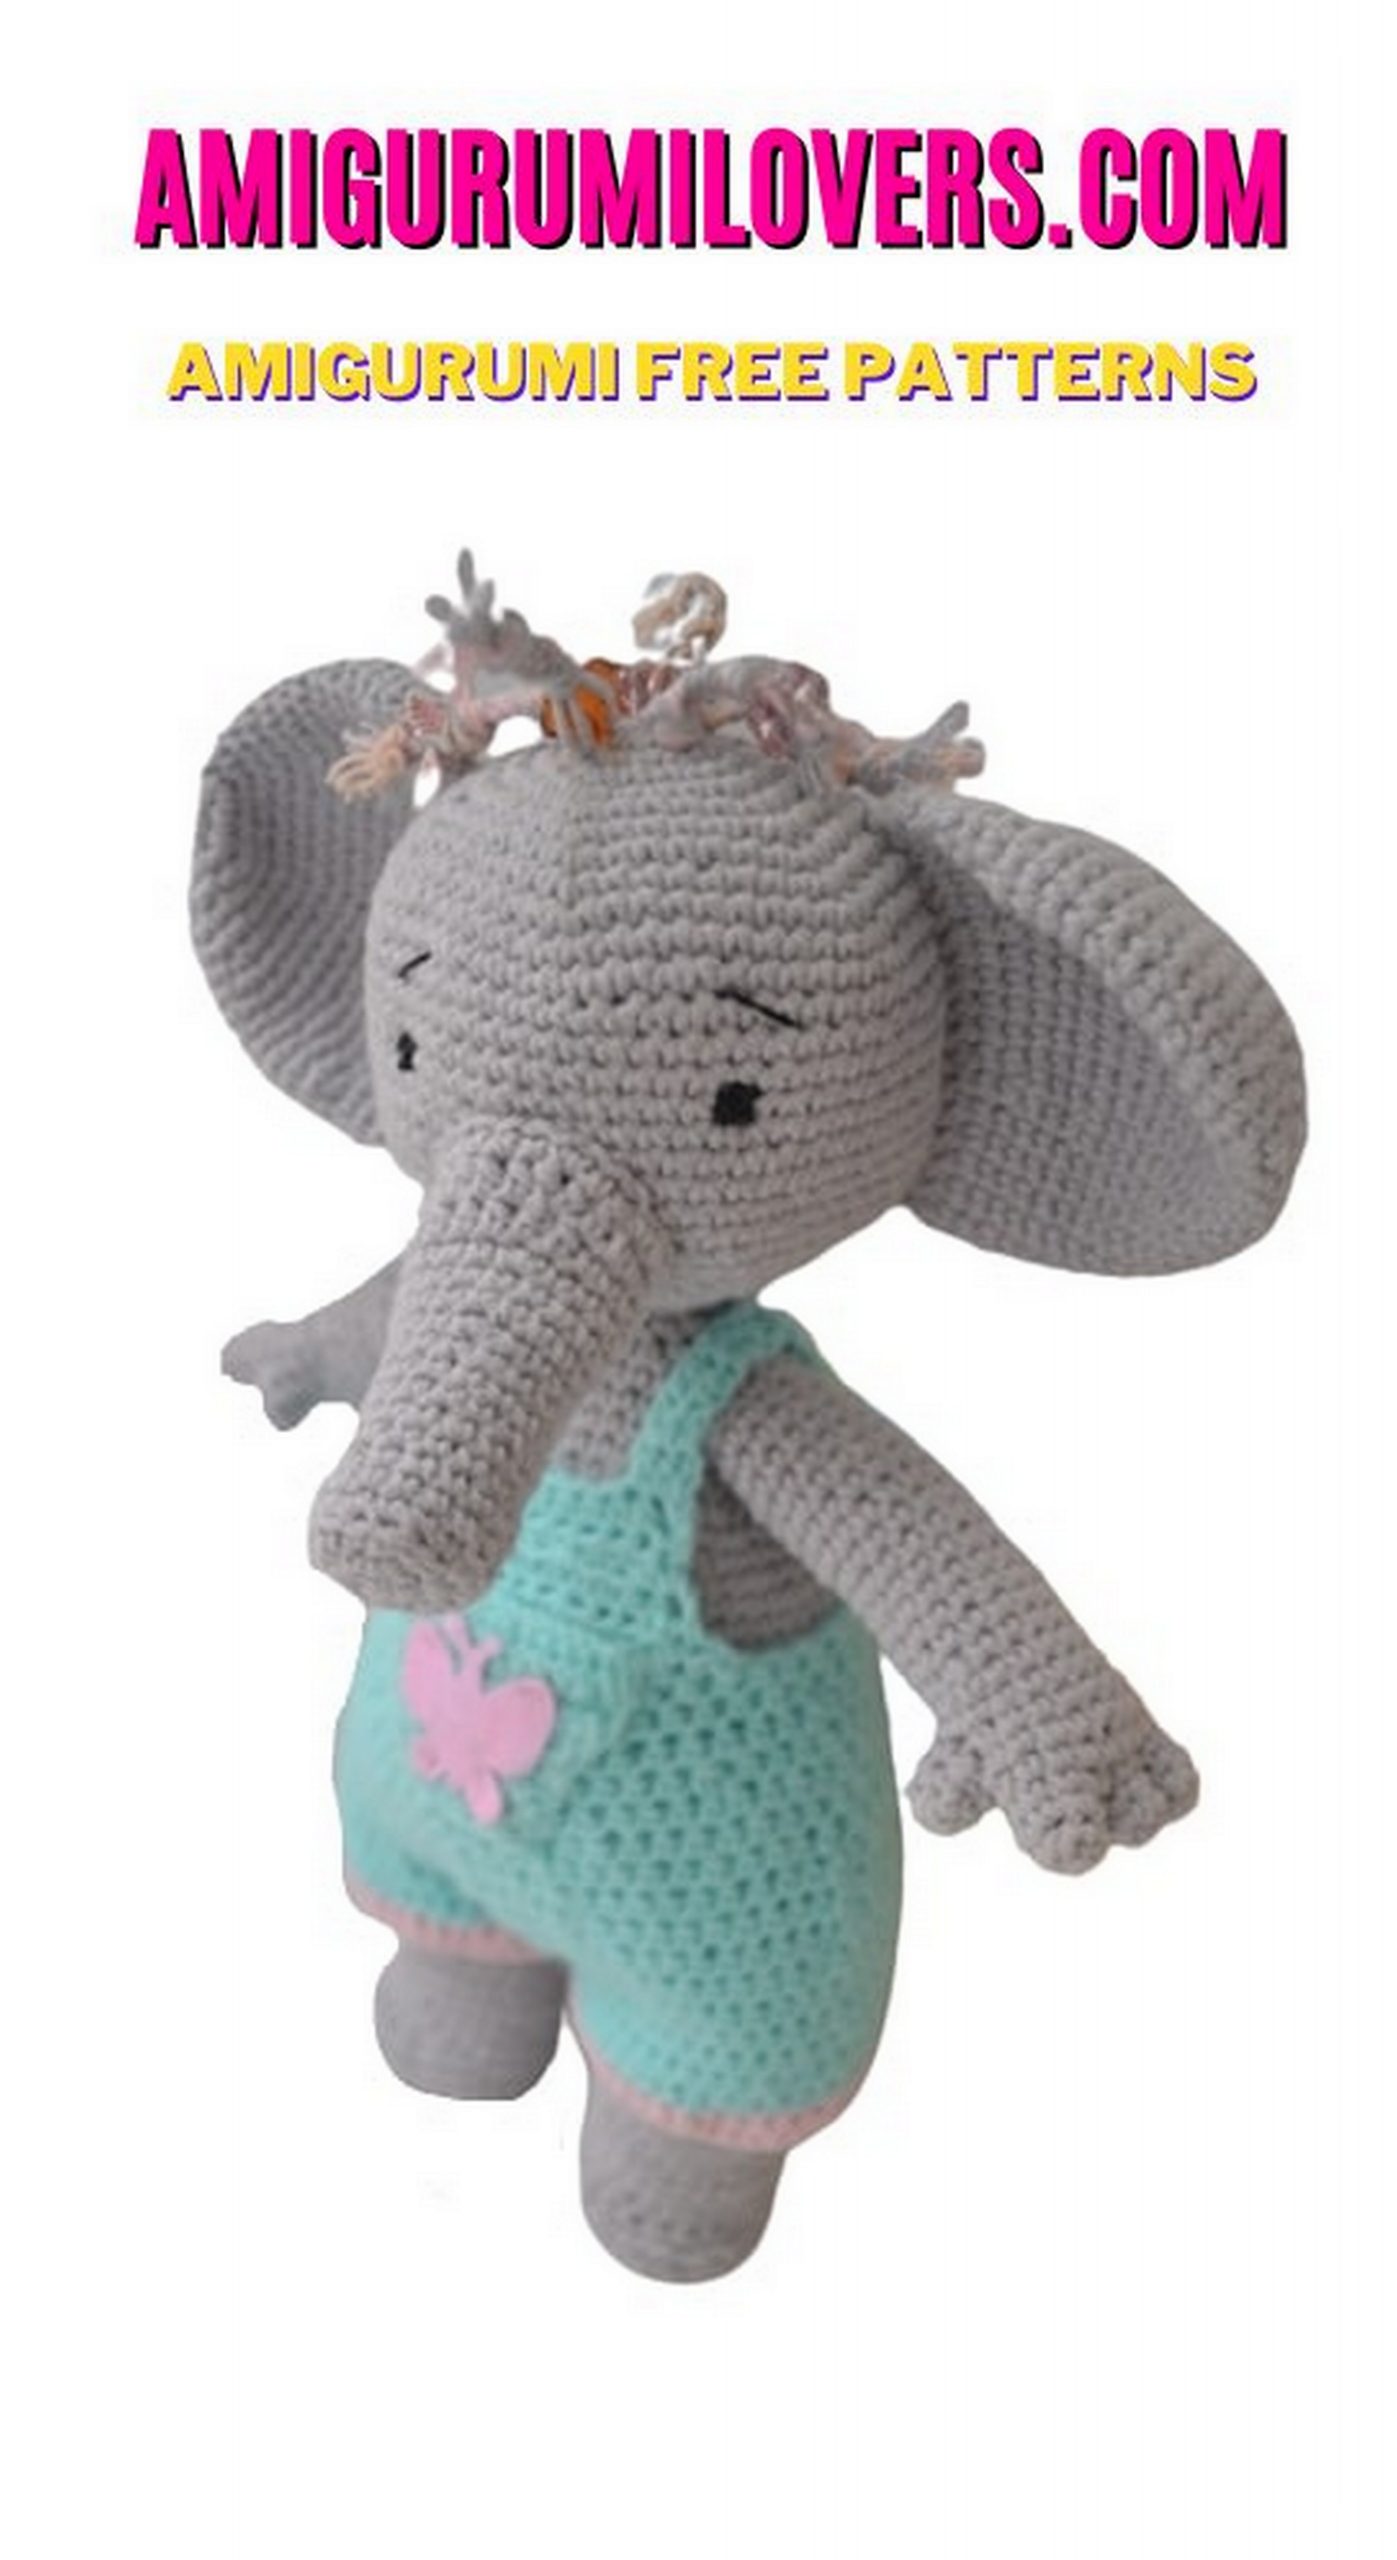
Charming Amigurumi Elephant Toma: Free Crochet Pattern
You may also enjoy exploring our free amigurumi patterns and other popular amigurumi animal patterns available on our website.
If you’re on the lookout for a delightful project that combines creativity and charm, you’ve landed in the right place. In this blog post, we’ll introduce you to Toma, the adorable amigurumi elephant that’s sure to bring joy to anyone who encounters it. This free crochet pattern is perfect for both beginners and experienced crocheters alike, allowing you to create a cute companion that you can cherish or gift to loved ones. With simple stitches and a cohesive guide, you will find that making Toma is not only enjoyable but also a wonderful way to improve your crochet skills.
Amigurumi, the Japanese art of crocheting small stuffed animals and figures, is a delightful practice that has taken the crafting world by storm. Crafting amigurumi is not just about creating toys; it’s about the joy of watching your yarn transform into something unique and special. Toma the elephant is a fantastic project for those new to amigurumi, as it allows you to explore basic techniques while encouraging creativity along the way. The pattern is clear and concise, allowing you to follow along with ease as you work on each part of Toma’s charming design.
Not only does crocheting Toma offer a satisfying way to spend your time, but it also serves as a great introduction to the world of amigurumi. You will learn essential techniques such as crocheting in the round, increasing, and decreasing stitches, making it the perfect starting point for your amigurumi journey. Plus, the colorful variations you can use for Toma allow for personalization, making each creation wholly unique to its maker. Whether you choose classic colors or get adventurous with vibrant hues, Toma will showcase your individual style.
This pattern is easy to follow, and we have ensured that it includes detailed instructions and helpful tips to guide you throughout the process. We want you to feel confident as you explore each step, so you can truly enjoy the rewarding experience of transforming yarn into a lovable, huggable creation. It’s an excellent project to work on during quiet evenings at home, or even as a fun group activity with friends who share your passion for crochet. With Toma, you’re not just crafting a toy; you’re creating memories and moments that will make you smile every time you see your finished product.
So gather your yarn, grab your hook, and let’s get started on creating Toma, the charming amigurumi elephant. By the end of this journey, you’ll not only have a new plush friend but also the satisfaction of having tackled a fulfilling crochet project. Ready to dive in? Let’s begin crafting Toma together!
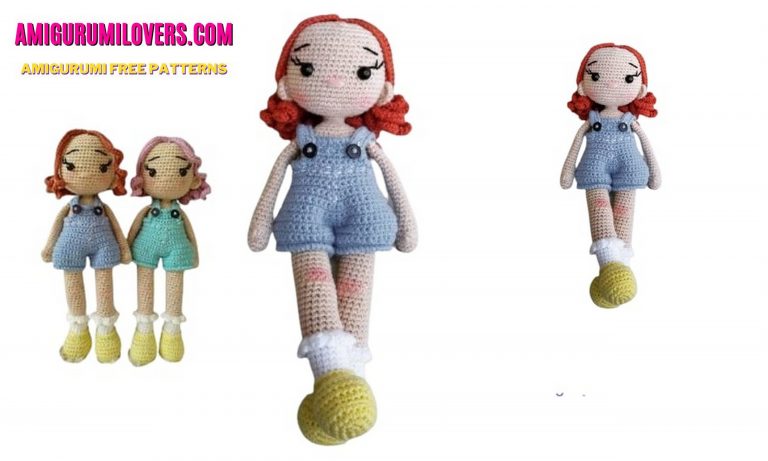
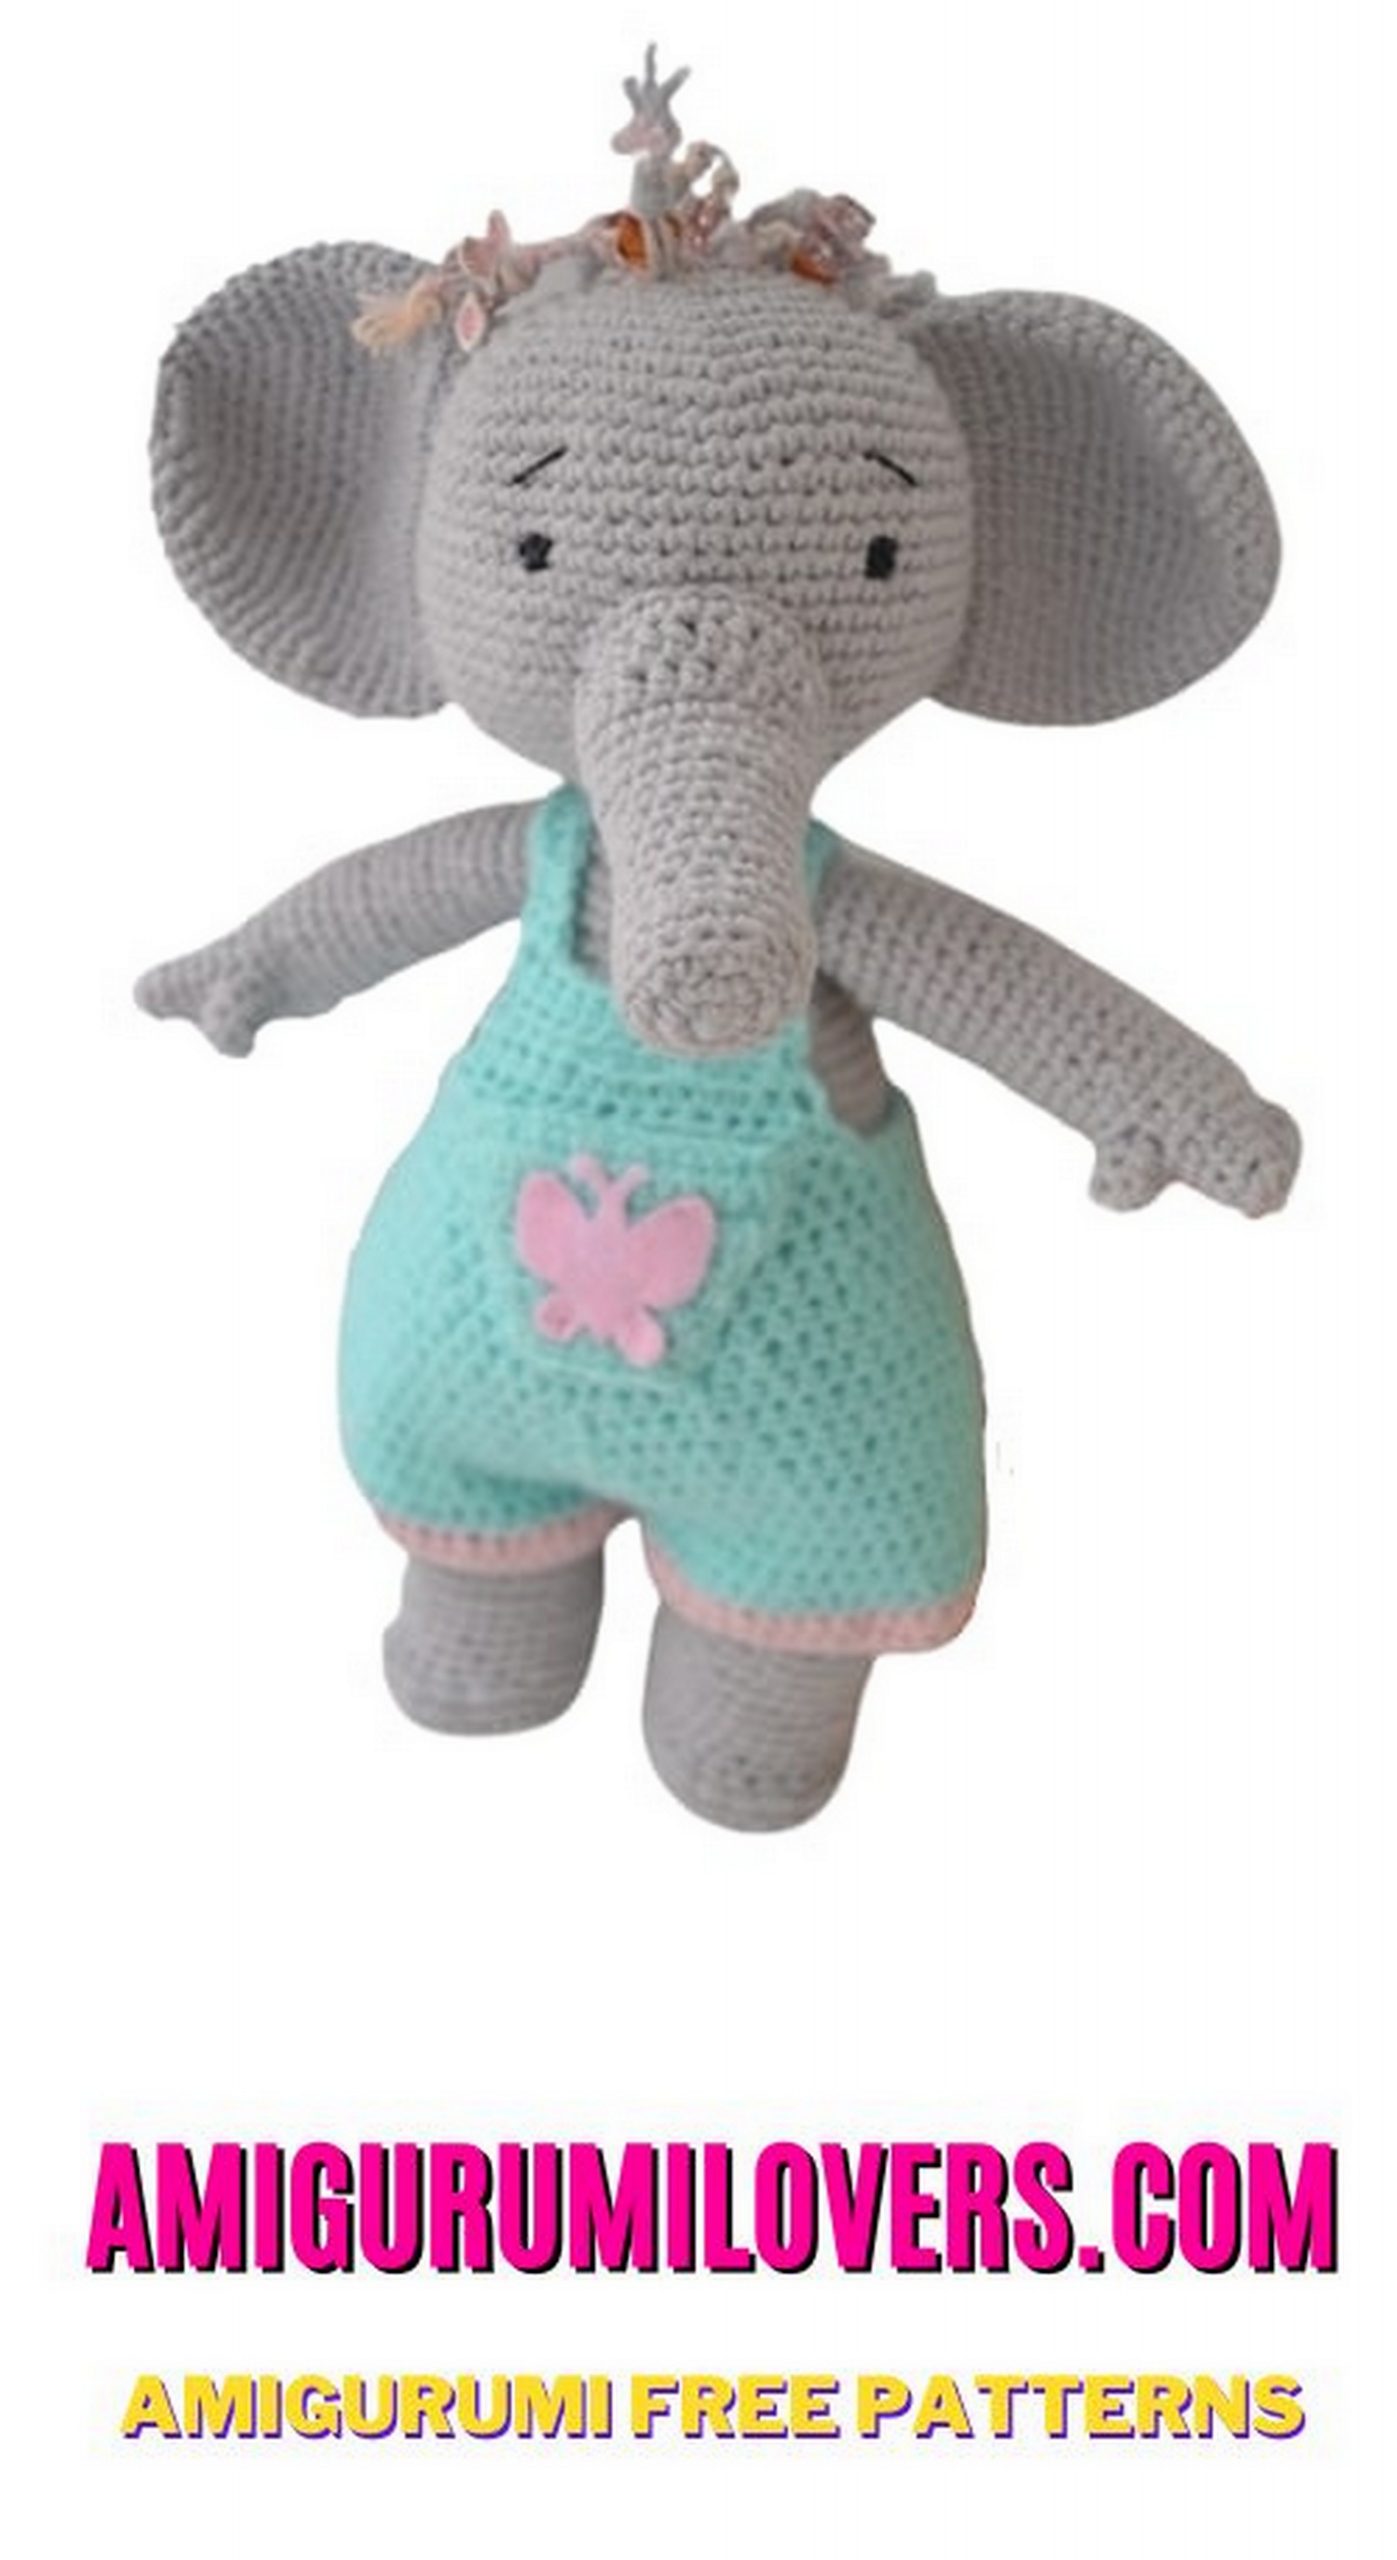
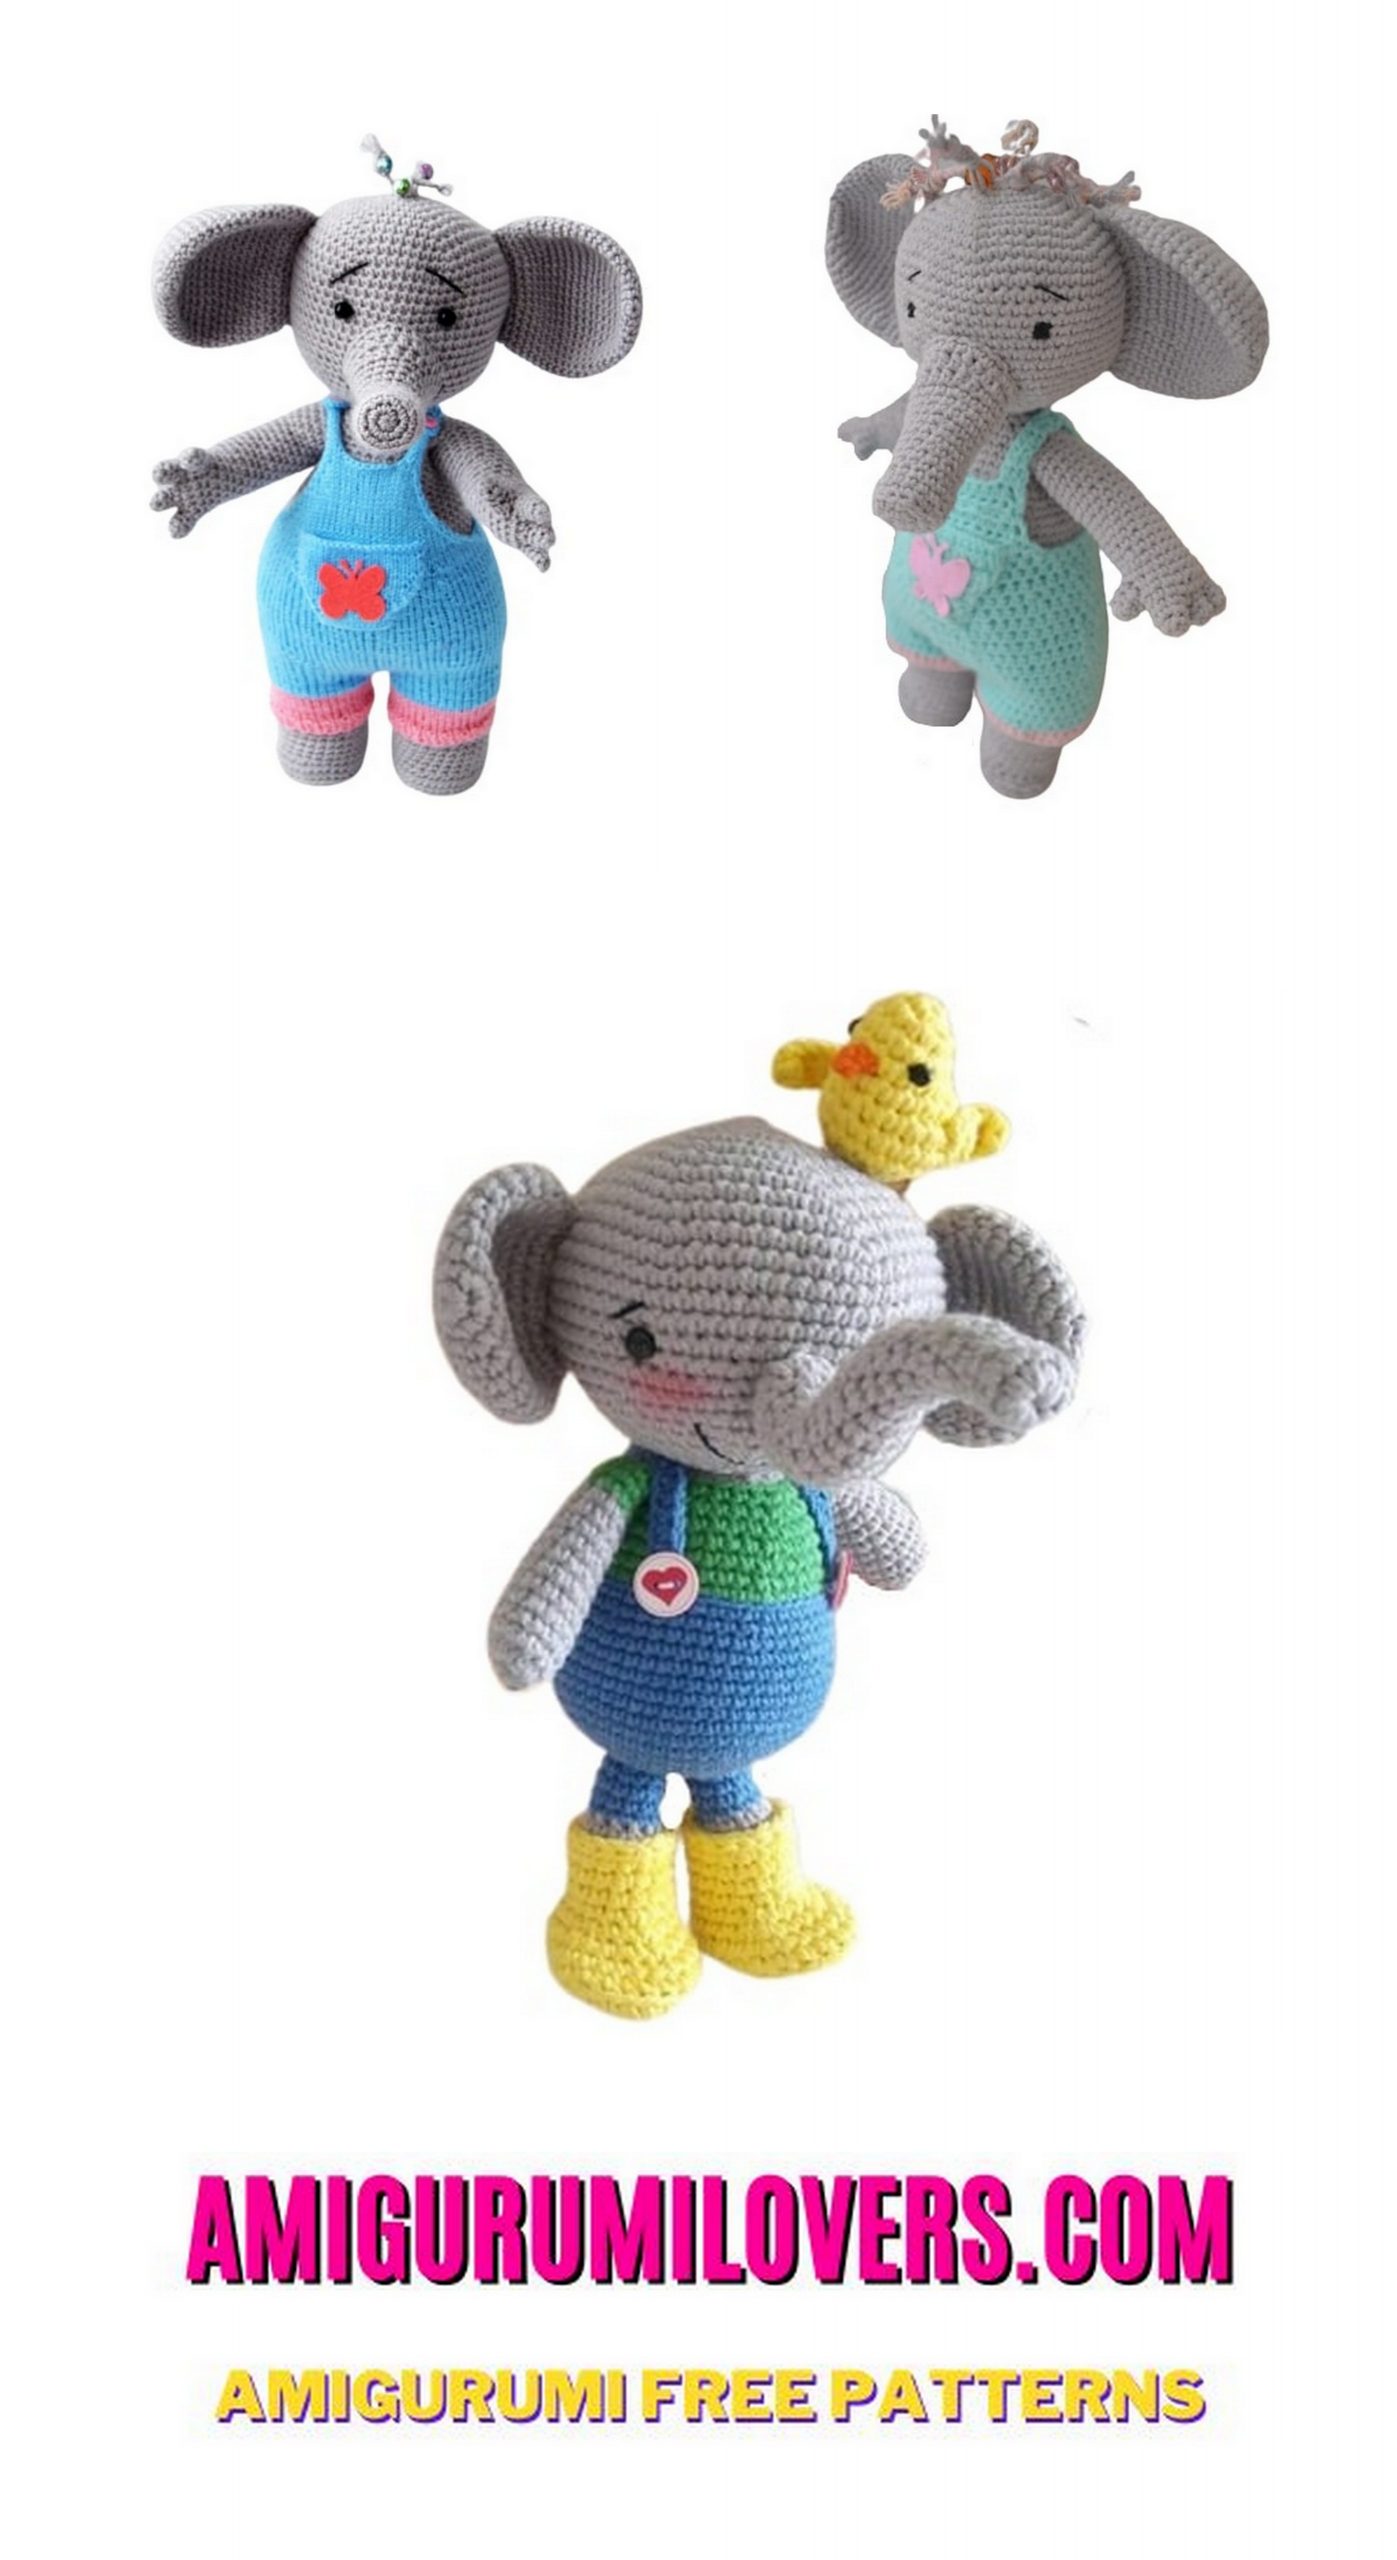
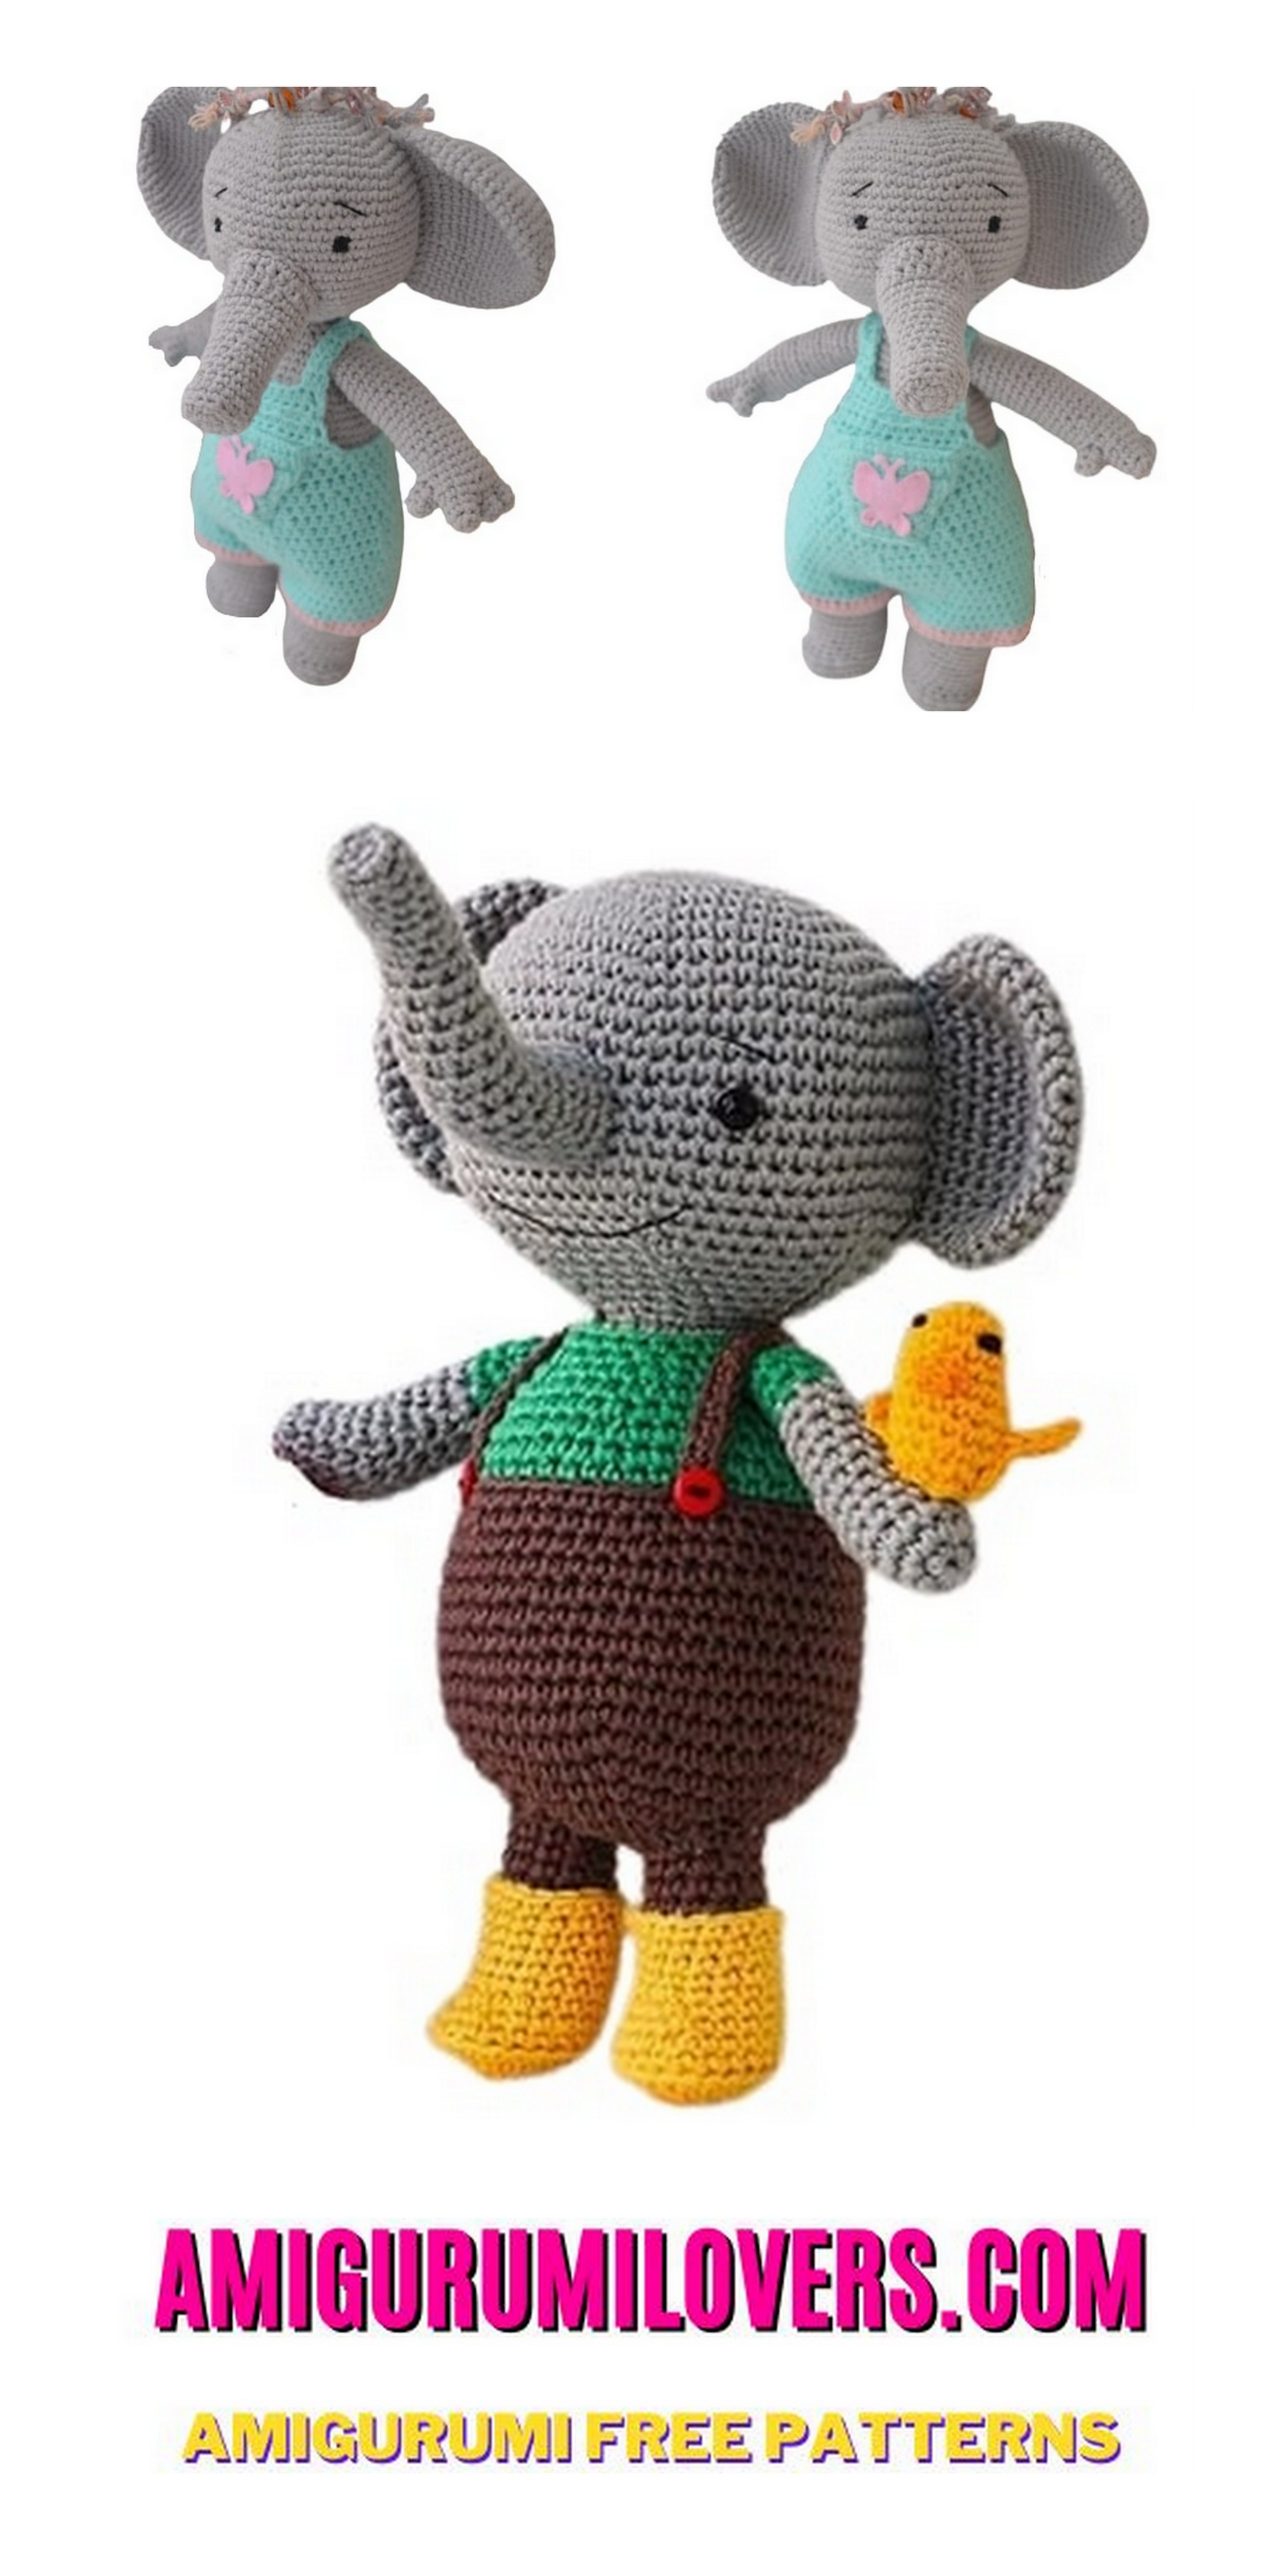
Say hello to Toma, the lovable amigurumi elephant waiting to be brought to life with your crochet skills! Our free crochet pattern for Amigurumi Elephant Toma is a delightful project for enthusiasts of all levels. Whether you’re a beginner looking for a rewarding challenge or an experienced crocheter seeking a fun new creation, Toma is sure to steal your heart. With clear instructions and helpful photos, crafting this adorable elephant is a joyous experience. Get ready to embark on a whimsical journey of creativity as you crochet your very own Toma!
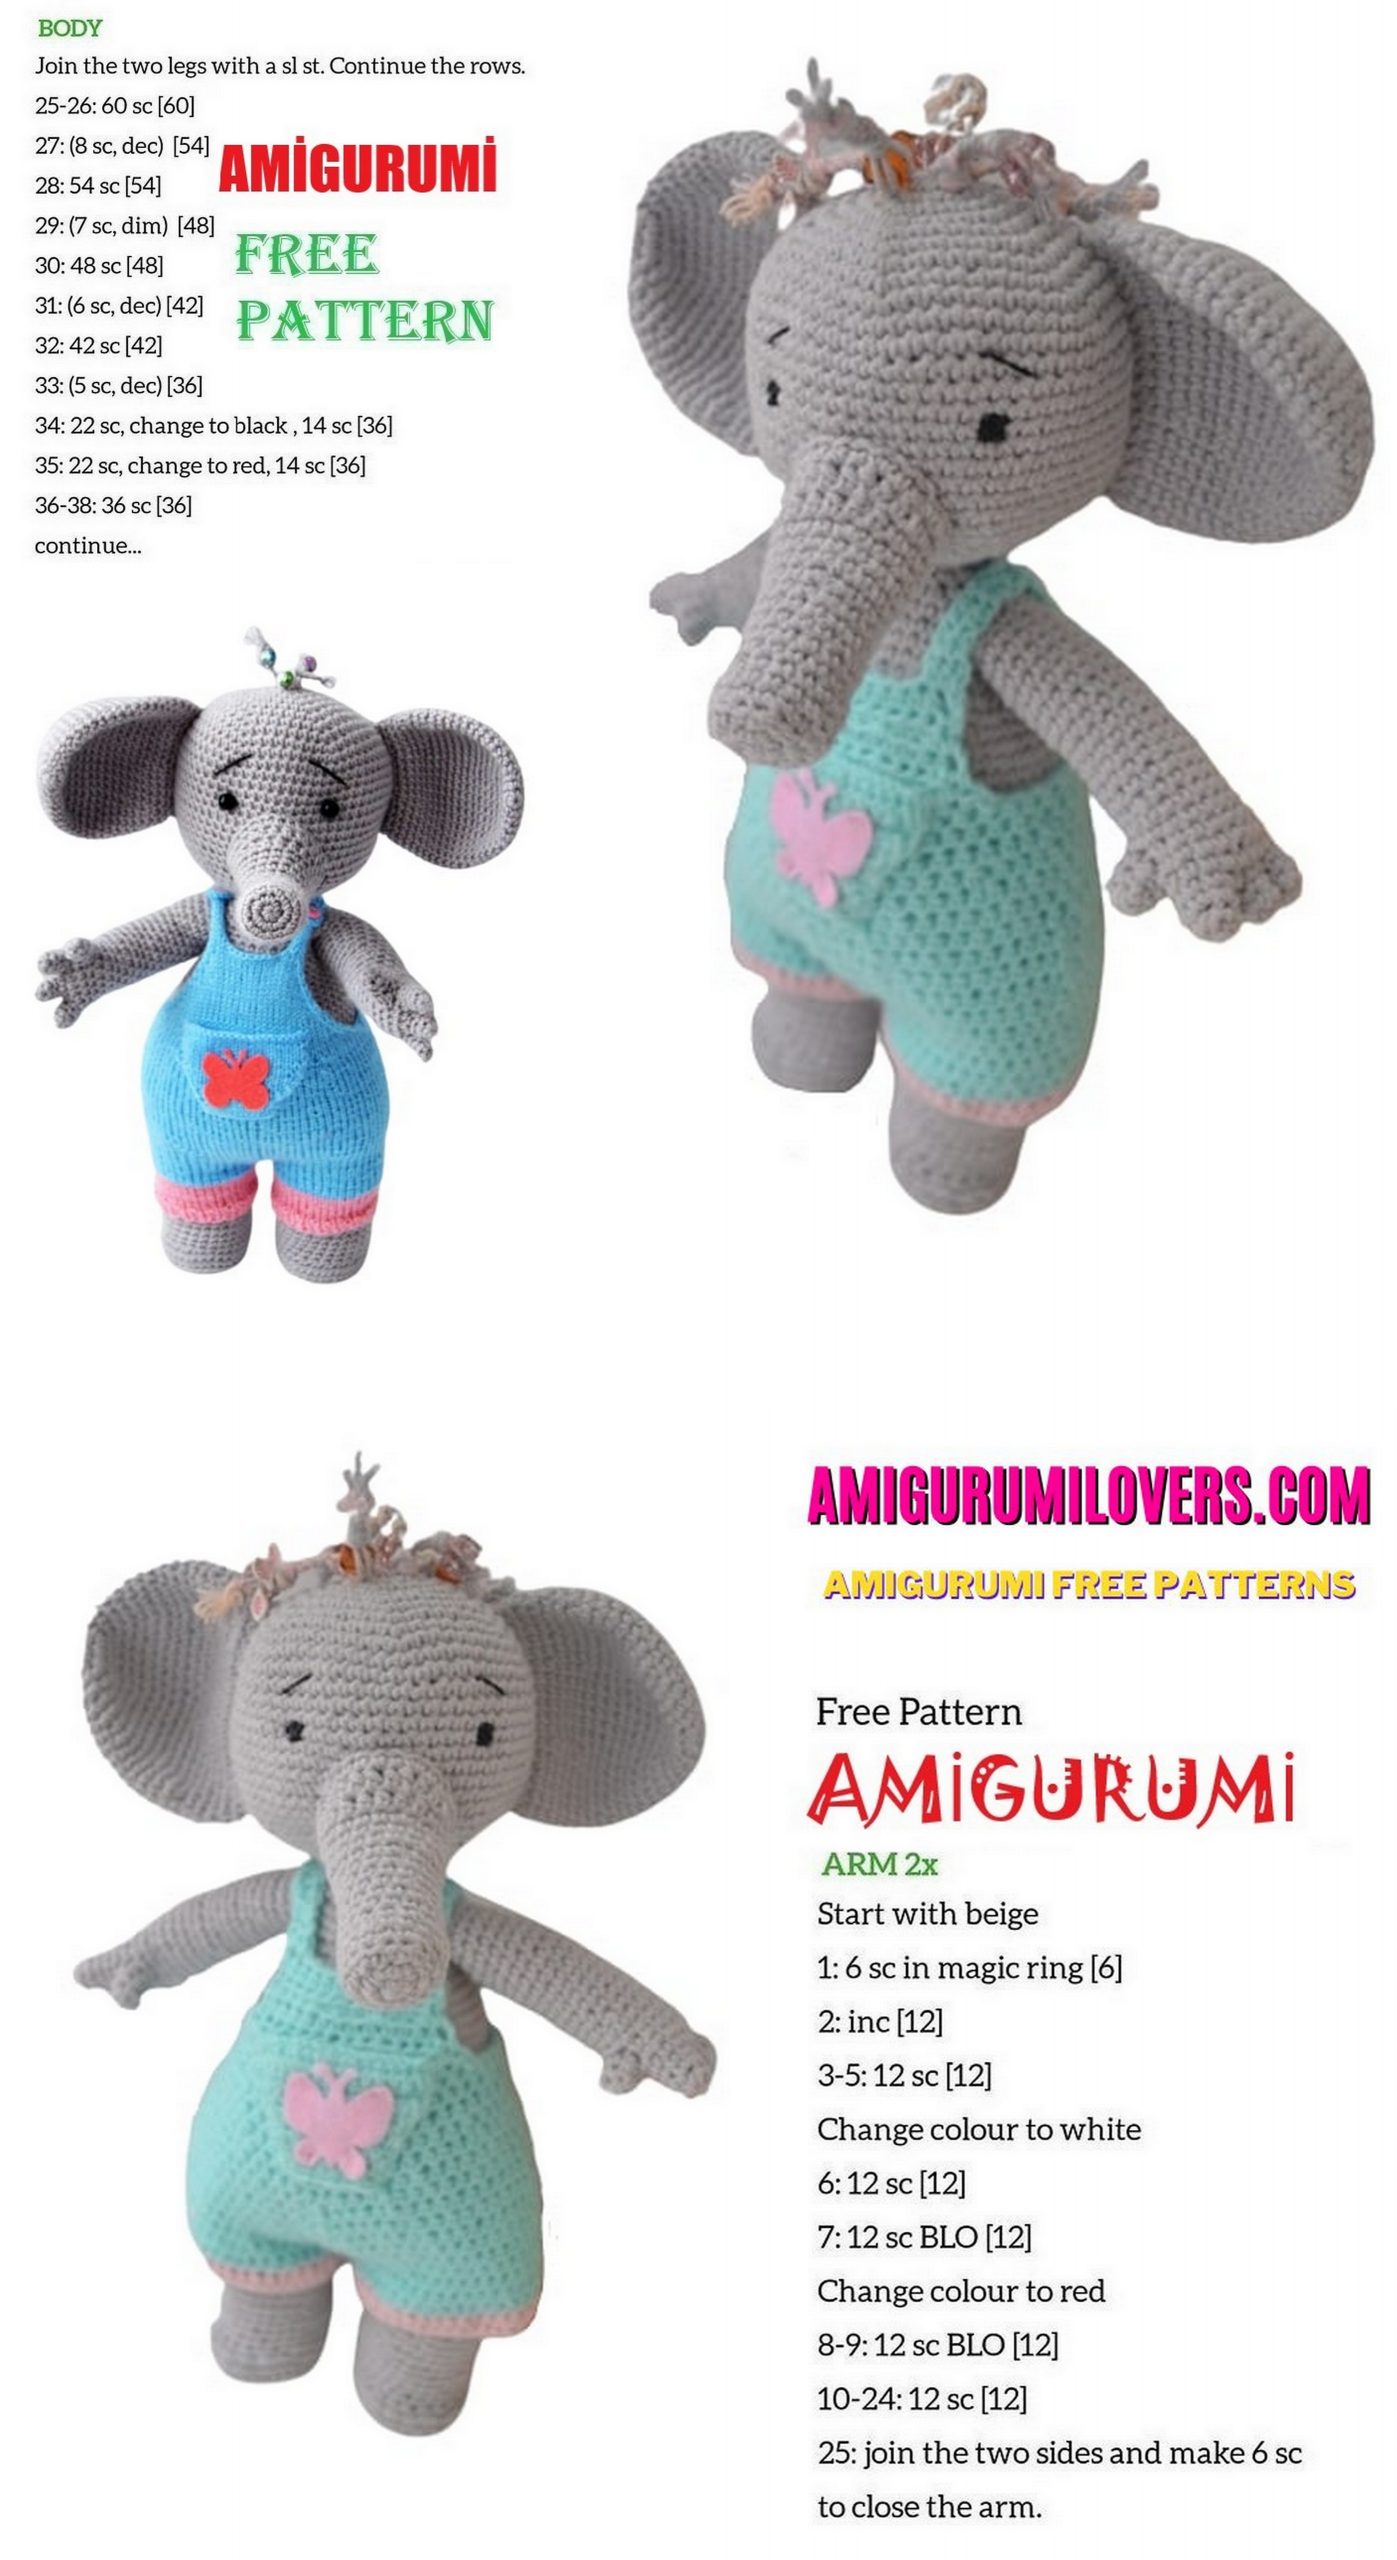
The size of the finished toy with the materials I used is 32 cm. The size of the toy depends on the thickness of the yarn, the thickness of the hook and the density of knitting!
Materials
1. Gray yarn, I had it a children’s novelty Pehorka 50g / 200m (it took almost 150g)
2. The yarn is blue
3. The yarn is pink
4. Hook 1.75
5. Filler
6. Needle for stitching
7. 2mm wire
8. Adhesive plaster
9. Wire cutters or, me old scissors
10.For the eyelet of a pair of black 6 beads 8 mm in size
11. A piece of pink felt – for a butterfly
12. Cardboard or plastic, for example, a lid from a mayonnaise bucket
13. Weightlifters, in my case it’s decorative glass pebbles
14. A pair of buttons
Abbrevations
Ch – chain
SL-ST – slip stitch
Sc – single crochet
Hdc – half double crochet
(12) – the number of loops in the knitted a number of “Decrease” – knit two columns of the previous row together “Increase” – knit 2 columns in one column of the previous row Chrome. – edge loop
1 = 2 – knit two from one loop
İnc – increase the front loop from the broach
Dec- knit 2 stitches together front
Knit – front loop
Purl – Wrong Loop
Head:
1) 6 sc into magic ring
2) İnc x6 times (12)
3) 1sc, inc x6 times (18)
4) 2 sc, inc x 6 times (24)
5) 3 sc, inc x 6 times (30)
6) 4 sc, inc x 6 times (36)
7) 5 sc, inc x 6 times (42)
8) 6 sc, inc x 6 times (48)
9) 7 sc, inc x 6 times (54)
10) 8 sc, inc x 6 times (60)
11) – 23) 60 sc (13 rows)
24) 8 sc, dec x 6 times (54)
25) 7 sc, dec x 6 times (48)
26) 6 sc, dec x 6 times (42)
27) 5 sc, dec x 6 times (36)
28) 4 sc, dec x 6 times (30)
29) 3 sc, dec x 6 times (24)
30) 2 sc, dec x 6 times (18)
Thread cut right handle Fingers (4 pieces)
1.6 sc into magic ring
2-3. bsc
Cut the thread, do not cut the thread on the last finger
Connect the fingers:
1. 3sc for the little finger, 3sc for the average, 6sc for the index, 3 sc for the average, 3 sc for the little finger (18)
2.18 sc
3.6 sc, 3 sc we knit together with the thumb, i.e. grab the thumb loop and handle loop, 9 sc (18)
4.6 sc, 3 sc on the thumb, 9 sc (18)
5-6. 18 sc At this stage we make a wire frame.
3 wires are made of approximately the same length, the fourth wire is made longer than the rest, then this wire will be attached to the tep frame. We isolate the junction with electrical tape. You can insert and knit further, I inserted the frame as I already knitted the entire handle, but filling in this option is more difficult
7. (dec, 7 sc) x 2 times (16)
8 – 22) 16 sc (15 rows)
Fasten and cut the thread
Left Handle:
Fingers (4 pieces)
1.6 sc into magic ring
2.-3. 6sc
Thread cut, on the last finger do not cut the thread
Connect the fingers:
1. 3sc on the little finger, 3sc on the average, 6sc on the index, 3 sc on the average, 3 sc on the little finger (18)
2.18 sc
3.10 sc, 3 sc we knit together with the thumb, 5 sc (18)
4.10 sc, 3 sc on the thumb, 5 sc (18)
5-6.18 sc
7. (dec, 7 sc) x 2 times (16)
8 – 22) 16 sc (15 rows)
Fasten and cut the thread
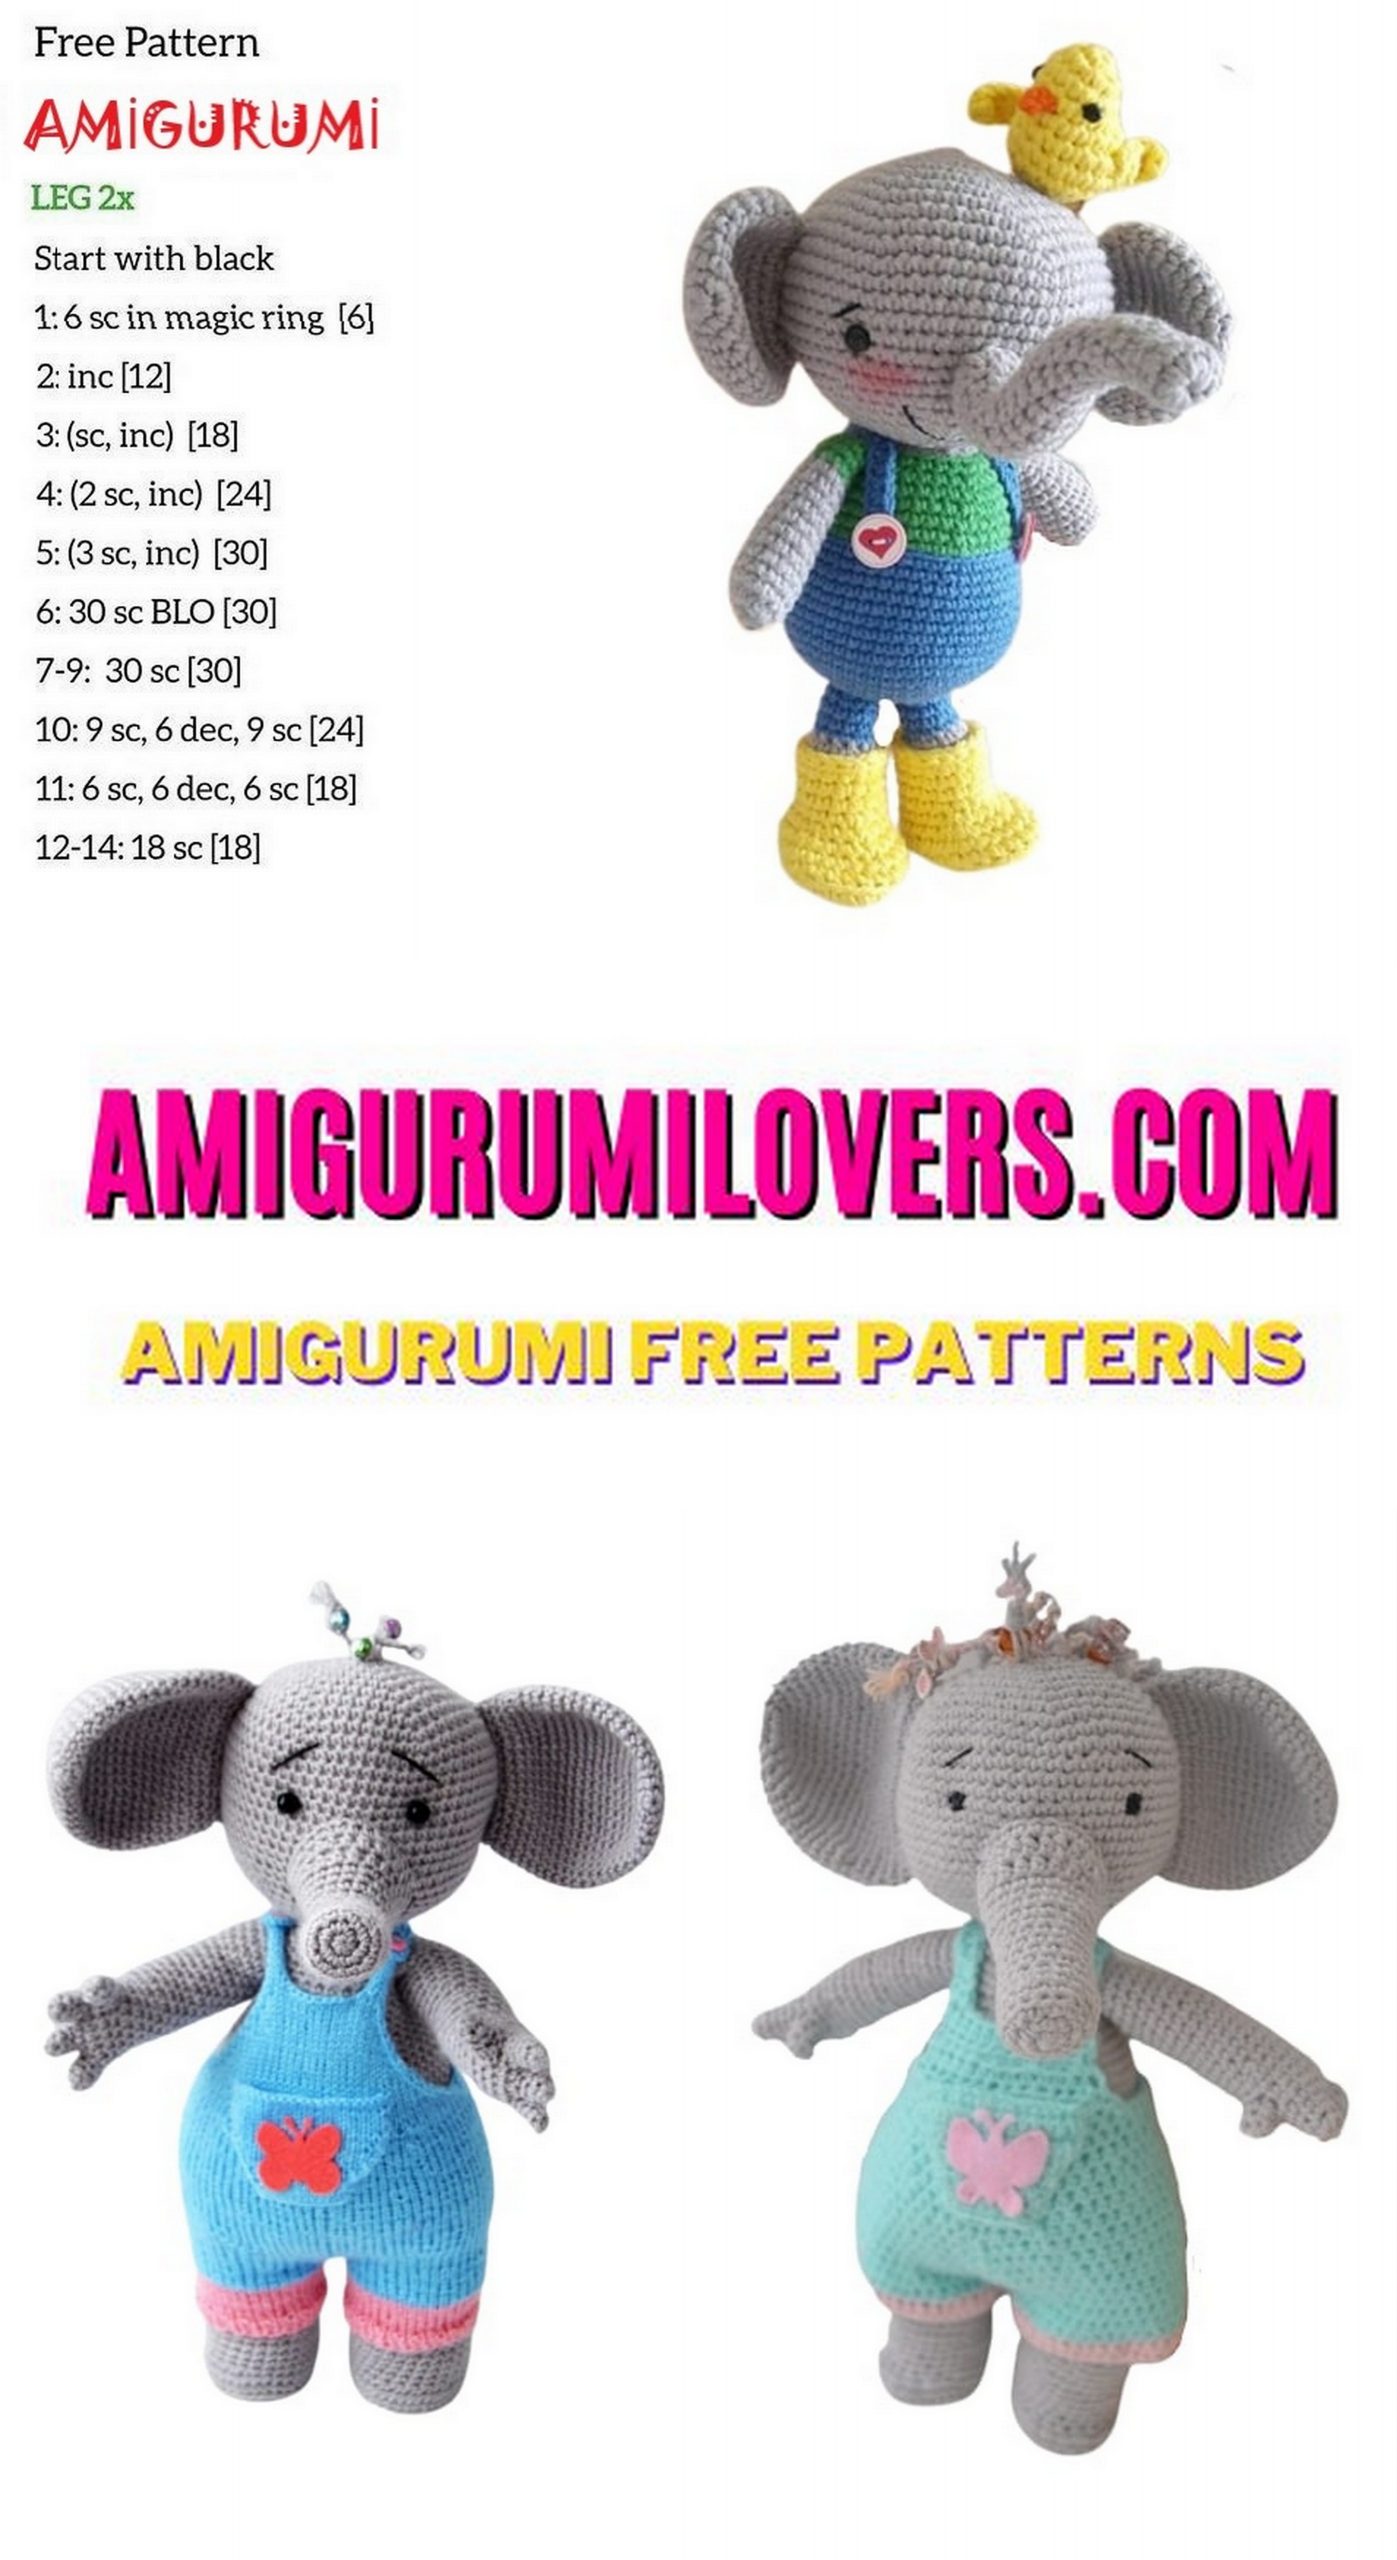
Legs:
1.6 sc into magic ring
2. inc x 6 times (12)
3. (1sc, inc) x 6 times (18)
4. (2 sc, inc) x 6 times (24)
5. (3 sc, inc) x 6 times (30)
6. (4 sc, inc) x 6 times (36)
We cut a little shoe from cardboard or from a screwdriver from under the bucket, we also round the wire to the size of the foot, I advise you to take a wire of about 30 cm long, because it will then be inserted into the head thereby holding it.
7. Behind the back of the hinge 36 sc
8.36 sc
9.12 sc, 6ub, 12 sc (30)
10.- 22. 30 sc in the last row On one leg, we break the thread, on the second we do not break and connect the legs and knit the body
23. 7 sc, 3 ch, attach the second leg, 30 sc along the second leg, 3 sc along the ch, 23 sc along the first leg (66)
24. 7 sc, 3 sc by ch, 56 sc (66)
25.8 sc, inc, 14 sc, inc, 17 sc, 3 inc, 15 sc, inc, 6 sc (72)
26. – 35. 72 sc (10 rows)
At this stage, you can insert insoles in the legs, wire, as well as weighting materials (for example: stack. Pebbles, simple pebbles, coins). In my case, this is a stack. pebbles for decor. We continue to knit the torso
36. (10 sc, dec) x 6 times (66)
37 – 39.66 sc (3 rows)
40. (9 sc, dec) x 6 times (60)
41 – 42. 60 sc (2 rows)
43. (8 sc, dec) x 6 times (54)
44 – 45.54 sc (2 rows)
46. (7 sc, dec) x 6 times (48)
47. 48 sc
48. (6 sc, dec) x 6 times (42)
49. 42 sc
50. (5 sc, dec) x 6 times (36)
51 – 52.36 sc (2 rows)
53. (4 sc, dec) x 6 times (30)
54 – 56.30 sc (3 rows)
We attach the handles, look so that the palms look inward
57. grab the loop of the hand and the loop of the heat, 7 sc handle + body, 8 sc for heat, 7 sc handle + body, 8 sc for heat (30)
58. knit 9 sc on the arm, 8 sc on the body, 9 sc on the hand, 8 sc on the body (34)
59.34 sc
60. dec, 7 sc, dec, 6 sc, dec, 7 sc, dec, 6 sc (30)
61. dec, 6 sc, dec, 5 sc, dec, 6 sc, dec, 5 sc (26)
62. dec, 5 sc, dec, 4 sc, dec, 5 sc, dec, 4 sc (22)
63. dec, 4 sc, dec, 3 sc, dec, 4 sc, dec, 3 sc (18)
64. 18 sc
We fix the thread, cut off leaving the thread for stitching the head
Sew on the head
Trunk:
1.6 sc into magic ring
2.İnc x 6 times (12)
3. 1 sc, inc x 6 times (18)
We cut cardboard or plastic at the office, but this is not necessary, I wanted the proboscis not to protrude from the filler, but to be even
4. Behind the back wall of the loop 18 sc
5.18 sc
6. (4 sc, dec) x 3 times (15)
7 – 14. 15 sc (8 rows)
15. (4 sc, inc) x 3 times (18)
16 – 17. 18 sc (2 rows)
18. (5 sc, inc) x3x (21)
19.5 sc, 6 HDC, 10 sc (21)
20.5 sc, 1 hdc, 1 inc hdc, 2 hdc, 1 inc hdc, 1 hdc, 3 sc, inc, 6 sc (24)
21. (3 sc, inc) x 6 times (30)
We cut the thread, leaving long tip for sewing, fasten and sew to the head.
HDC should be upstairs.
Ears
1.6c into magic ring
2.İnc x 6 times (12)
3. (1sc, inc) x 6 times (18)
4. (2 sc, inc) x 6 times (24)
5. (3 sc, inc) x 6 times (30)
6. (4 sc, inc) x 6 times (36)
7.36 sc
8. (5 sc, inc) x 6 times (42)
9-10. 42 sc (2 rows)
11. (6 sc, inc) x 6 times (48)
12 – 15. 48 sc (4 rows)
16. (6 sc, dec) x 6 times (42)
17 – 18. 42 sc
19. (5 sc, dec) x 6 times (36)
20. 36 sc
21. (4 sc, dec) x 6 times (30)
Fold the part in half and knit 12 sc, grabbing the front and rear loops. Cut the thread, leaving a long end for sewing make out a face
Sew eyes:
At the level of 15 – 16 rows, between the eyes 9 sc. We introduce the needle at point 5, display at point 1, string the bead, insert the needle at point 2, display at point 5. These manipulations can be done several times. Tie the ends. Sew the second eye in the same way. Insert the needle at point 5, output at point 3, string the bead, insert the needle at the point, remove at point 5, tie, cut the thread and thread into the head
We sell a mouth – a smile
The toy is almost ready
Hair. Cut the threads 13-15 cm, take three threads, thread through the loop and weave a pigtail to the desired length
Knitting 40 stitches and distribute to 4 knitting needles
1-4. We knit with an elastic band (1 knit, 1 purl)
5-12. Knit facial (8 rows), change the color to blue
13-23. we knit with the front ones (11 rows) We remove one leg on additional knitting needles (circular). We knit the second leg in the same way. We connect the legs. The junction of the legs will be the beginning of the row
24 – 28. 80 knit (5 rows)
29. 9 knit, from one we knit 2 loops (hereinafter 1 = 2), (19 knit, 1 = 2) * 3 times, 10 knit (84)
30.10 knit, 1 = 2, (20 knit, 1 = 2) * 3 times, 10 knit (88)
31 – 60. 88 knit (30 rows)
61.10 knit, 2 loops together (hereinafter dec), (20 knit, dec) * 3 times, 10 knit (84)
62 – 64. 84 knit (3 rows)
65.9 knit, dec, (19 knit, dec) * 3 times, 10 knit (80)
We divide the pants on the front and back, i.e. 40 loops Knit before
66 .chrome, dec, 34 knit, dec, chrome (38)
67.crome, 37 purl (38)
68.chrome, dec, 2 knit, dec, chrome (36)
69.chrome, 35 purl (36)
70.chrome, dec, 30 knit, dec, chrome (34)
71.krom, 33 purl (34)
72 .chrome, dec, 28 knit, dec, chrome (32)
73.krom, 31 purl (32)
74 .chrome, dec, 26 knit, dec, chrome (30)
75.krom, 29 purl (30)
76 .chrome, dec, 24 knit, dec, chrome (28)
77. chrome, 27 purl (28)
78 .chrome, dec, 22 knit, dec, chrome (26)
79.chrome, 25 purl (26)
80.chrome, y6.20 knit, dec, chrome (24)
81. chrome, 23 purl (24)
82.chrome, dec, 18 knit, dec, chrome (22)
83. chrome, 21 purl (22)
84.chrome, dec, 16 knit, dec, chrome (20)
85.chrome, 19 purl (20)
86.chrome, dec, 14 knit, dec, chrome (18)
87. chrome, 17 purl (18) We close the loops, leaving the loops for the straps
88. chrome, 4 knit, 8 loops close, 3 knit, chrome
We knit webbing
1, 3, 5, 7, 9, 11, 13 rows. Chrome, 4 purl (5)
2, 4, 6, 8, 10, 12 rows. Chrome, 3 knit, chrome (5)
Close the loop
We knit the second strap in the same way
We knit the back just like before
We knit the straps up to the 11th row
12. chrome, knit, 2 loops close, chrome
13. chrome, dial 2 loops, 2 purl
14. chrome, 3 knit, chrome
15. chrome, 4 purl
16. close the loop
Sew the hole between the legs, fasten all the threads and refuel. Sew on buttons
Dial 21 loops
1, 3, 5, 7 rows. Chrome, 19 knit, chrome (21)
2, 4, 6, 8 rows. Chrome, 20 purl (21)
9.chrome, dec, 15 knit, dec, chrome (19)
10. chrome, 18 purl (19)
11. chrome, 17 knit, chrome (19)
12. chrome, 18 purl (18)
13. chrome, dec, 13 knit, dec, chrome (17)
14. chrome, 16 purl (17)
15. chrome, dec, 11 knit, dec, chrome (15)
16. chrome, 14 purl (15)
17. chrome, dec, 9 knit, dec, chrome (13)
18. chrome, 12 purl (13)
19. chrome, 11 knit, chrome (13)
20. chrome, 12 purl (13)
Crochet Pants Knit Pink Pants
1.40 ch, lock in the ring
2 – 3. 2 ch, 40 HDC, sl-st Change to bare yarn
4 – 7. 2 ch, 40 HDC, sl-st We knit the second leg in the same way We connect the legs, each new row starts with 2 ch, finish sl-st
8.20 HDC for the first leg, 40 HDC for the second, 20 HDC for the first (80)
9 – 12.80 hdc (80)
13.21 hdc, 2 dec hdc, 3b hdc, 2 dec hdc, 15 hdc (76)
14.21 hdc, dec hdc, 3b hdc, dec hdc, 15 hdc (74)
15.2 hdc, dec hdc, 35 hdc, dec hdc, 32 hdc (72)
16. (10 hdc, dec hdc) X6 times (66)
17. 66 hdc
18. (9 hdc, dec hdc) X6 times (60)
19. b0 hdc
20. (8 hdc, dec hdc) X6 times (54)
21. (7 HDC, dec hdc) X6 times (48)
We fix the thread, cut it. Divide the pants in half, on the front and back, i.e. 24 HDC.
Divide the pants in half, on the front and back, i.e. 24 HDC. We connect the thread to the side and knit before:
22.4 sc, 16 HDC, 3 sc, sl-st, turn
23. 2 sl-st, 2 sc, 14 HDC, 2 sc, sl-st, turn
24. sl-st, 2 sc, 12 HDC, 2 sc, sl-st, rotation
25. sl-st, 2 sc, 10 HDC, 2 sc, sl-st, rotation
26. sl-st, 2 sc, 8 HDC, 2 sc, sl-st, rotation
27. ch lift, 2 sc, 6HDC, 2 sc, sl-st, turn
28 .– 29. Ch, 10 sc, rotation. We fix the thread and hide. We knit the back part similarly. We knit the straps
30 – 46. Ch, 4 sc, turn
47. ch, 1 sc, 2 ch, 1 sc, turn
48. ch, 4 sc We fix the thread, and hide the second strap. We knit in the same way. Sew buttons, sew a hole between the legs.
1.16 ch, 15 sc by ch, turn
2. Ch, 15 sc, turn
3. Ch, 15 sc, turn
4. Ch, Dec, 11 sc, dec, turn (13)
5. Ch, dec, 9 sc, dec, turn (11)
6. Ch, 11 sc, turn
7. Ch, Dec, 7 sc, dec, turn (9)
8. Ch, 9 sc, turn
9. Ch, Dec, 5 sc, dec, turn (7)
10 – 11. Ch, 7 sc, turn
We fix the thread, leave a long tip for sewing.
Cut a butterfly from felt and glue it on a pocket
Before you leave, make sure to check out more free amigurumi crochet patterns and discover new ideas for your next project.
You can also browse our full amigurumi pattern archive for hundreds of beginner-friendly designs.