Free Santa Claus and Snowman Amigurumi Pattern | Create Festive Crochet Holiday Decorations
You may also enjoy exploring our free amigurumi patterns and other popular amigurumi animal patterns available on our website.
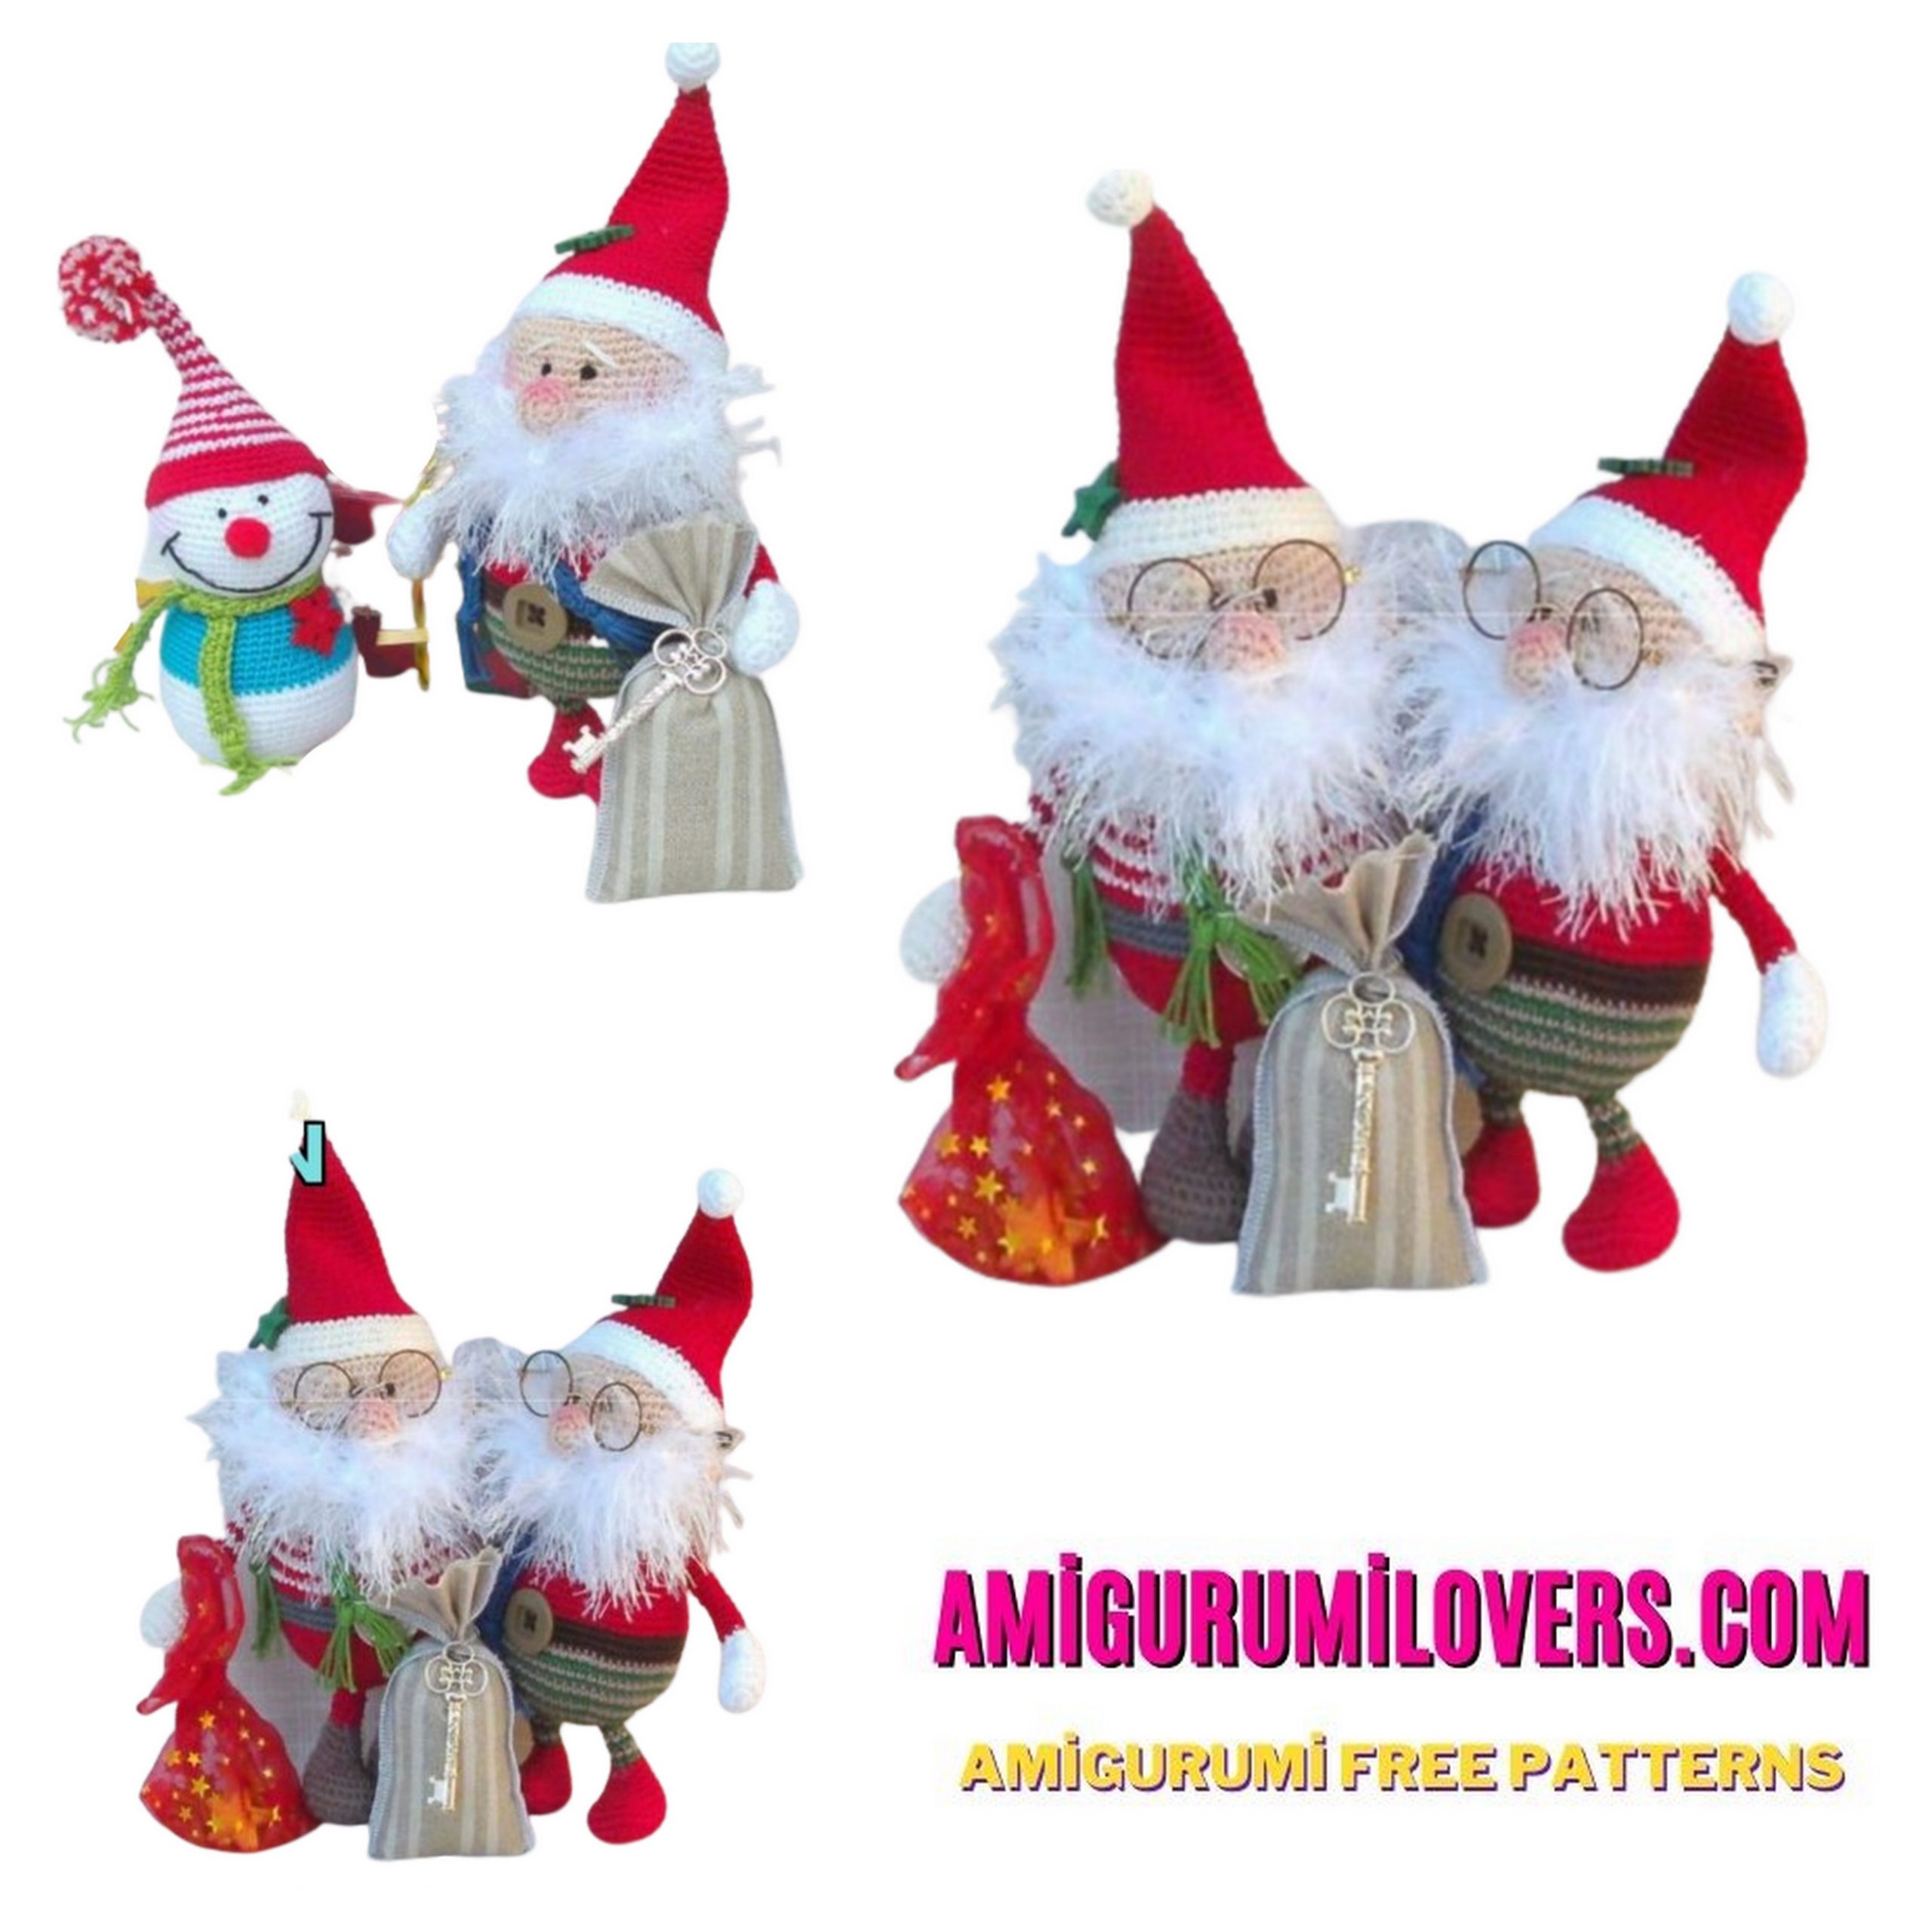
Welcome to our crochet corner, where creativity meets festive cheer! As the holiday season approaches, there’s no better way to sprinkle some joy into your home than with handmade decorations. In this blog post, we are excited to share a delightful free amigurumi crochet pattern for creating your very own Santa Claus and Snowman. These adorable figures not only add a whimsical touch to your holiday decor but also make for lovely gifts that friends and family will cherish for years to come.
Amigurumi, which translates to “knitted or crocheted stuffed toys,” has captured the hearts of many crafters, especially during this joyous time of year. If you’re a beginner, fret not! This pattern is designed to be straightforward and beginner-friendly, ensuring that you can enjoy the process of crafting without feeling overwhelmed. With just a few basic crochet techniques, you’ll find the magic of amigurumi unfolding in your hands as you stitch together these festive characters.
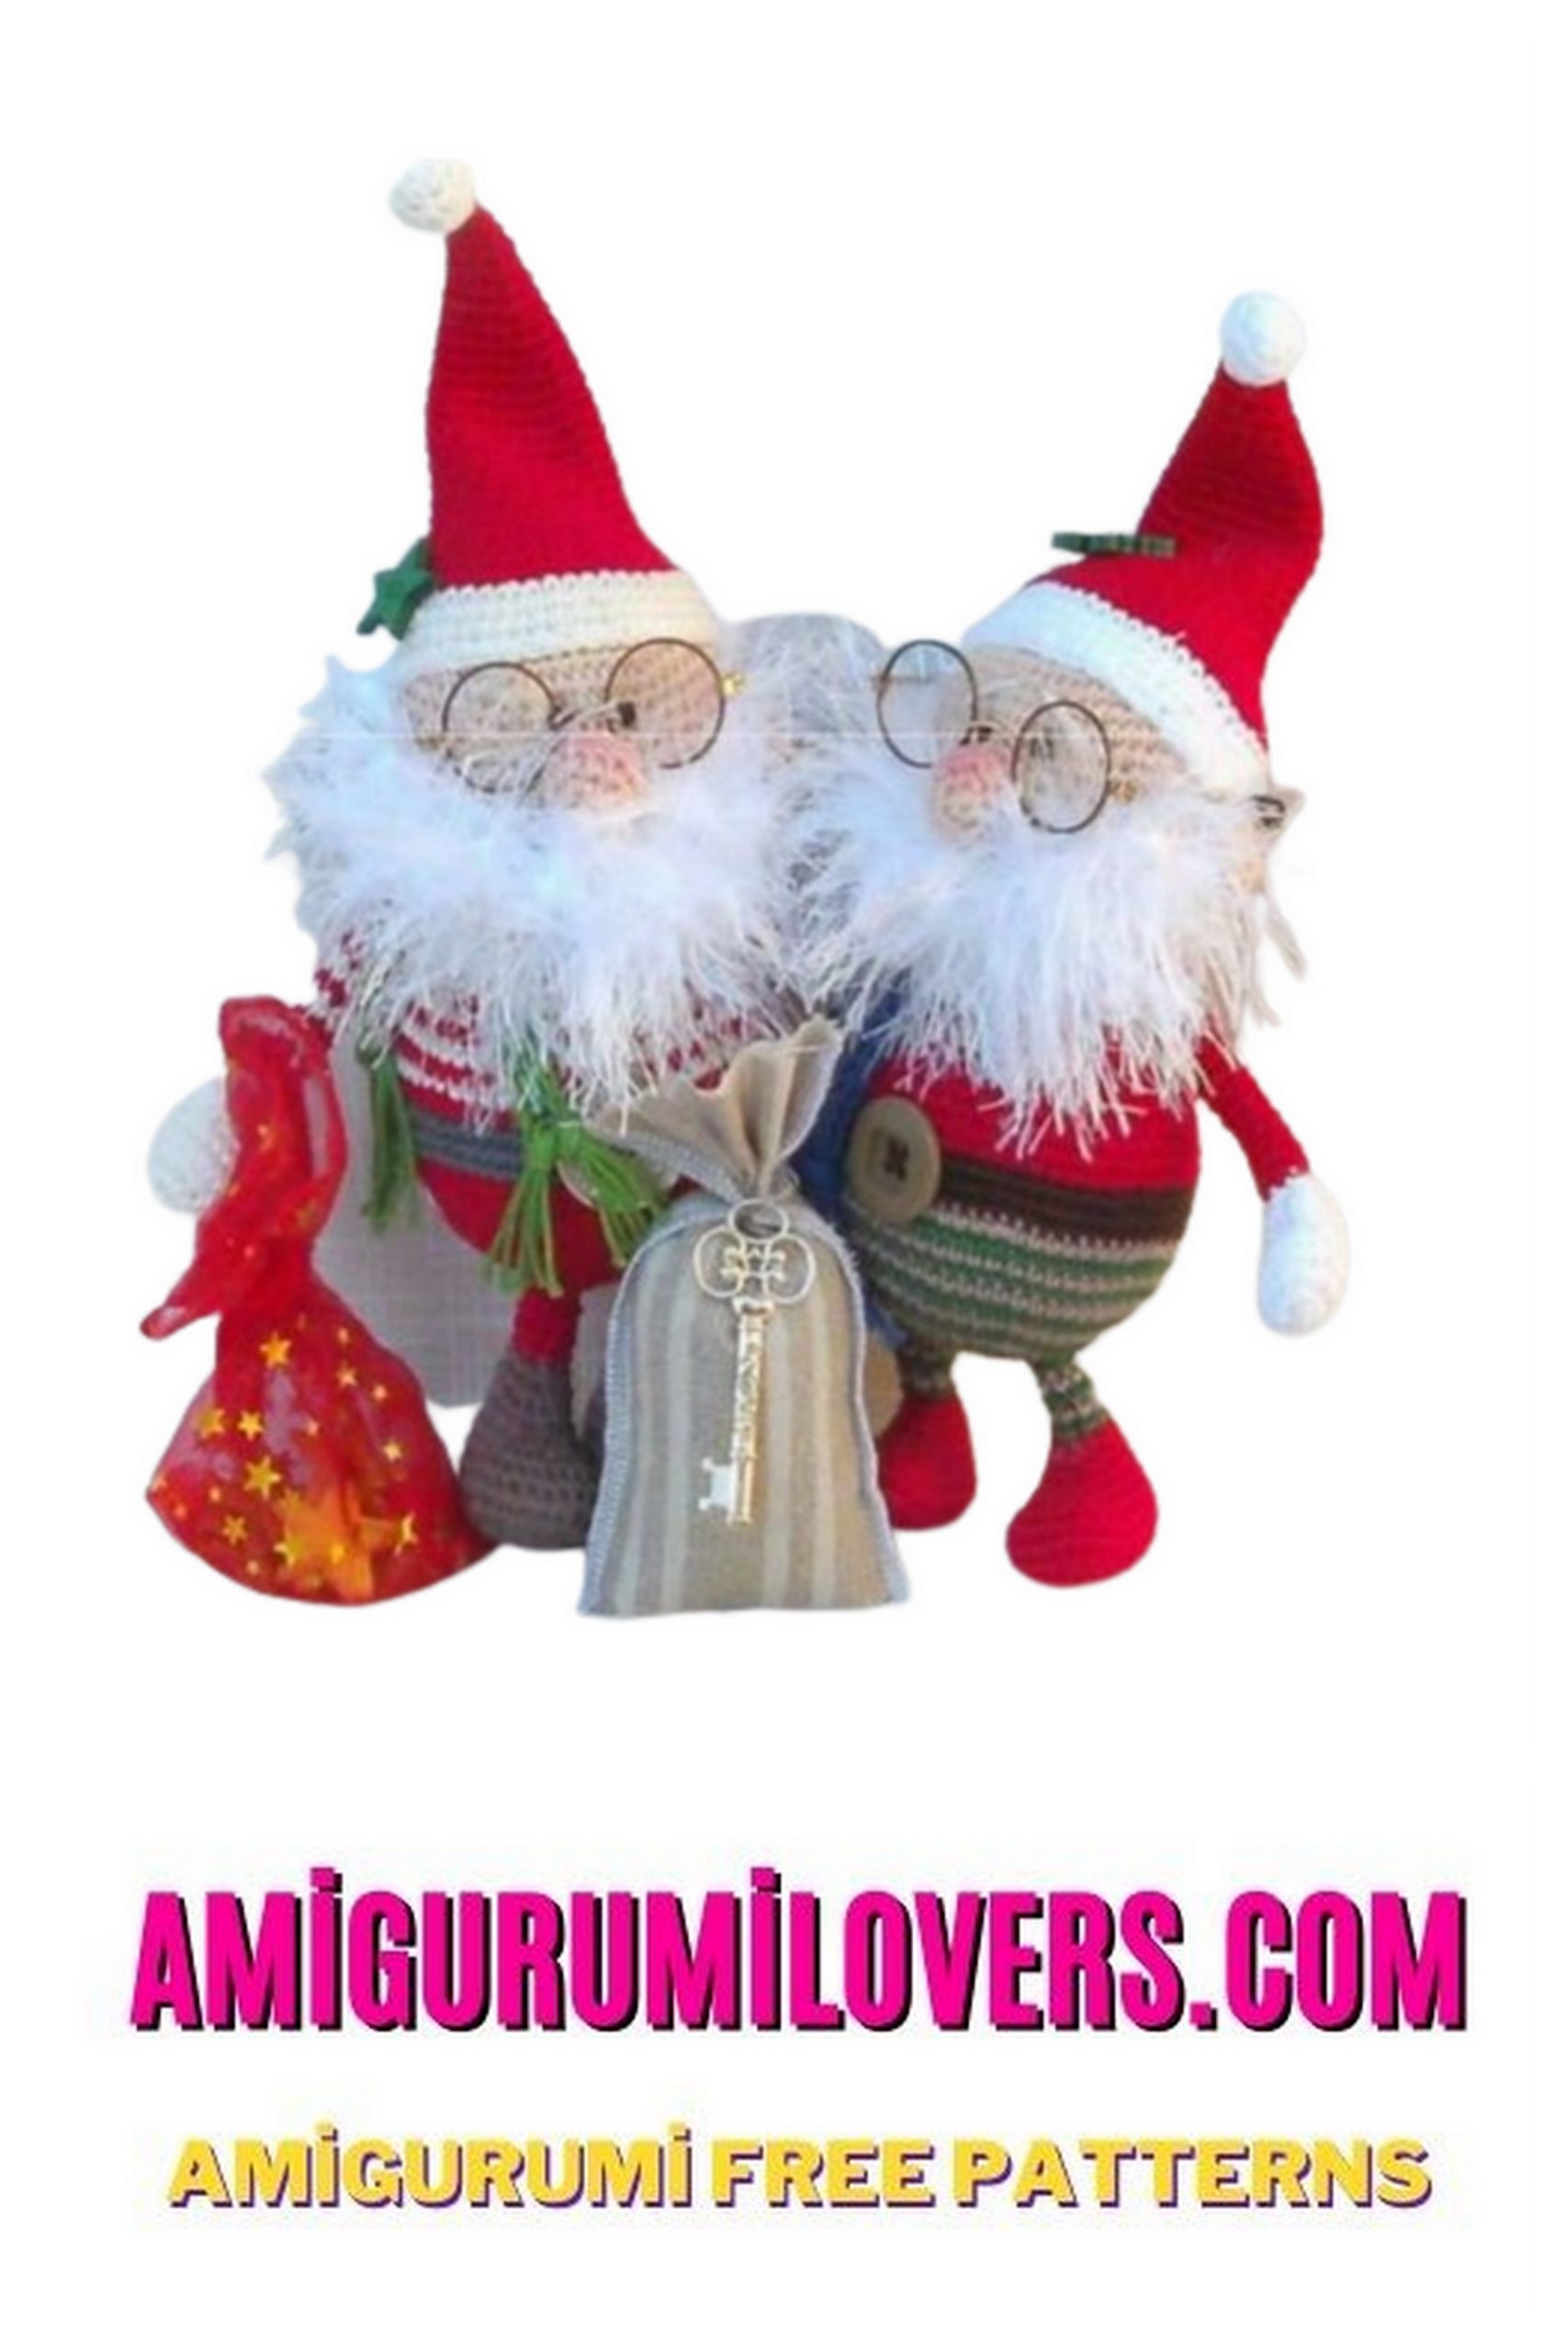
The Santa Claus and Snowman designs are not only charming but also versatile. You can customize them with different yarn colors and embellishments, allowing for personal touches that reflect your holiday spirit. Imagine creating a unique Santa with a sparkly red suit or a snowman adorned with a colorful scarf—you can let your imagination run wild! These characters can serve as table centerpieces, mantel decorations, or delightful gifts to share the joy of the season with loved ones.
In this post, we’ll walk you through each step of creating these festive amis, offering helpful tips and tricks along the way. Whether you are an experienced crocheter or just starting your crochet journey, we invite you to join us in crafting these enchanting figures. You don’t need any special tools, just some yarn, a crochet hook, and a little bit of time. The warmth and satisfaction of making something by hand will surely enhance your holiday experience, creating priceless memories as you crochet alongside family and friends.
So grab your crochet hook and some yarn, and let’s dive into this fun and festive project. With each stitch, you’ll be one step closer to adorning your home with handmade holiday cheer. Stay tuned for the complete pattern and let’s make this season extra special with unique, cozy decorations!
Welcome to the magical world of amigurumi! What could be more delightful than crafting your own festive holiday decorations in the form of Santa Claus and Snowman? The wonderful news is that this guide offers the Santa Claus and Snowman Amigurumi pattern for free! Designed to cater to all skill levels, this pattern provides clear, detailed, and step-by-step instructions for a joyful crafting experience.
Pattern Highlights:
- Materials List: Discover the materials you’ll need to create your Santa Claus and Snowman decorations.
- Basic Techniques: The pattern includes explanations of fundamental amigurumi crochet techniques, making it accessible to beginners.
- Detailed Instructions: Each step is meticulously explained to ensure a smooth crafting process.
- Festive Charm: Your finished Santa Claus and Snowman amigurumi will add a touch of holiday magic to your home decor.
To learn more about the Santa Claus and Snowman Amigurumi pattern and embark on your crochet adventure, follow the instructions below. Craft your very own festive decorations and infuse the holiday spirit into your home with these charming amigurumi creations!
Materials and tools:
– Alize Bahar, Cotton Gold or Catania for body and dress. Alize Decofur for Santa’s beard.
– – Hook 2, 2-5 or 3 (or a suitable needle for the yarn used). It will
have a height of 25–26 cm from the point of the cap to the foot, but the final size will be
depend on the size of the hook and yarn that you work.
– – Buttons of decor (one for Santa’s ornament, sewn to Santa’s belt, New Year’s hat
or a snowman hat of any shape)
– – Red or white wire (you can buy in shops of creativity, a hobby!). Replace
this stuffing on Santa’s hand so she can bend. The same solution for the snowman
– – 10mm snowman nose pompom in a creative hobby shop
– – a needle for sweating bags
Additional Information::
All parts of the body begin with the amigurumi ring technique – except for Santa’s foot – and then
continue to work in a spiral without closing the rows.
– Use markers to track rows.
– Fill each piece continuously while crocheting.
– After the body parts have been made, cut the yarn, leaving the end of the thread 20
cm, which can be used for sewing.
Abbreviations:
MC = Magic circle
Sc = single crochet
Inc = increase, two sc in same st
Dec = decrease, two sc together
RND = round
Sc rnd = sc in every stitch of the rnd
St = stitch
Ch = chain
Sc rnd = sc in every st of the rnd
CC = Yarn color change
[…] = repeat instructions within brackets as specified.
PATTERN

Head (1 pc.)
– use flesh-colored yarn!
1. Row: 6 SC into magic ring.
2. Row: inc * (6x) {12 SC}
3. Row: 1SC, inc (6x) {18 SC}
4. Row: 2 SC, inc (6x) {24 SC}
5. Row: 3 SC, inc (6x) {30 SC}
6. Row: 4 SC, inc (6x) {36 SC)
7. Row: 5 SC, inc (6x) {42 SC}
8. Row: 6 SC, inc (6x) {48 SC}
9. Row: 7SC, inc (6x) {54 SC}
10-18. Row: 54 SC {54 SC}
19. Row: 7 SC, dec (6x) {48 SC}
20. Row: 6 SC, dec (6x) {42 SC}
21. Row: 5 SC, dec (6x) {36 SC}
22. Row: 4 SC, dec (6x) {30 SC}
Cut the yarn!
Embroider eyes after the figure is fully assembled. Over the nose. Place them on 1 row
close to each other.
If you do not like the embroidery, you can replace it with 6 mm protective eyes.
(Protective eyes are located between rows 11-12, with an interval of about 5 columns.).
When embroidering eyes, always put them on your head after sewing on your nose relative to
him, but when using safe eyes, we will sew the nose after fixing the eyes.
Nose + ears (flesh color):
They are made with the same number of loops, so we make 3 pieces!
1. Row: 5 SC into magic ring
2. Row: İNC * (5x) {10 SC}
3. Row: (1 SC, İNC) (5 x) {15 SC}
4. Row: 15 SC {15 SC}
5. Row: (1 SC, DEC) * (5x) {10 SC}
We cut the yarn, and after the body and head are sewn, it’s worth sewing on the ears before
put on a hat. Sew the ears below the center line of the head so that they do not interfere with the exact
fitting cap.
After sewing on the nose, you can tint it as you wish (using a blush,
possibly using textile dye).
Beard:
To prepare a beard when the body and head are sewn, the ears are sewn and the hat is sewn to the head.
We start behind the left ear, bypassing it with a thread for eyelashes in front.
Take the yarn and start pulling the thread over the head behind the left ear (fasten), lower yourself to 6-7
rows down on the head and fasten the stitches. Walking under the nose, it runs along a horizontal line, then
symmetrically to the starting line.
To enrich the beard, we perform this stage several times.
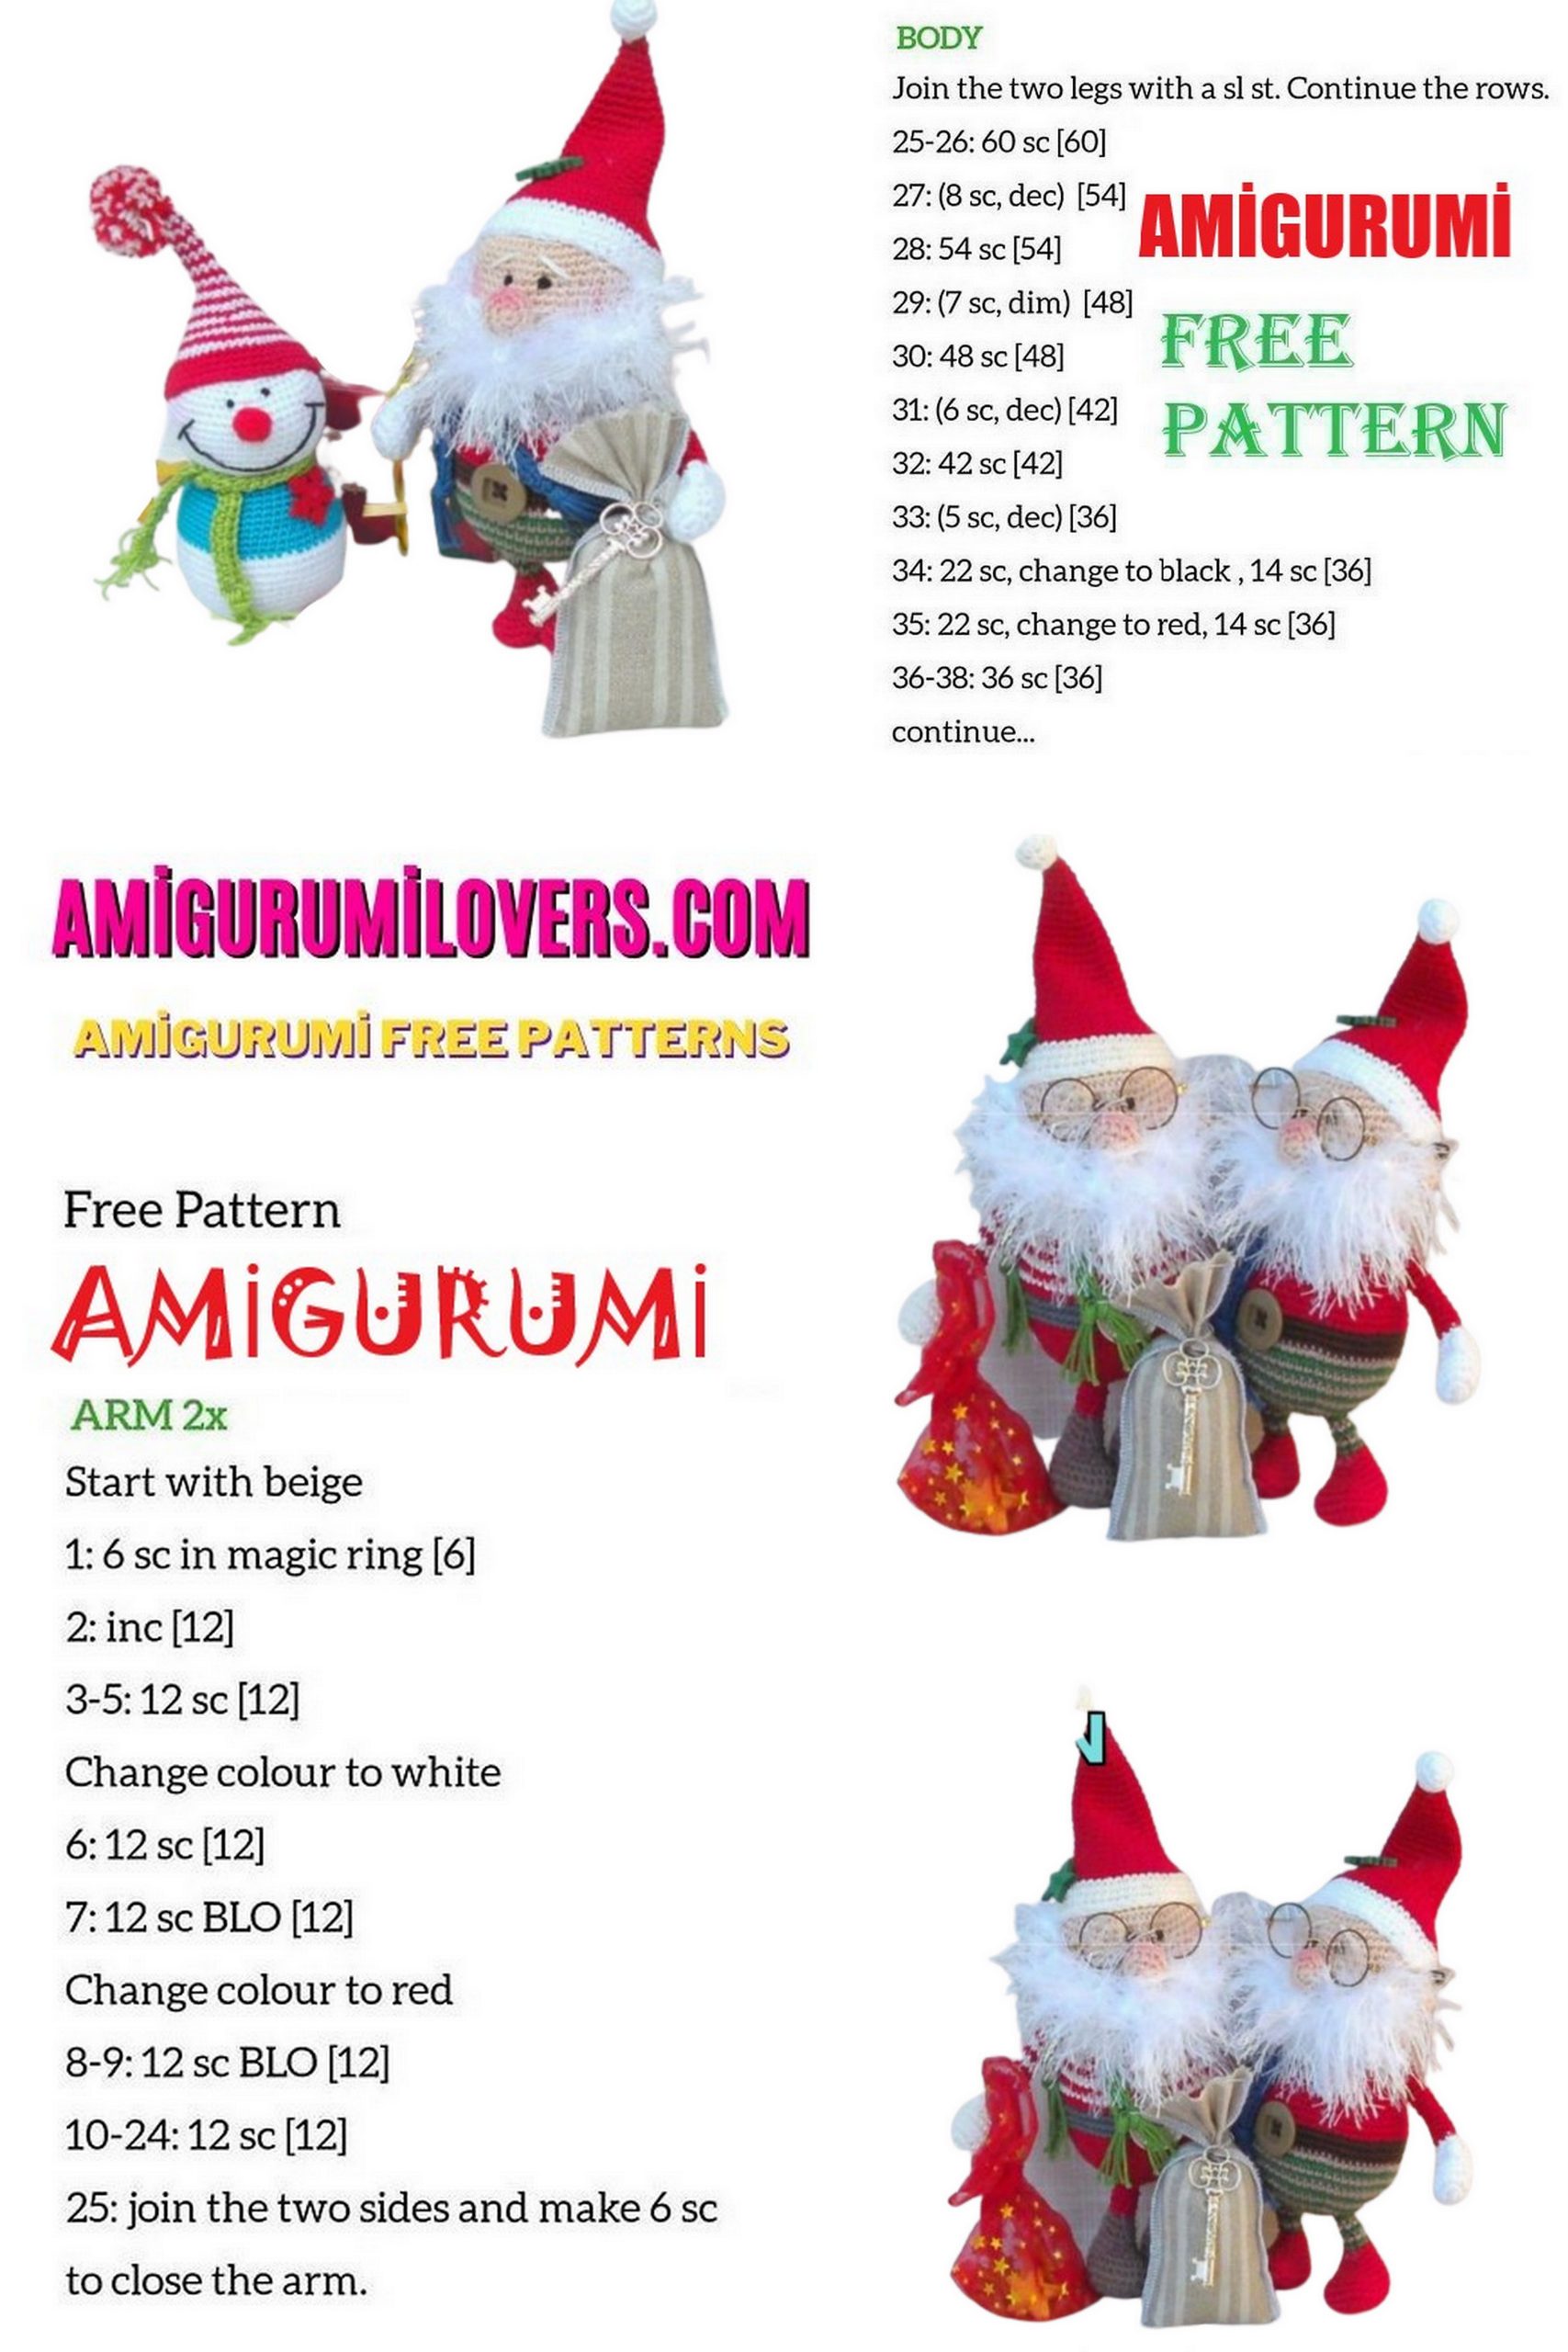
BODY: (1 pc.)
Start with a trouser-colored yarn.
1. Row: 6 SC İNTO MAGİC RİNG
2. Row: İNC * 6 {12 SC}
3. Row: (1 SC, İNC) * (6x) {18 SC}
4. Row: (2 SC, İNC) * (6x) {24 SC}
5. Row: (3 SC, İNC) * (6x) {30 SC}
6. Row: (4 SC, İNC) * (6x) {36 SC}
7. Row: (5 SC, İNC) * (6x) {42 SC}
8. Row: (6 SC, İNC) * (6 x) {48 SC}
9. Row: 48 SC {48 SC}
10. Row: (7 SC, İNC) * (6x) {54 SC}
11.-13. Row: 54 SC {54 SC}
14. Row: (8 SC, İNC) * (6 x) {60 SC}
15. Row: (9 SC, İNC) * (6 x) {66 SC}
Change the color to a dark brown or dark gray yarn (this will be the Santa Claus belt!)
16-18. Row: 66SC {66 SC}
Change the color to red (or any other color of your Santa’s jacket).
19. Row: (9SC, DEC) * (6x) {60 SC}
20-21. Row: 60SC {60 SC}
22. Row: (8 SC, DEC) * (6x) {54 SC}
23-24. Row: 54SC {54 SC}
25. Row: (7 SC, DEC) * (6x) {48 SC}
26. Row: 48SC {48 SC}
27. Row: (6 SC, DEC) * (6 x) {42 SC}
28. Row: 42 SC {42 SC}
29. Row: (5 SC, DEC) * (6x) {36 SC}
30. Row: 36 SC {36 SC}
31. Row: (4 SC, DEC) * (6x) {30 SC}
Switch to skin color!
Row 32: 30 {30 SC}
Cut the yarn so as to leave a longer thread to sew the body and head together!
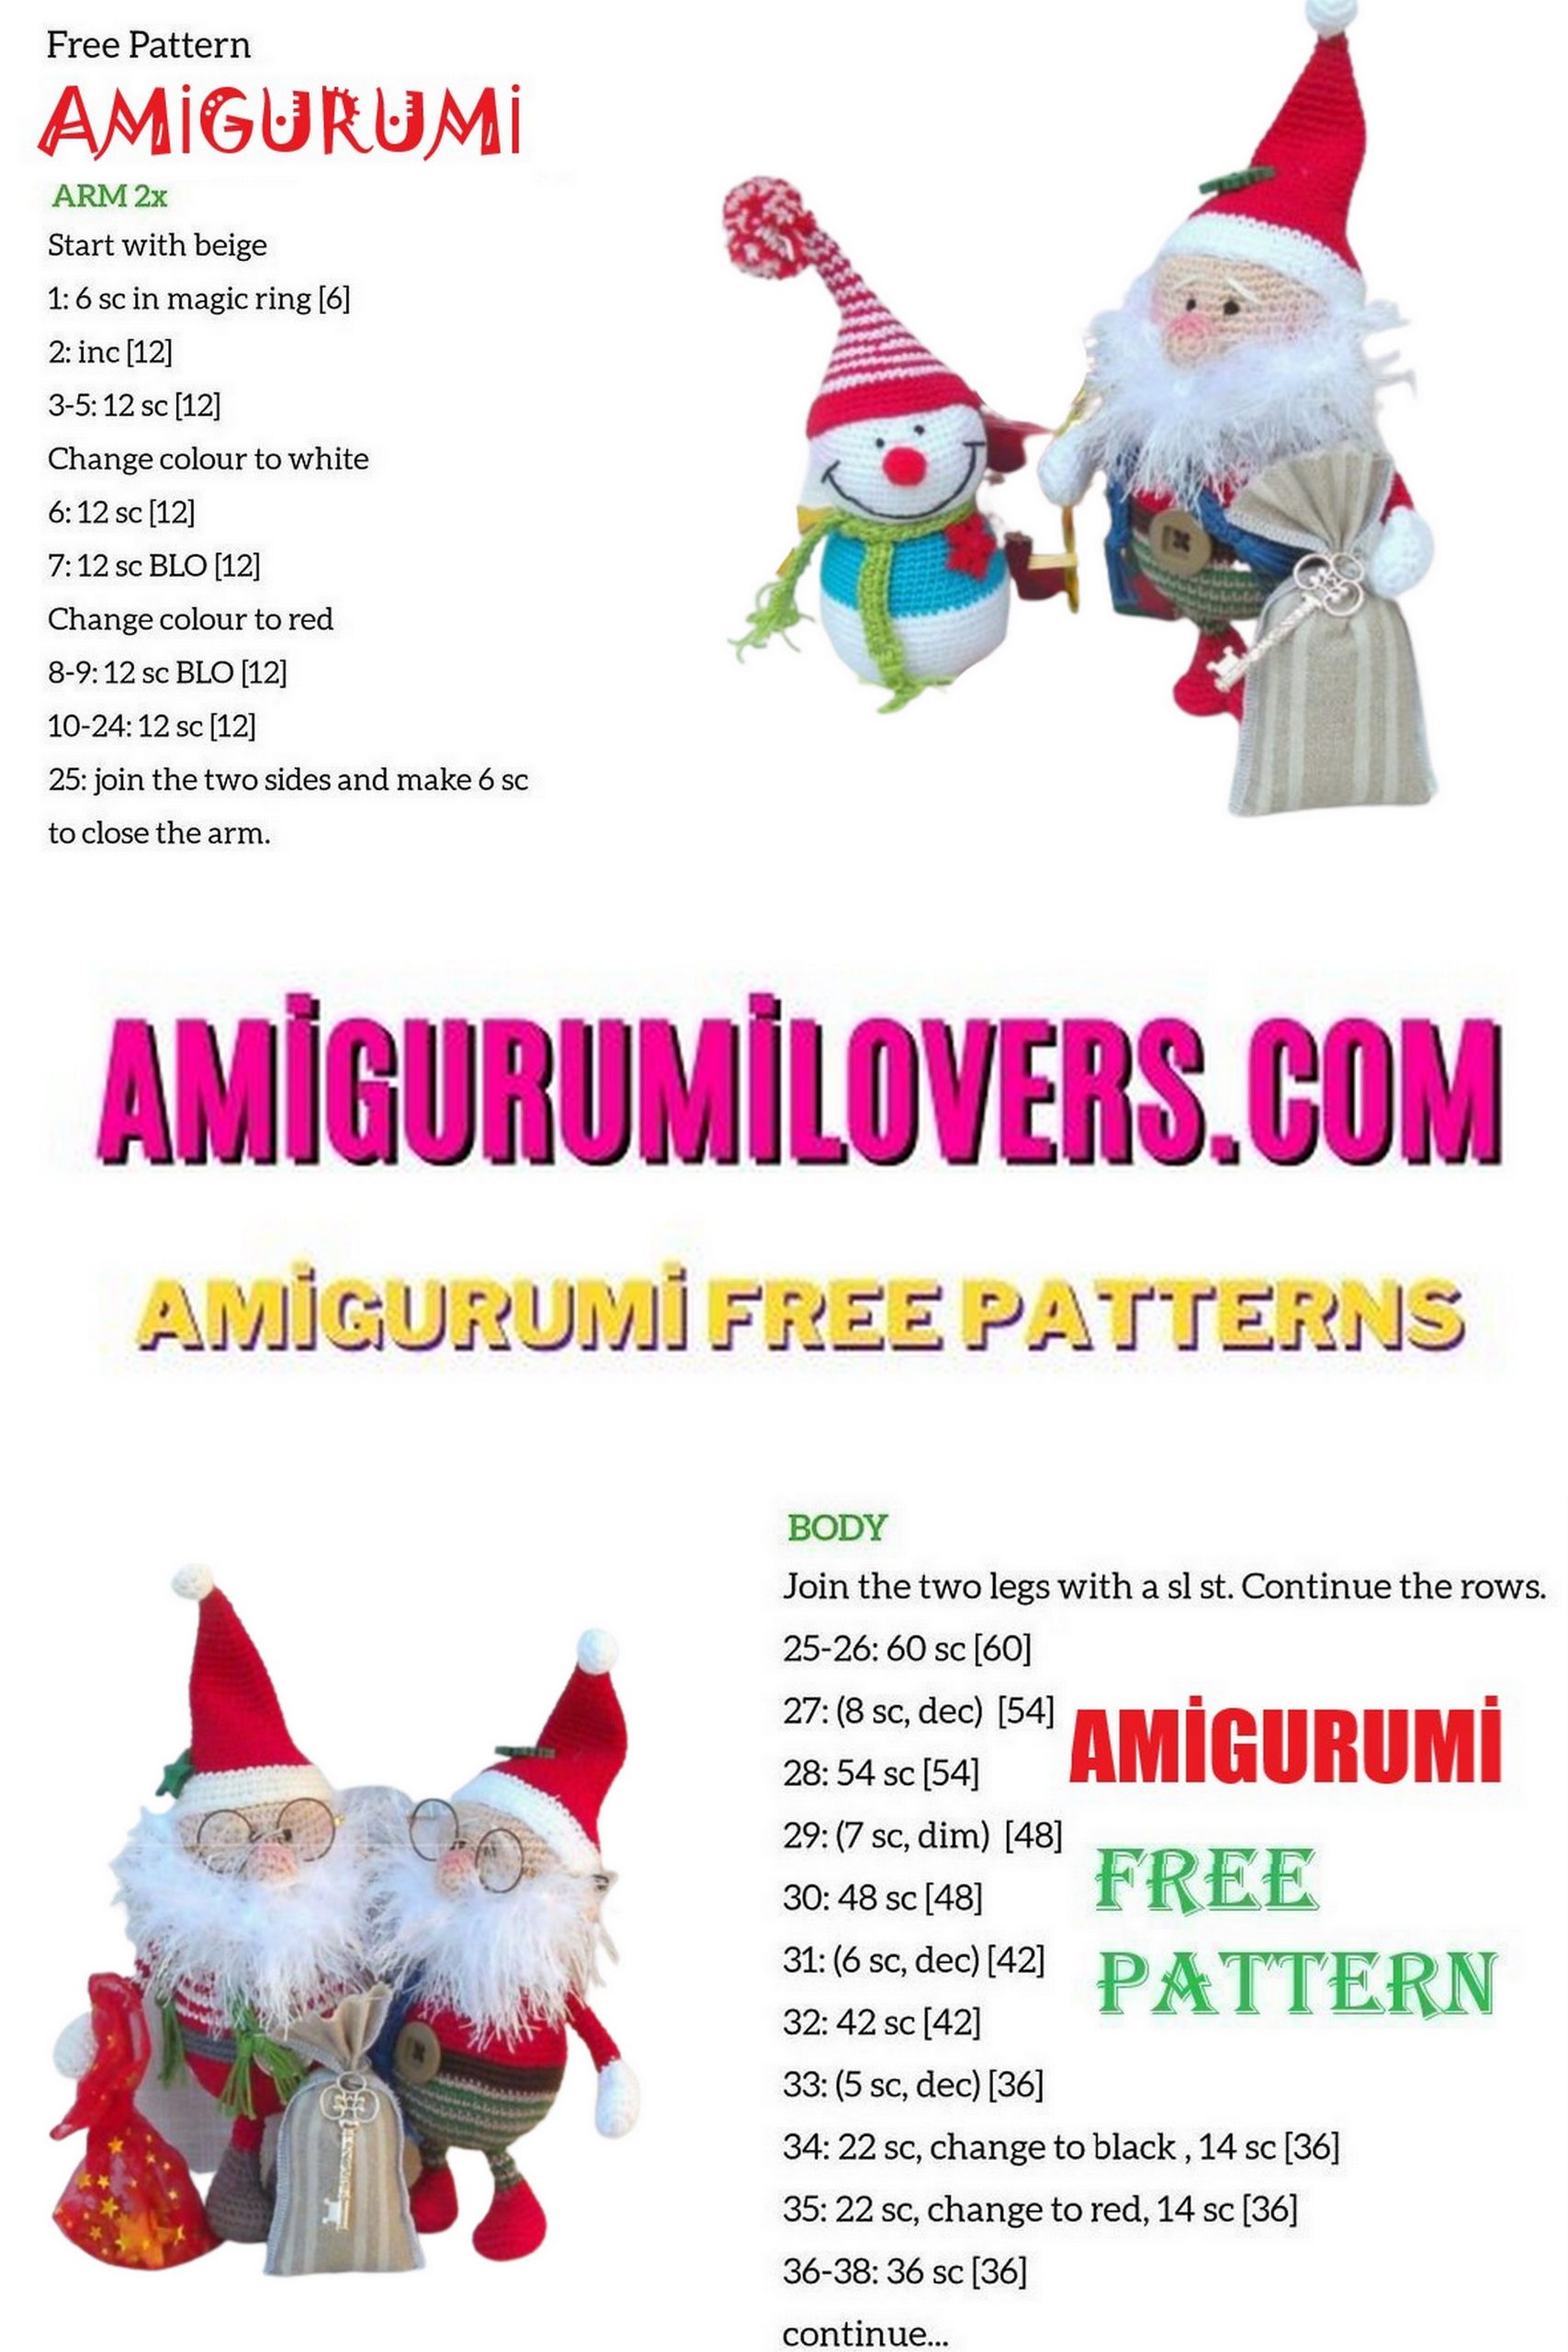
RIGHT HAND (1 pc):
Let’s start with the white thread !!
Row 1: 7 SC into magic ring
Row 2: İNC * (7x) {14 SC}
Row 3: (1SC, İNC) * (7x) {21 SC}
4-5. Row: 27SC {21 SC}
Row 6: 5 DEC, (4CCH in 1 loop – POPCORN), 10 SC {16 SC}
Row 7: 16SC {16 SC}
Row 8: 1 DEC, 14 SC
Row 9: (3 SC, DEC) * (3x) {12 SC}
Row 10: (2 SC, DEC) * (3x) {9 SC} Change the color to “sweater color”!
11-27. Row: 9SC {9 SC} Crochet in total: 153 SC
When trimming the yarn, leave enough yarn to sew your hands on.
LEFT HANDS (1 pc):
Let’s start with the white thread!
Row 1: 7 SC into magic ring
Row 2: İNC * (7x) {14 SC}
Row 3: (1SC, İNC) * (7x) {21 SC}
4-5. Row: 21SC {21 SC}
Row 6: (POPCORN (finger design) in 1 loop), 5DEC, 10 SC {16 SC}
Row 7: 16SC {16 SC}
Row 8: 1 DEC, 14 SC {15 SC}
Row 9: (3 SC, DEC) * (3x) {12 SC}
Row 10: (2 SC, DEC) * (3x) {9 SC} Change the color to “jacket color”
11-27. Row: 9SC {9 SC} Crochet in total: 153 SC
Trimming yarn, leaving enough yarn to sew hands on.
Look on the Internet – How to Crochet Popcorn
Legs (2 PCS.):
Let’s start with the “shoe” yarn!
Row 1: 7 ch, 2 loop from hook, 4 SC, 4SC in 1 loop, then TURN to the other side
chains, 4 SC, 2 inc {16 SC}
Row 2: İNC, 5 SC, 4İNC ,, 5 SC, inc {22 SC}
Row 3: 2İNC, 6 SC, 2İNC, 4 SC, 2İNC, 8 SC {28 SC}
4-5. Row: 128SC {28 SC}
Row 6: DEC, 25 SC {27 SC}
Row 7: 8 SC, 6DEC, 7 SC {21 SC}
Row 8: 7 SC, 4DEC, 6 SC {17 SC}
Row 9: 6 SC, 3DEC, 5 SC {14 SC}
Row 10: 6 SC, 2DEC, 4 SC {12 SC}
Row 11: (2 SC, DEC) * (3x) {9 SC}
Change the color of your trousers!
12-16. Row: 9SC {9 SC} Spiral Knitting: 45 SC
Cap (1 pc):
Red yarn!
Row 1: 6 SC into magic ring
Row 2: 6SC {6 SC}
Row 3: 1 SC, inc (3x) {9 SC}
Row 4: 9SC {9 SC}
Row 5: (2 SC, İNC) * (3x) {12 SC}
Row 6: 12 SC {12 SC}
Row 7: (3 SC, İNC) * (3x) {15 SC}
Row 8: 15 SC {15 SC}
Row 9: 4 SC, inc (3x) {18 SC}
Row 10: 18 SC {18 SC}
Row 11: (5 SC, İNC) * (3x) {21 pp}
Row 12: 21 SC {21 SC}
Row 13: (6 SC, İNC) * (3x) {24 SC}
Row 14: 24 SC {24 SC}
Row 15: (7 SC, İNC) * (3x) {27 SC}
Row 16: 27SC {27 SC}
Row 17: (8 SC, İNC) * (3x) {30 SC}
Row 18: 30 SC {30 SC}
Row 19: (4 SC, İNC) * (6x) {36 SC}
Row 20: 36 SC {36 SC}
Row 21: (5 SC, İNC) * (6x) {42 SC}
Row 22: 42 SC {42 SC}
Row 23: (6 SC, İNC) * (6x) {48 SC}
Row 24: 48 SC {48 SC} Change the color to white yarn!
Row 25: (7 SC, İNC) * (6x) {54 SC}
26-28. Row: 54 SC {54 SC}
Trimming the yarn, leaving so much yarn that we could sew the cap to the head.
Sewing:
put the cap over your head well so that it fits.
The cap does not need to be filled, but if necessary, we can insert the wire and then
control where to tilt the cap.
Cap pompom (1 pc)
With white yarn!
Row 1: 5 SC into magic ring
Row 2: İNC * (5x) {10 SC}
Row 3: (1 SC, İNC) * (5x) {15r}
Row 4: 15 SC {15 SC}
Row 5: (1 SC, DEC) * (5x) {10 SC}
Row 6: DEC * 5 {5 SC}, tighten
Cut the yarn, leaving it long enough to sew the tassel to the cap.
Scarf (1 pc., Any color)
We crochet, turn and, starting with 3 loops from the hook. We knit dc we go to the end
chains. The ends of the scarf can be fringed.
SNOWMAN
Head (1 pc.) – use white yarn!
Row 1: 6 SC İNTO MAGİC RİNG
Row 2: 6inc {12 SC}
Row 3: 1SC, inc (6x) {18 SC}
Row 4: 2 SC, inc (6x) {24 SC}
Row 5: 3 SC, inc (6x) {30 SC}
Row 6: 4 SC, inc (6x) {36 SC)
Row 7: 5 SC, inc (6x) {42 SC}
Row 8: 6 SC, inc (6x) {48 SC}
9-16. Row: 48 SC {48 SC}
Row 17: 6 SC, dec (6x) {42 SC}
Row 18: 5 SC, dec (6x) {36 SC}
Row 19: 4 SC, dec (6x) {30 SC} Cut the yarn!
Embroider eyes after the figure is fully assembled. Over the nose. Place them on 1 row
close to each other.
If you do not like the embroidery, you can replace it with 6 mm protective eyes.
(Protective eyes are located between rows 11-12, with an interval of about 5 columns.) You
you can use a creative 10mm pompom for your nose, but you can replace it with
crocheted nose. ☺
Also embroider smiling lips before connecting your head and body.
Nose:
1. Row 1: 5 SC into magic ring
2. Row 2: 5inc {10 SC}
3. Row 3: (1 SC, İNC) * (5x) {15r}
4. Row 4: 15 SC {15 SC}
5. Row 5: (1 SC, DEC) * (5x) {10 SC}
Case: (1 pc.) With white thread
Row 1: 6 SC into magic ring
Row 2: 6inc {12 SC}
Row 3: (1 SC, İNC) * (6x) {18 SC}
Row 4: (2 SC, İNC) * (6x) {24 SC}
Row 5: (3 SC, İNC) * (6x) {30 SC}
Row 6: (4 SC, İNC) * (6x) {36 SC}
Row 7: (5 SC, İNC) * (6x) {42 SC}
Row 8: (6SC, İNC) * (6x) {48sc}
Row 9: 48 SC {48 SC}
Row 10: (7SC, İNC) * (6x) {54SC}
11-13 Row: 54 SC {54 SC}
Row 14: (8 SC, İNC) * (6x) {60 SC}
Row 15: 60 SC {60 SC} Change the color to the color of a snowman’s sweater!
Row 16: (8 SC, DEC) * (6x) {54 SC}
17 -18 Row: 54 SC {54 SC}
Row 19: (7SC, DEC) * (6x) {48sc}
20-21 Row: 48 SC {48 SC}
Row 22: (6 SC, DEC) * (6x) {42 sc}
23-24. Row: 42 SC {42 SC}
Row 25: (5 SC, DEC) * (6x) {36 SC}
Row 26: 36 SC {36 SC}
Row 27: (4 SC, DEC) * (6x) {30 SC}
Cut the yarn so as to leave a long thread to sew the body and head together!
Scarf (1 pc., Any color)
About 50 ch, turn and, starting with 3 loops from the hook, we knit through each chain link with
dc to the end of the row. The ends of the scarf can be fringed.
Cap (1 pc. Any color):
Row 1: 6 SC into magic ring
Row 2: 6SC {6 SC}
Row 3: (1 SC, İNC) * (3x) {9 SC}
4-6. Row: 9SC {9 SC}
Row 7: (2 SC, İNC) * (3x) {12 SC}
8-10. Row: 12 SC {12 SC}
Row 11: (3 SC, İNC) * (3x) {15 SC}
Row 12: 15 SC {15 SC}
Row 13: (4 SC, İNC) * (3 x) {18 sc}
Row 14: 18 SC {18 SC}
Row 15: (5 SC, İNC) * (3x) {21 SC}
Row 16: 21 SC {21 SC}
Row 17: (6 SC, İNC) * (3x) {24 SC}
Row 18: 24 SC {24 SC}
Row 19: (7SC, İNC) * (3x) {27SC}
Row 20: 27 SC {27 SC}
Row 21: (8 SC, İNC) * (3x) {30 SC}
Row 22: 30 SC {30 SC}
Row 23: (4 SC, İNC) * (6x) {36 SC}
Row 24: 36 SC {36 SC}
Row 25: (5 SC, İNC) * (6x) {42 SC}
Row 26: 42 SC {42 SC}
Row 27: (6 SC, İNC) * (6x) {48 SC}
28-30. Row: 48SC (48 SC), trim the yarn. Pull the cap over the snowman’s head and sew it on.
Cap brush (1 pc)
Make a brush of yarn according to the colors of the cap and sew it onto the cap.
We can also crochet a brush, in which case the snowman will have a cap similar to
Santa hat in the picture ☺
With white yarn!
Row 1: 5 SC into magic ring
Row 2: İNC * (5x) {10 SC}
Row 3: (1 SC, İNC) * (5x) {15sc}
Row 4: 15 SC {15 SC}
Row 5: (1 SC, DEC) * (5x) {10 SC}
Row 6: DEC * 5 {5 SC}, tighten
Cut the yarn, leaving it long enough to sew the tassel to the cap.
Before you leave, make sure to check out more free amigurumi crochet patterns and discover new ideas for your next project.
You can also browse our full amigurumi pattern archive for hundreds of beginner-friendly designs.